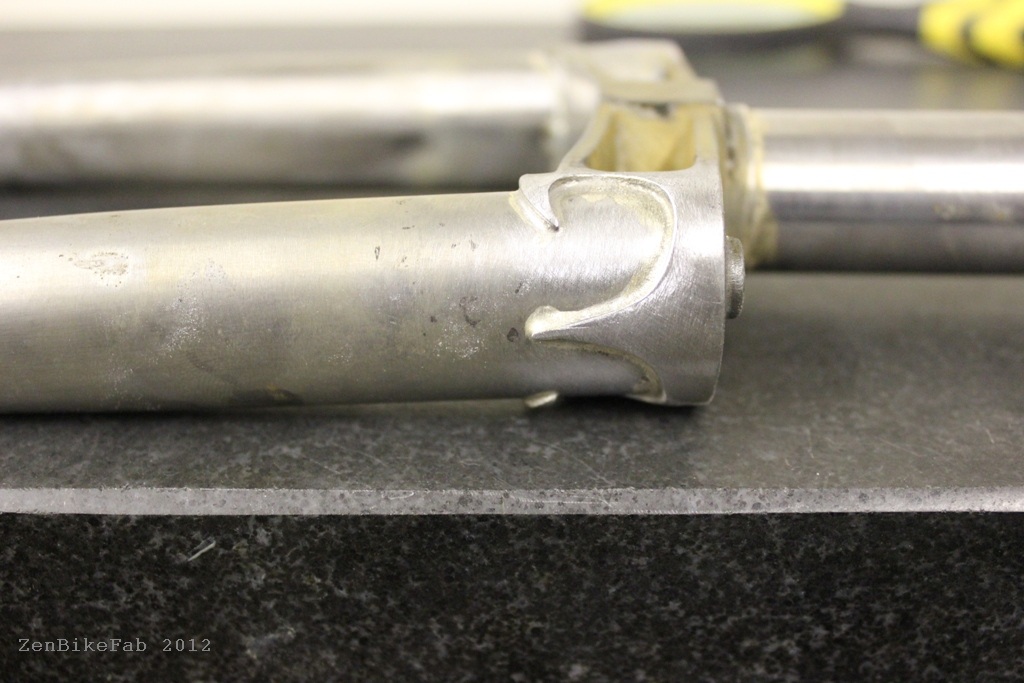
The next five Ramblers are getting closer to done. As always thanks to the guys at Zen for their hard work, and the update photos.


We are still in recovery mode from the SF Expo, it was a great time, and now we need to get back up to speed. The day before we left for San Francisco the decals made it here, nothing like everything coming together at once. Her is the slide show of the decals and colorways for the three primary combinations:
[gallery link="file" order="DESC" columns="5" orderby="title"]
They are top mounted mylar printed by the last professional bicycle decal shop here in the US, at least as far as I could find, that could work in full color as well as variations for different types of application. I am beyond happy with how they came out. The bikes feel much more like the real deal. Not that they ride any differently, but the branding definitely kicks it up a notch.
You probably noticed the "FOUNDER" sticker on the left chain stay, these will only be on the first run of bikes in production as well as the round coming out of Kickstarter. Which if you missed it, our Rambler project is live:
We are getting tons of interest, likes etc. and while that is great, we need backers to make it happen. We will take the support in any way you can give it, but without enough pledges to reach our goal, the project will not fund. Thus, I am asking directly for your help, your pledges and to spread the word to everyone you know who rides a bike, has been thinking about riding, and wants to be able to get around on a true sport bike, that can still be comfortable and carry home the groceries.
The project went live last night, and we already have one backer for a frame set in the first few hours, Thank you!
Please help spread the news about the project. The word of mouth distribution is the most powerful, blog, link, Facebook, throw it out there on the forums every little bit help to get the Ramblers out into the world. I can not do this without your help.
The SF Expo is going great, I met some awesome people on the first day: vendors, promoters and bloggers. Between the show and the KS project I could barely sleep, from all the energy building up, although I am sure that problem will start to ease off after today, first full open to the public day. I am so grateful to the support of my family, friends offering us a place to stay, cousins coming up to help and all of you who have come out and been so stoked to see the Ramblers. It is all of you that give me the energy to keep this going - Thank you!
I am so lucky to have friends and friends through my wife that are gifted artists and designers. I have a heavy tilt towards the analytical side and while I can conceptualize what I want an art project to be, it is awesome to throw out a range of ideas and to get something like this back on the first try. Gigantic thank you to all of you who have helped me.

This is very close to what will be the shirt and bag art for the Kickstarter rewards. There will be options of this or the porteur build, as well as a couple of color options. Now to get the Kickstarter part launched, stuck in a holding pattern waiting for approval.
Nothing like cutting it to the wire, but it seems like things happen that way sometimes. Decals should be here before the show, fingers crossed, here is a preview with the proof sheet:
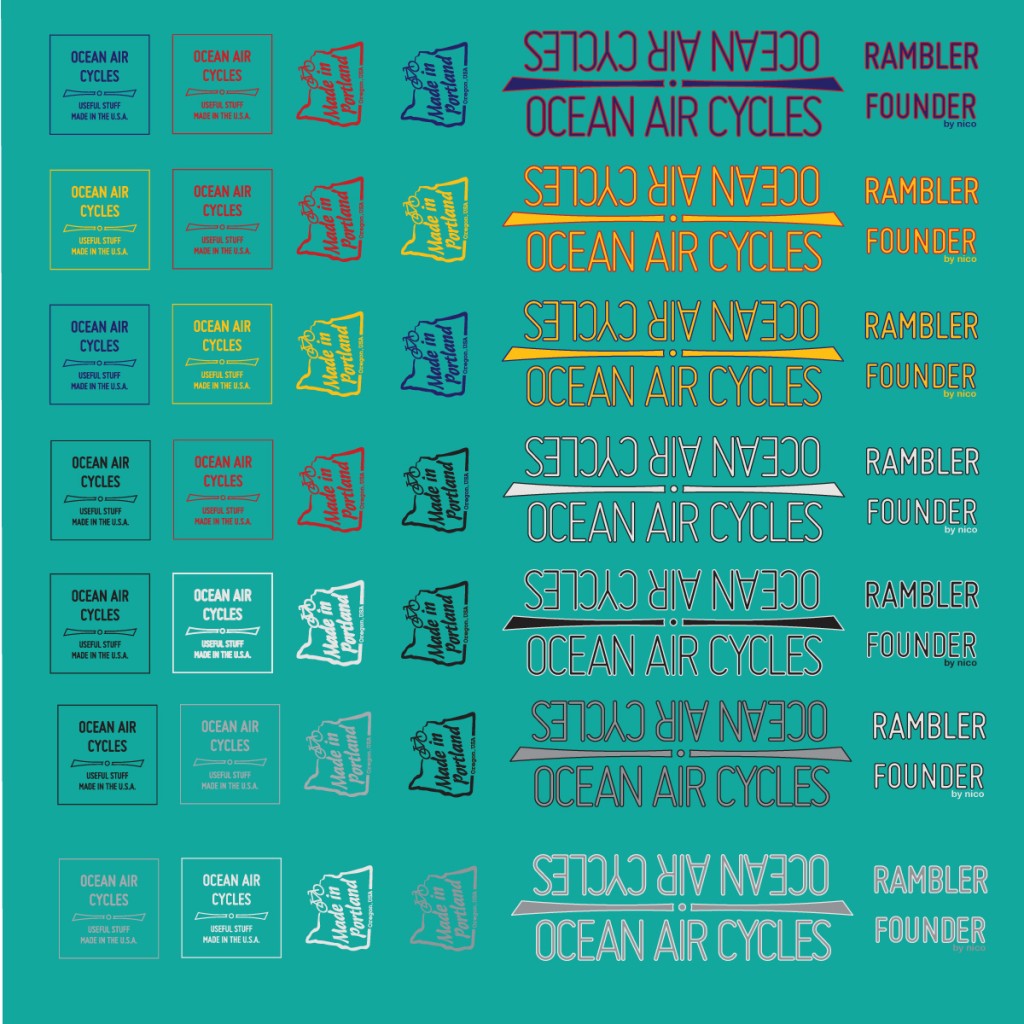
The top three will be the primary colors used, with a few neutral options down the line for custom colors. The small square logo will be on the head tube, made in Portland on the seat tube, Ocean Air Cycles on the down tube, RAMBLER on the top tube up front drive side, and Founder on the left chain stay for this first round of bikes being run through Kickstarter (soon, very son).
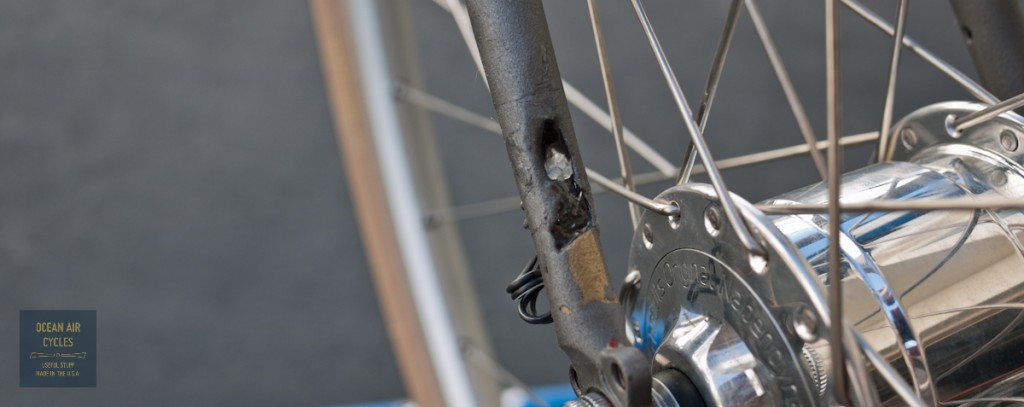
Rambler No.2 (Red) was going to be a cornerstone in the three bike heard that I am bringing to the SF expo in just a few days. At 57cm it is square in the middle if medium and most likely to be getting test rides, that is until the fork was blasted instead of chemical stripped, and it is not really clear how much steel is still there. After an assessment it was pretty clear that the fork is never going to be supporting a rider again, but it will hold up the front end of the bike for the expo, that is better than no bike and I decided to make lemonade with what I had.
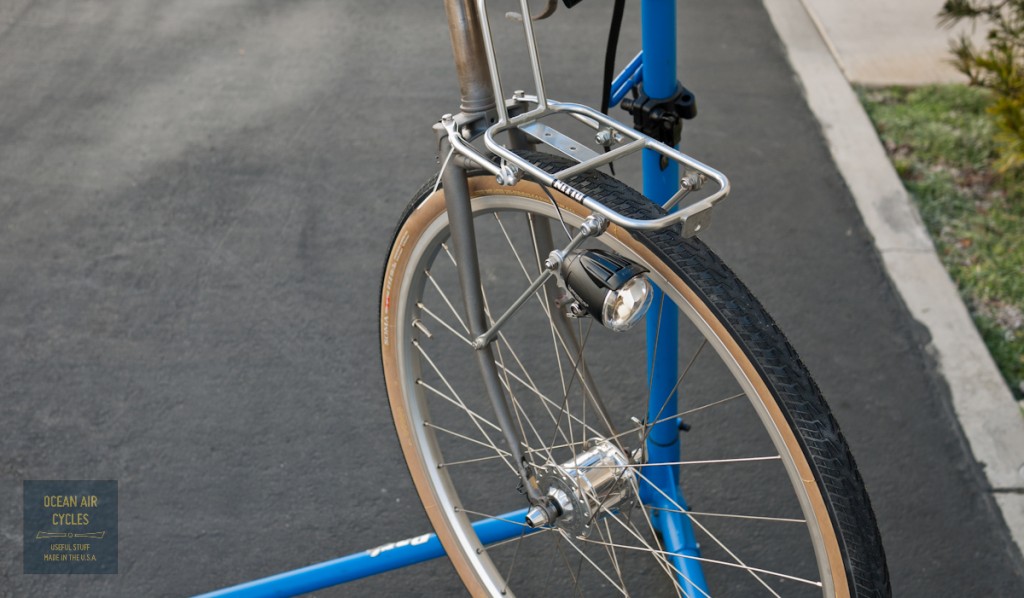
The bottom of the right fork leg is pretty much gone just above the fork leg. I thought about some ways to stabilize it, headed up the street to FCD surfboards, and the guys let me have some resin. A tape mold, injection of epoxy through the vent hole and a few hours later I a confident that it will hold up to transport and display.
There is not enough left of the dropouts to mount a rack or fender, but I was able to make a Mark's rack work to hold up the light. That is when I went full in, and wired up the whole bike front and rear. This bike is the first one of the batch to get the full dynamo lighting system. That is front and rear lighting powered by the rotation of the front hub.
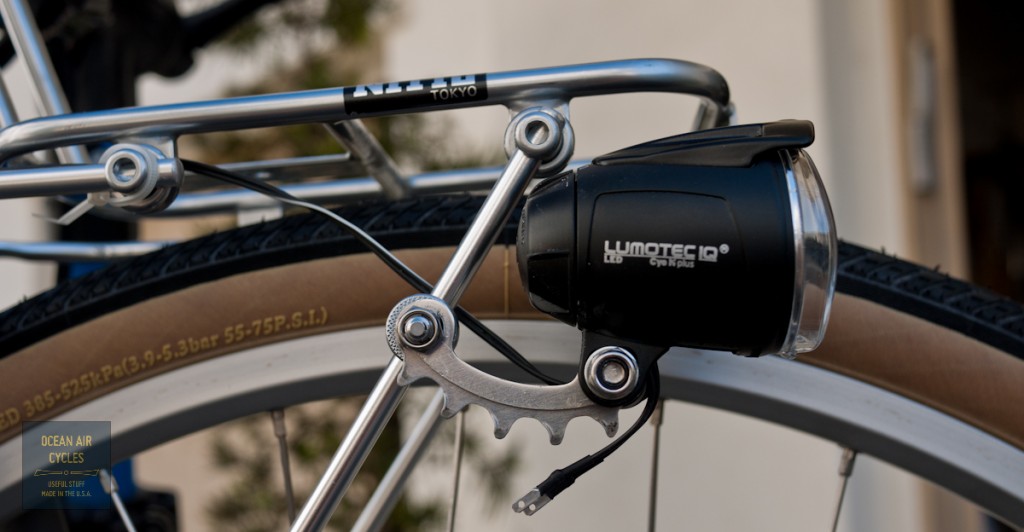
The chain ring bracket is perfect. The wire from the hub to the headlight runs through the guides on the right fork leg.

The curly q wire allows the lighting wire to be installed or removed with the connectors intact on the wire ends. I first saw this either on Alex Wetmore's blog or on Flicker someplace. It works better than solid loops that will not pass the connectors in the event that you need to strip the lights with intentions of putting them back on.

In an ideal world the wires would be tucked under the fender for the run from the crown to the headlight and the returning tail light wire. This being what it is, they are tied off to the rack. The tail light wire enters into the frame through the port at the top of the down tube.
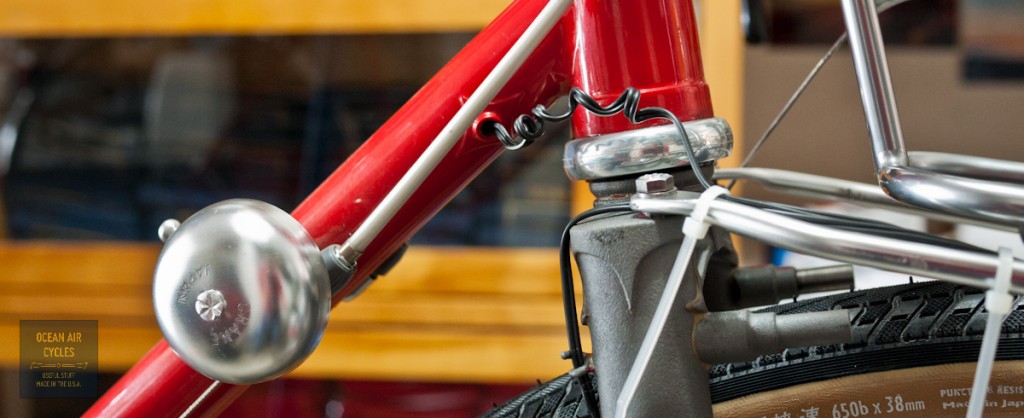
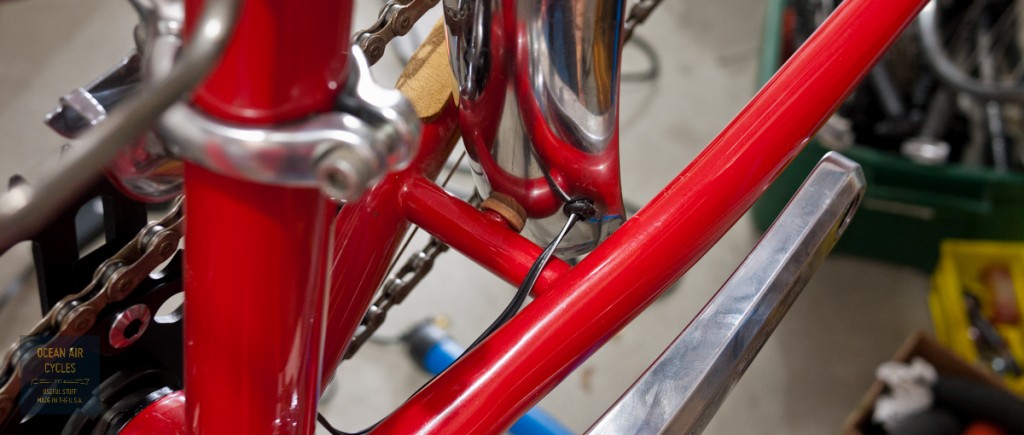
It passes along, protected from snagging, inside the down tube, around the bottom bracket and up the seat tube just a bit to the exit port.

There is a short exposed run along the left chain stay before it tucks into the rear fender. To protect the wire from being cut by the sharp fender edge I used a commonly available rubber stress relief grommet.

the wire then runs along the inside edge of the fender. The Berthoud fenders are quite nice for this as the edge is rolled, but not crimped completely shut as it is on some other brands of metal fenders.

Once fully tucked in, you can crimp the channel shut just a bit, or use a few short beads of silicone to hold it in place. The wire exits the rear of the fender through, another stress relief grommet, and then connects up to the tail light.
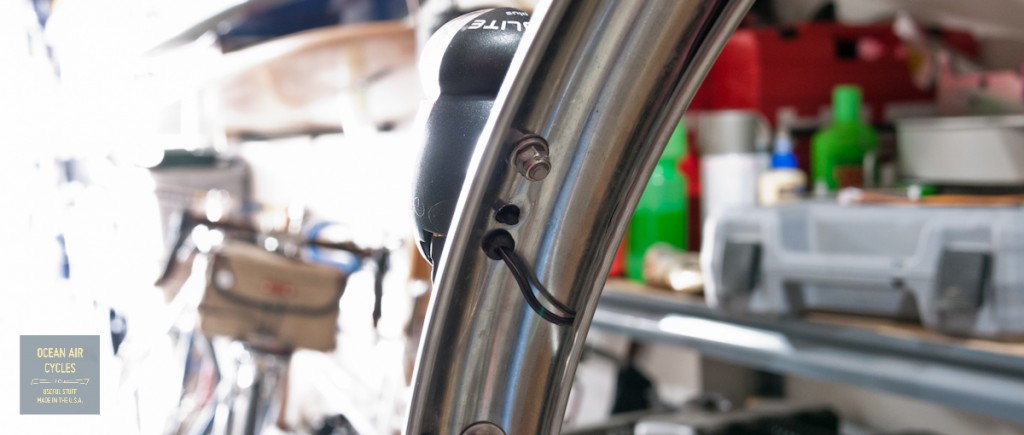
A quick spin of the front wheel to confirm that everything is still working and it is almost time to clean up. I decided to secure the short run of wire between the seat tube ans the fender with a piece od red reflective tape that was a close enough color match.
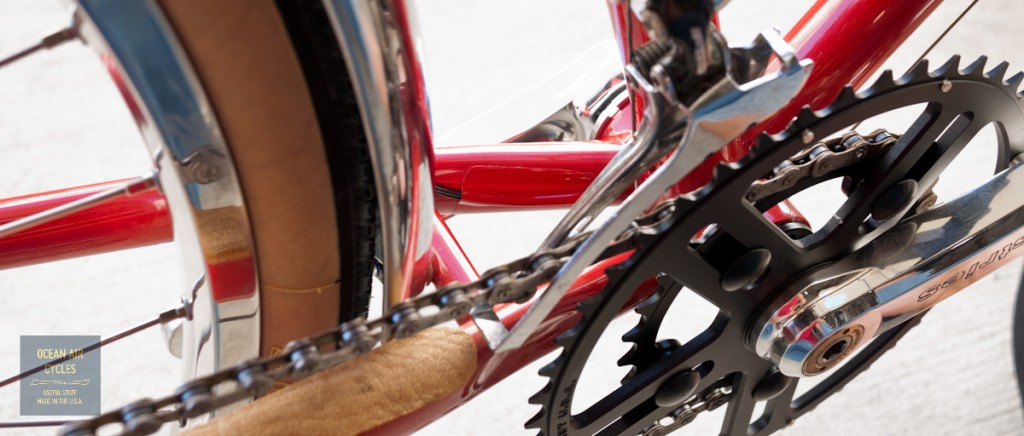
While not everything I had dreamed for a complete bike, I am still pretty happy with the results, and when the replacement fork gets here it should go together pretty quickly.

With everything in the right places on the 51 porter conversion it was time to put the cherry on top. There is something just right about the feel of cotton tape with just a few coats of shellac. I have found that the orange tape, particularly Newbams, when paired with garnet shellac is not only a near perfect match for brooks leather saddles, but has a warm tone that you can not replicate any other way. It is just one of those things that takes time, patience, and is a process you can not cheat on. This project has a layer of Soma thick and zesty under the orange cotton, finished off with cotton twine and then three coats of garnet shellac, the pictures tell the rest of the story.


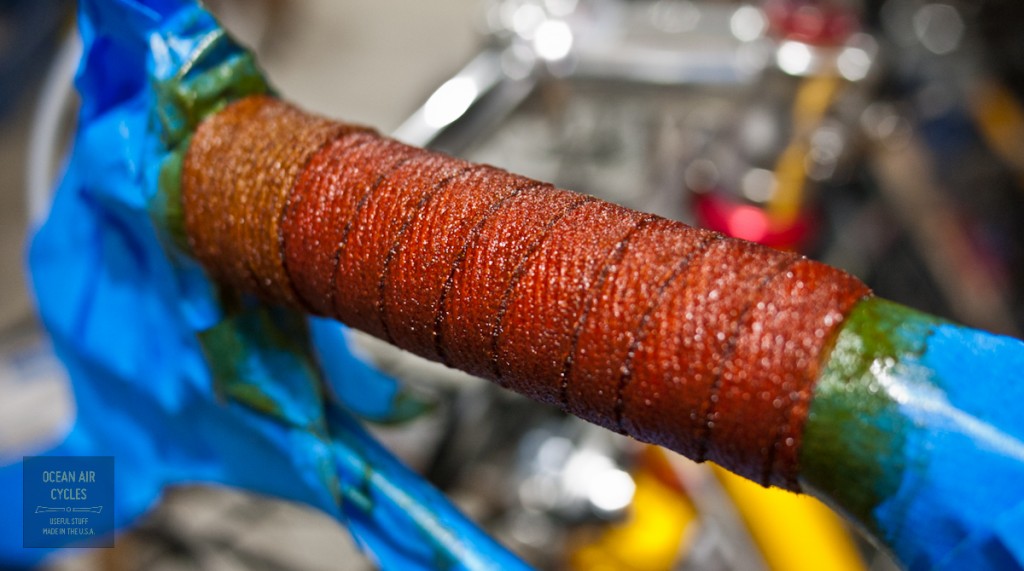

The amazing thing is the feel, grippy, but soft, with just a touch of cush. It will soften with time, last for years with an occasional re-coat, and only look and feel better with usage.
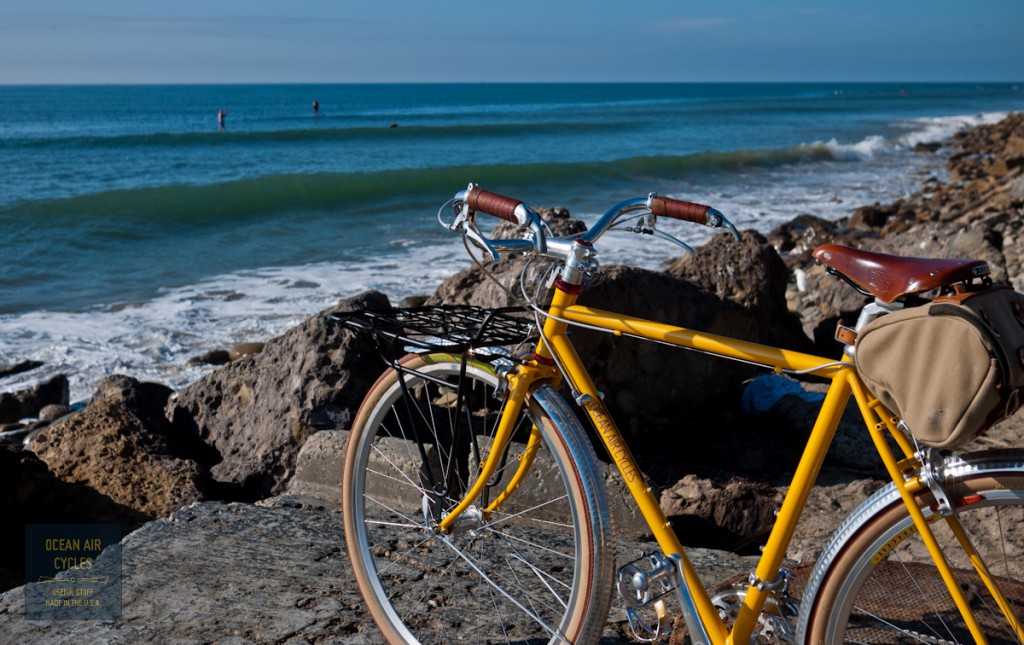
And for the color, most would not know it isn't leather unless you told them, a perfect match for a worn in Brooks.
This last week I was able to get the 51 Rambler switched over from its original drop bar build:

There was nothing really wrong with the way the bike was built up, and it fit my wife well. The thing is, it just was not how she wanted to use the bike. She prefers to sit upright, be able to put our minpin in a front basket of sorts, but still have the bike preform at a high level. I sourced some new parts, others were already on hand, and set to work on the conversion.
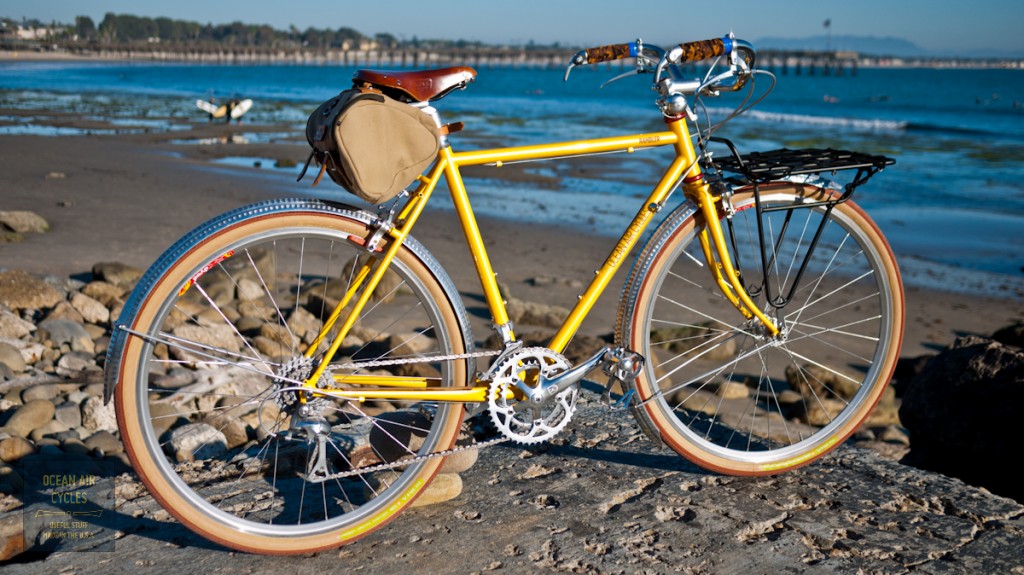
It came out fantastic. Some details worth note. The Wald bars work just fine with bar end shifters. The newish Tektro city levers are stylish and work great with the Paul Racers. The Pari Moto tires were swapped for a set of Soma B-lines to add a bit more durability as well as the look of the red tires. The Porteur rack is a Soma Fab offering as well. I modified it slightly so that it worked more gracefully with the front dropouts as well as having a couple of struts welded on for mounting the top end to the crown bosses. The whole thing is rock solid. The cherry on top is the new Crane mini hammer strike bell.

Only a few test ride miles in so far, but all smiles. I still need to do a final wrap on the grips and work out a basket or box for the dog, but it is pretty close to her dream bike at this point.
The process has started on the next round of t shirt art (read Kickstarter Reward). It is going to be a silhouette of sorts of the Rambler size extremes, somewhere between the simple outline and a Rebour drawing, with a heavy tilt towards the silhouette side. Updates as things progress, but the process is part of the fun.
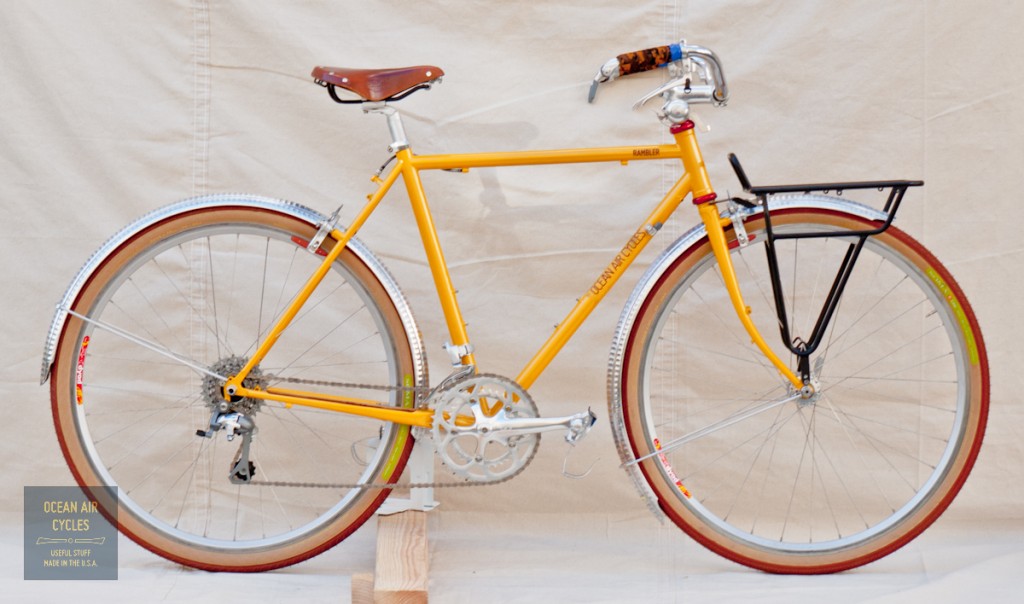

Lately I have been getting more interest in the various bags I have on my Rambler. The 5 bag set up I have been running in most of the pictures is a mash-up of self-made and store-bought bags that have built up over the last five years. Some are on the bike every day, while others, the panniers, are only there for the more voluminous loads. I have a few new designs I am getting ready to sew up, and before the switch I thought it would be a good time to share my thoughts on each of the bags.
Up front I have been using an Acorn brand handle bar bag for a few years now. These bags are hand-made by a husband and wife team in Los Angeles, and are an incredible value if you can get your hands on one.


This bag holds all of my essentials: spare tube, patch kit, pump (Lezyne micro floor drive) multi tool, maps, energy bar for an emergency bonk and plenty of room left over for my Micro 4/3 camera kit or a lunch and jacket etc. The bag is made with un-waxed canvas, and has proven water tight through a few rainy seasons now. You will also not my "FrontFlector" No.1. I have a couple of different versions, all working as hoped. While not a headlight replacement, I have found it quite effective in getting driver's attention. There is over a full 20 square inches of 3m reflective tape, it can easily be retro fit to most traditional front bags, and is integral with the front pocket. I will be offering these as part of the line over this winter.
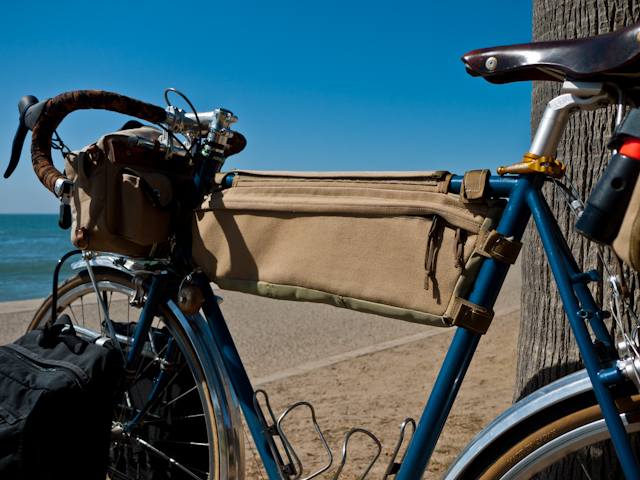
The frame bag I run all the time is the first one I have ever made. It came out well enough in spite of my early sewing skills and has help up far better than I expected.
[caption id="attachment_3137" align="aligncenter" width="640"]
Click on the Pic to see the bag specs[/caption]
Some of the design aspects were meant to be a trial, assuming I would need to replace or repair in time. It is going on two years at this point, and nothing has needed anything other than use. I carry my pole mounted GoPro camera in it on most rides, and often use it to carry a dozen eggs. On longer rides it holds a 2l platypus bladder, and in the winter it holds my extra layers and the come on and off throughout the ride. Like the Acorn bags, I chose the un-waxed canvas, and it had proven water tight through two winters.
On the rear I have my self-made saddle bag.
[caption id="attachment_3139" align="aligncenter" width="640"]

Click on the Pic to see the bag specs[/caption]
I originally made this bag to increase the rear loading capacity of my Rivendell Roadeo, a sport bike, that was not intended to carry panniers, but has a geometry biased towards rear load. It has just a bit more room than a Carradice Nelson long flap. Made with the same un-waxed canvas, it has yet to let me down in a California rain storm. As of late it mostly holds up the reflector, and the occasional bulky package.
It also, like my front bag, has a self-made reflector. Starting with the basic premise of the reflective triangles made for runners, I upped the reflective surface area. Most triangles have a mesh center, but if you are strapping it to you bike or bag, a breathable center is a waste of real estate IMO. It may look a bit dorky, but after thousands of miles at the margins of the day, it gets results. Hands down cars give me a wider passing space when it is on there, and I do not leave home without it on the bike.
For the loads with a bit more volume I have a set of the Jandd Mini MTN panniers, that I modified with a set of Arkel mounting hooks. These have been with me for well over 5 years now and have proven quite versatile.
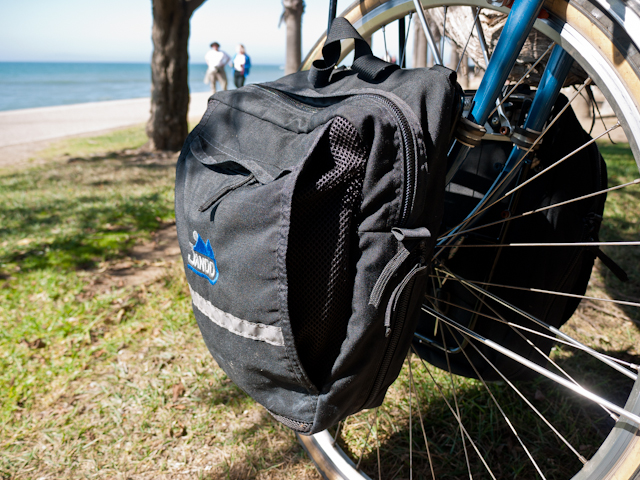
They are a mass-produced bag, made with Cordura Nylon. They are fairly water-resistant, but have had leakage in heavy rain. The width of the bottom half is expandable for the really big loads. I have used these for everything from touring, to groceries and commuting. They will swallow a gallon of mill, 2 quarts of yogurt and have tons of room the softer packages. While labeled mini, these have a surprising amount of capacity and are rated at 2000 ci for the pair.
I am pretty happy with all these bags. If it were not for the constant need to tinker, the tools and ability to make exactly what I want, and it being part of the business, I would probably push these bags for a decade or more. So what is next? I am planning on making a 5 bag set with Dimension Polyant's XPAC laminate material. This is a composite 3 layer laminate of cordura, mylar, and pack cloth with rip stop fibers. The weight is a fraction of the canvas, and it will be waterproof. Canvas is great, but my three every day bags tip the scales at around 7 lbs empty, that is significant IMO. I will still have a set of canvas bags in the works, bit materials have pros and cons, and I need to work it out with some test bags.
The rambler is designed to handle modest front loads, and I want to up the size on the handlebar bag. This will reduce my tendency to fall back on the panniers when I need just that little bit more space. The design will be rooted in a traditional Berthoud style bag, but with modern materials and a couple of twists.
The frame bag will be similar in design to my current bag, but with a couple of improvements and the use of XPAC as the main material.
The saddle bag will shrink a bit, have a different closure system, and shape.
Fourth on the lest is a set of roll top panniers. Everything I can find on the market, short of the Berthoud mini, is still a bit big for most of what I need. I am leaning towards a roll top design for water tightness and a bit of flexibility in volume. I will use Arkel hooks until I can find something lighter that is as easy to get on and off, yet incredibly secure.
Time to move the designs from paper to pattern, cut some cloth and get sewing.
 This is very close to what will be the shirt and bag art for the Kickstarter rewards. There will be options of this or the porteur build, as well as a couple of color options. Now to get the Kickstarter part launched, stuck in a holding pattern waiting for approval.
 The top three will be the primary colors used, with a few neutral options down the line for custom colors. The small square logo will be on the head tube, made in Portland on the seat tube, Ocean Air Cycles on the down tube, RAMBLER on the top tube up front drive side, and Founder on the left chain stay for this first round of bikes being run through Kickstarter (soon, very son).
 The bottom of the right fork leg is pretty much gone just above the fork leg. I thought about some ways to stabilize it, headed up the street to FCD surfboards, and the guys let me have some resin. A tape mold, injection of epoxy through the vent hole and a few hours later I a confident that it will hold up to transport and display.
 There is not enough left of the dropouts to mount a rack or fender, but I was able to make a Mark's rack work to hold up the light. That is when I went full in, and wired up the whole bike front and rear. This bike is the first one of the batch to get the full dynamo lighting system. That is front and rear lighting powered by the rotation of the front hub.
 The chain ring bracket is perfect. The wire from the hub to the headlight runs through the guides on the right fork leg.
 The curly q wire allows the lighting wire to be installed or removed with the connectors intact on the wire ends. I first saw this either on Alex Wetmore's blog or on Flicker someplace. It works better than solid loops that will not pass the connectors in the event that you need to strip the lights with intentions of putting them back on.
 In an ideal world the wires would be tucked under the fender for the run from the crown to the headlight and the returning tail light wire. This being what it is, they are tied off to the rack. The tail light wire enters into the frame through the port at the top of the down tube.
 It passes along, protected from snagging, inside the down tube, around the bottom bracket and up the seat tube just a bit to the exit port.
 There is a short exposed run along the left chain stay before it tucks into the rear fender. To protect the wire from being cut by the sharp fender edge I used a commonly available rubber stress relief grommet.

 the wire then runs along the inside edge of the fender. The Berthoud fenders are quite nice for this as the edge is rolled, but not crimped completely shut as it is on some other brands of metal fenders.
 Once fully tucked in, you can crimp the channel shut just a bit, or use a few short beads of silicone to hold it in place. The wire exits the rear of the fender through, another stress relief grommet, and then connects up to the tail light.
 A quick spin of the front wheel to confirm that everything is still working and it is almost time to clean up. I decided to secure the short run of wire between the seat tube ans the fender with a piece od red reflective tape that was a close enough color match.
 While not everything I had dreamed for a complete bike, I am still pretty happy with the results, and when the replacement fork gets here it should go together pretty quickly.


 The amazing thing is the feel, grippy, but soft, with just a touch of cush. It will soften with time, last for years with an occasional re-coat, and only look and feel better with usage.
 And for the color, most would not know it isn't leather unless you told them, a perfect match for a worn in Brooks.
 There was nothing really wrong with the way the bike was built up, and it fit my wife well. The thing is, it just was not how she wanted to use the bike. She prefers to sit upright, be able to put our minpin in a front basket of sorts, but still have the bike preform at a high level. I sourced some new parts, others were already on hand, and set to work on the conversion.
 It came out fantastic. Some details worth note. The Wald bars work just fine with bar end shifters. The newish Tektro city levers are stylish and work great with the Paul Racers. The Pari Moto tires were swapped for a set of Soma B-lines to add a bit more durability as well as the look of the red tires. The Porteur rack is a Soma Fab offering as well. I modified it slightly so that it worked more gracefully with the front dropouts as well as having a couple of struts welded on for mounting the top end to the crown bosses. The whole thing is rock solid. The cherry on top is the new Crane mini hammer strike bell.
 Only a few test ride miles in so far, but all smiles. I still need to do a final wrap on the grips and work out a basket or box for the dog, but it is pretty close to her dream bike at this point.


 This bag holds all of my essentials: spare tube, patch kit, pump (Lezyne micro floor drive) multi tool, maps, energy bar for an emergency bonk and plenty of room left over for my Micro 4/3 camera kit or a lunch and jacket etc. The bag is made with un-waxed canvas, and has proven water tight through a few rainy seasons now. You will also not my "FrontFlector" No.1. I have a couple of different versions, all working as hoped. While not a headlight replacement, I have found it quite effective in getting driver's attention. There is over a full 20 square inches of 3m reflective tape, it can easily be retro fit to most traditional front bags, and is integral with the front pocket. I will be offering these as part of the line over this winter.
The frame bag I run all the time is the first one I have ever made. It came out well enough in spite of my early sewing skills and has help up far better than I expected.
[caption id="attachment_3137" align="aligncenter" width="640"]
 Click on the Pic to see the bag specs[/caption]
Some of the design aspects were meant to be a trial, assuming I would need to replace or repair in time. It is going on two years at this point, and nothing has needed anything other than use. I carry my pole mounted GoPro camera in it on most rides, and often use it to carry a dozen eggs. On longer rides it holds a 2l platypus bladder, and in the winter it holds my extra layers and the come on and off throughout the ride. Like the Acorn bags, I chose the un-waxed canvas, and it had proven water tight through two winters.
On the rear I have my self-made saddle bag.
[caption id="attachment_3139" align="aligncenter" width="640"]
 Click on the Pic to see the bag specs[/caption]
I originally made this bag to increase the rear loading capacity of my Rivendell Roadeo, a sport bike, that was not intended to carry panniers, but has a geometry biased towards rear load. It has just a bit more room than a Carradice Nelson long flap. Made with the same un-waxed canvas, it has yet to let me down in a California rain storm. As of late it mostly holds up the reflector, and the occasional bulky package.
It also, like my front bag, has a self-made reflector. Starting with the basic premise of the reflective triangles made for runners, I upped the reflective surface area. Most triangles have a mesh center, but if you are strapping it to you bike or bag, a breathable center is a waste of real estate IMO. It may look a bit dorky, but after thousands of miles at the margins of the day, it gets results. Hands down cars give me a wider passing space when it is on there, and I do not leave home without it on the bike.
For the loads with a bit more volume I have a set of the Jandd Mini MTN panniers, that I modified with a set of Arkel mounting hooks. These have been with me for well over 5 years now and have proven quite versatile.
 They are a mass-produced bag, made with Cordura Nylon. They are fairly water-resistant, but have had leakage in heavy rain. The width of the bottom half is expandable for the really big loads. I have used these for everything from touring, to groceries and commuting. They will swallow a gallon of mill, 2 quarts of yogurt and have tons of room the softer packages. While labeled mini, these have a surprising amount of capacity and are rated at 2000 ci for the pair.
I am pretty happy with all these bags. If it were not for the constant need to tinker, the tools and ability to make exactly what I want, and it being part of the business, I would probably push these bags for a decade or more. So what is next? I am planning on making a 5 bag set with Dimension Polyant's XPAC laminate material. This is a composite 3 layer laminate of cordura, mylar, and pack cloth with rip stop fibers. The weight is a fraction of the canvas, and it will be waterproof. Canvas is great, but my three every day bags tip the scales at around 7 lbs empty, that is significant IMO. I will still have a set of canvas bags in the works, bit materials have pros and cons, and I need to work it out with some test bags.
The rambler is designed to handle modest front loads, and I want to up the size on the handlebar bag. This will reduce my tendency to fall back on the panniers when I need just that little bit more space. The design will be rooted in a traditional Berthoud style bag, but with modern materials and a couple of twists.
The frame bag will be similar in design to my current bag, but with a couple of improvements and the use of XPAC as the main material.
The saddle bag will shrink a bit, have a different closure system, and shape.
Fourth on the lest is a set of roll top panniers. Everything I can find on the market, short of the Berthoud mini, is still a bit big for most of what I need. I am leaning towards a roll top design for water tightness and a bit of flexibility in volume. I will use Arkel hooks until I can find something lighter that is as easy to get on and off, yet incredibly secure.
Time to move the designs from paper to pattern, cut some cloth and get sewing.


