Local Advocacy September 10 2013, 0 Comments
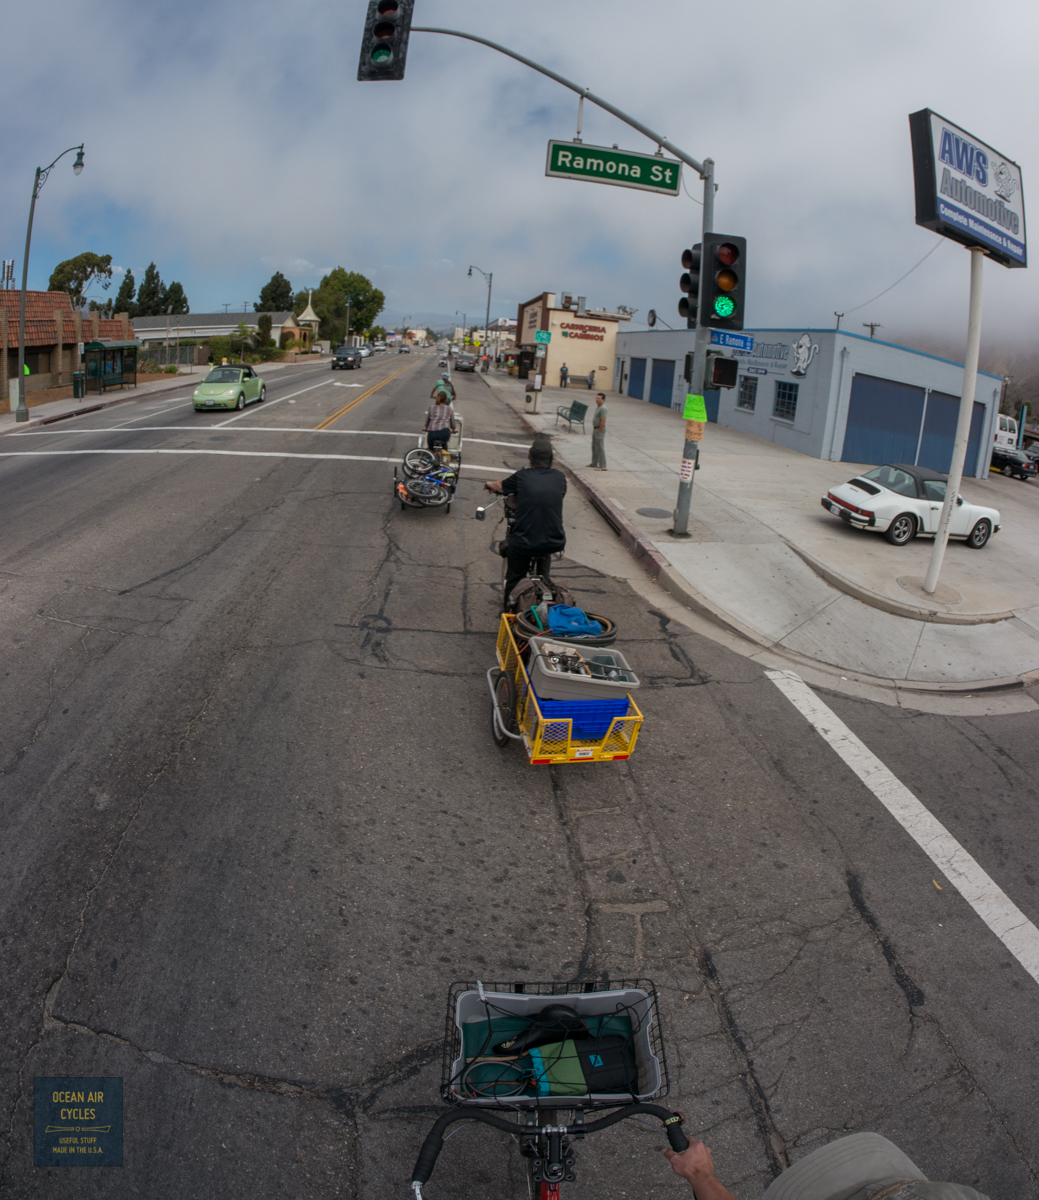
Our town is really lucky to have some passionate bicycle advocates. Aside from making a huge push for great, and ever improving, infrastructure, they have also formed the
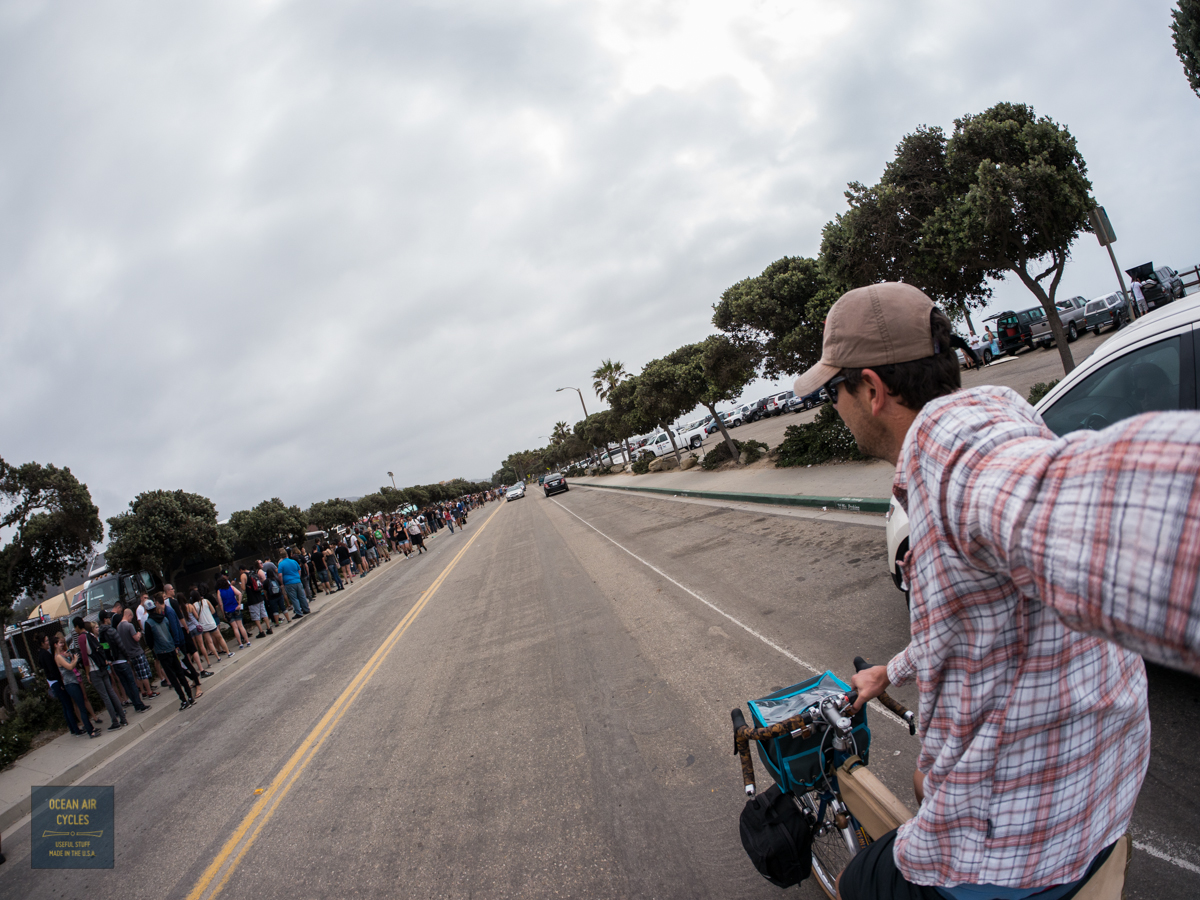
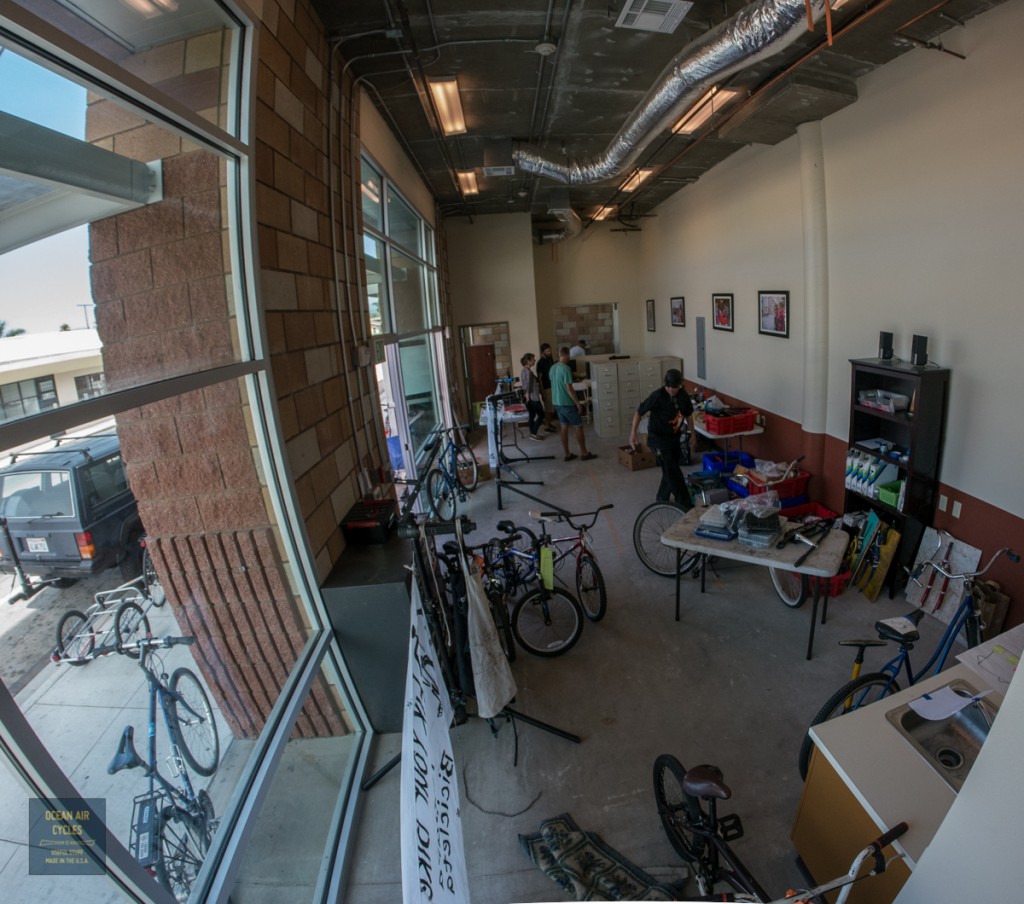
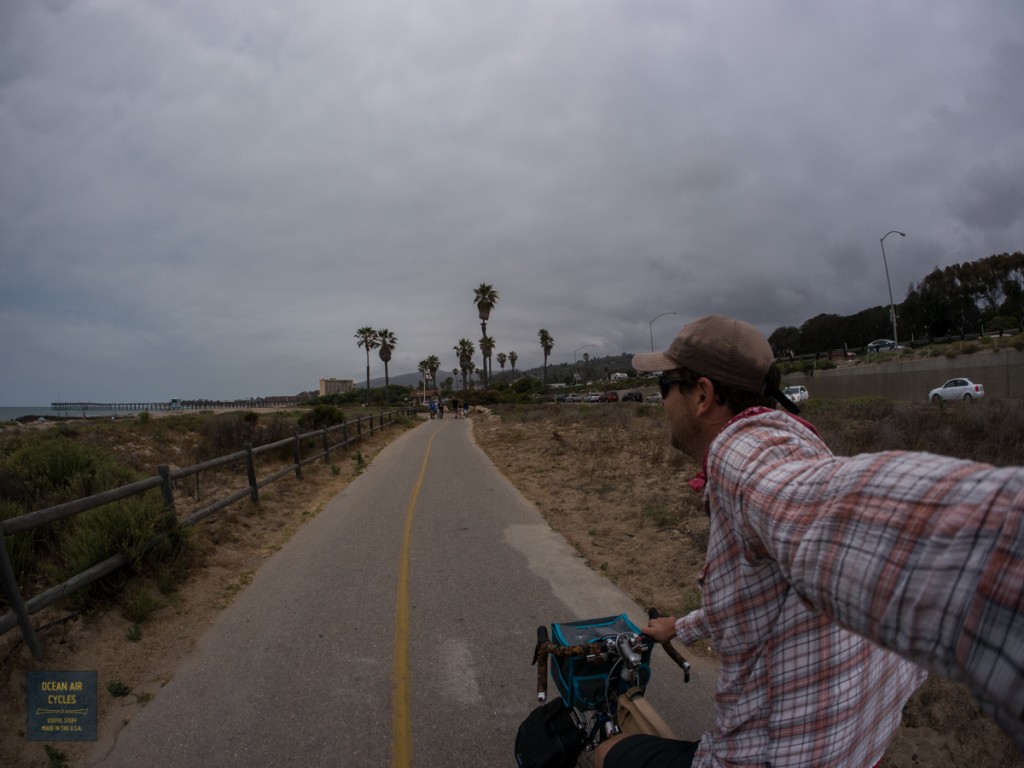
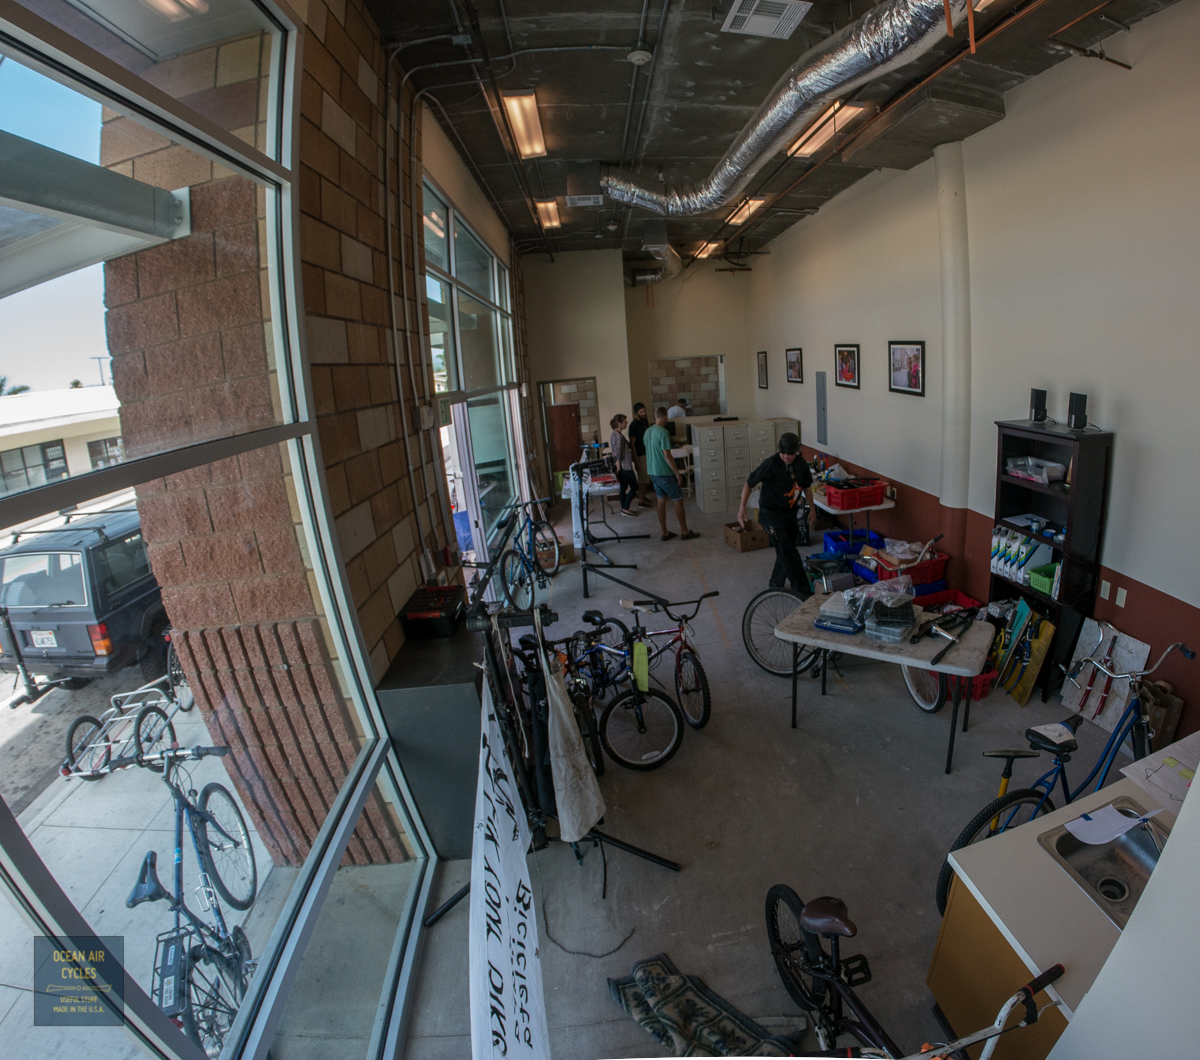
Ventura Bike HUB. The HUB is a pure community organization, mechanics and advocates that come together to help the community fix and learn to fix their bikes. The mission has been growing and their work is the fuel for our local transporational cycling scene. One of their bigger challenges has been finding a steady storage and working location. In the past few months they were able to secure a space with the City Housing Authority that will serve them and the community well. This past Sunday I was lucky to help them with their move from the temporary location to the new space.

A fully bike powered and volunteer driven event. There new space is awesome and will get them the exposure they need to grow.
The next steps in local advocacy have been a move up to organizing at a County level. The City of Ventura has been doing pretty darn good, as have some of the other 10 cities in our county. The trick will be learning from each other and developing tools that can be used to improve not just all 10 cities but the unincorporated portions of the county as well. There is no reason why Ventura County as a whole should not be setting the standard for human-powered transport. We have tight-knit communities, industry and year round awesome weather.
As a Coalition there has been one official meeting. We all came away inspired, and with a few questions to answer as we define our path. The first is if we should be Bicycle only or "Active Transportation"? After that comes the volunteer based efforts of setting up Web Pages, Mission statements, by-laws, organizational structures, and pushing on to things like County wide maps and governmental activism. All of this would never have made it this far if not for that hard work of
Rachel at VCCool, Thank You.
I am reaching out to all of you that have ridden this path before. Any advice or experiences you would like to share are welcome. We will need lots of help, everything from the above mentioned web designers to fundraising, shops and people who work within the city and county infrastructure. The next meeting will be Thursday September 26 6:30 P.M. at the Fillmore High school. I hope to see some of you there.
Daddy Days August 30 2013, 0 Comments
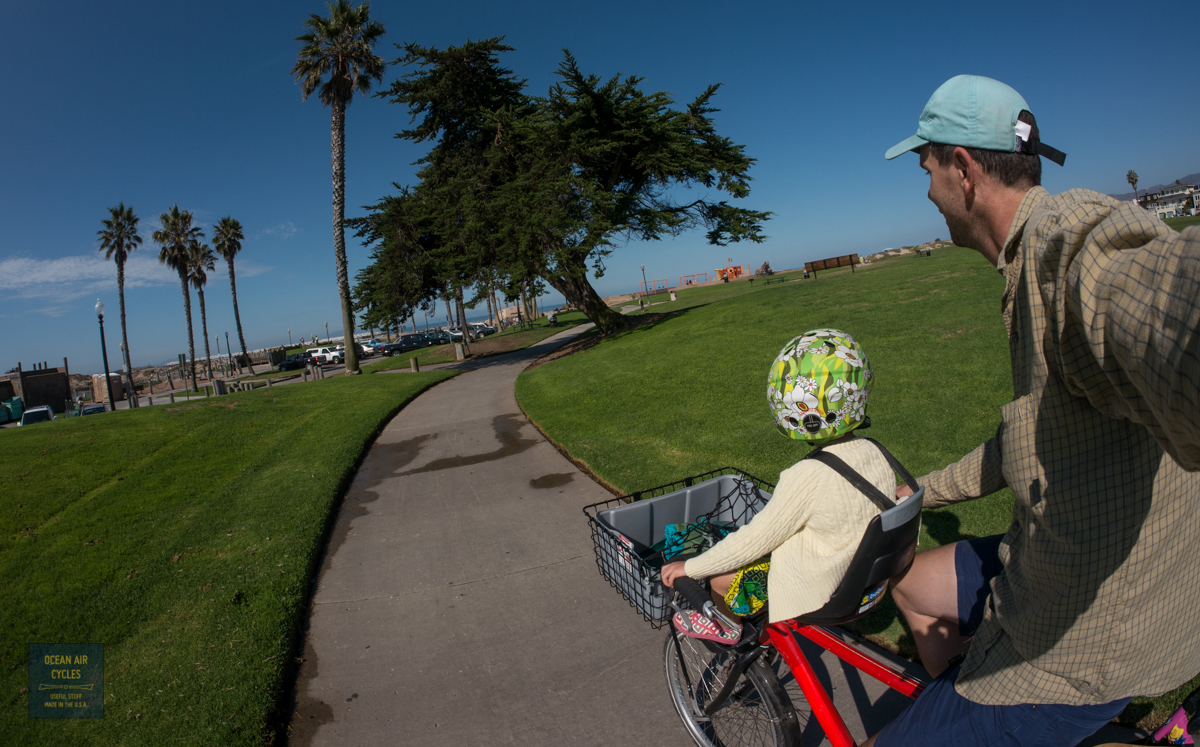
Friday is still daddy day for the moment, there is plenty going on, and things have always been busy, but never like this. That said, we took some time this morning to squeeze in a ride before she gets too big for her current seat.

Say Cheese! Loaded with everything from the pocket kite, to the strider camera gear, supplies and her toy lap top in case she needed to do so work, we cut out across town to the favorite playground.

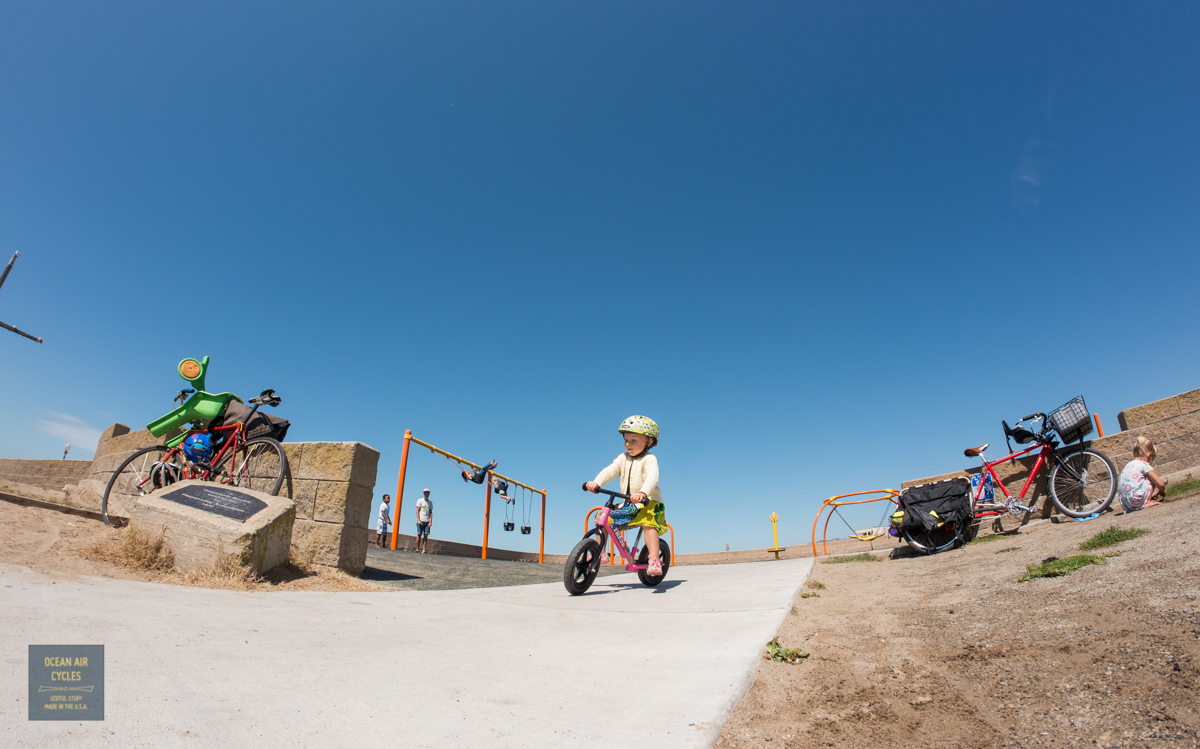
Met some friends, turns out there are more dads then you would think hanging out at the playgrounds these days. Just when I thought she was worn out, it was time to pull out the Strider and jam on the little hill.

Super stoked that she is rocking it with her feet up. That is a new development in the last week or two, and today was the first day covering significant distance. I am pretty sure she was showing off for Toby and Maverick over by the swings in the background. A perfect morning, and catching up while she is completely crashed out.
Coffee Gear August 27 2013, 0 Comments
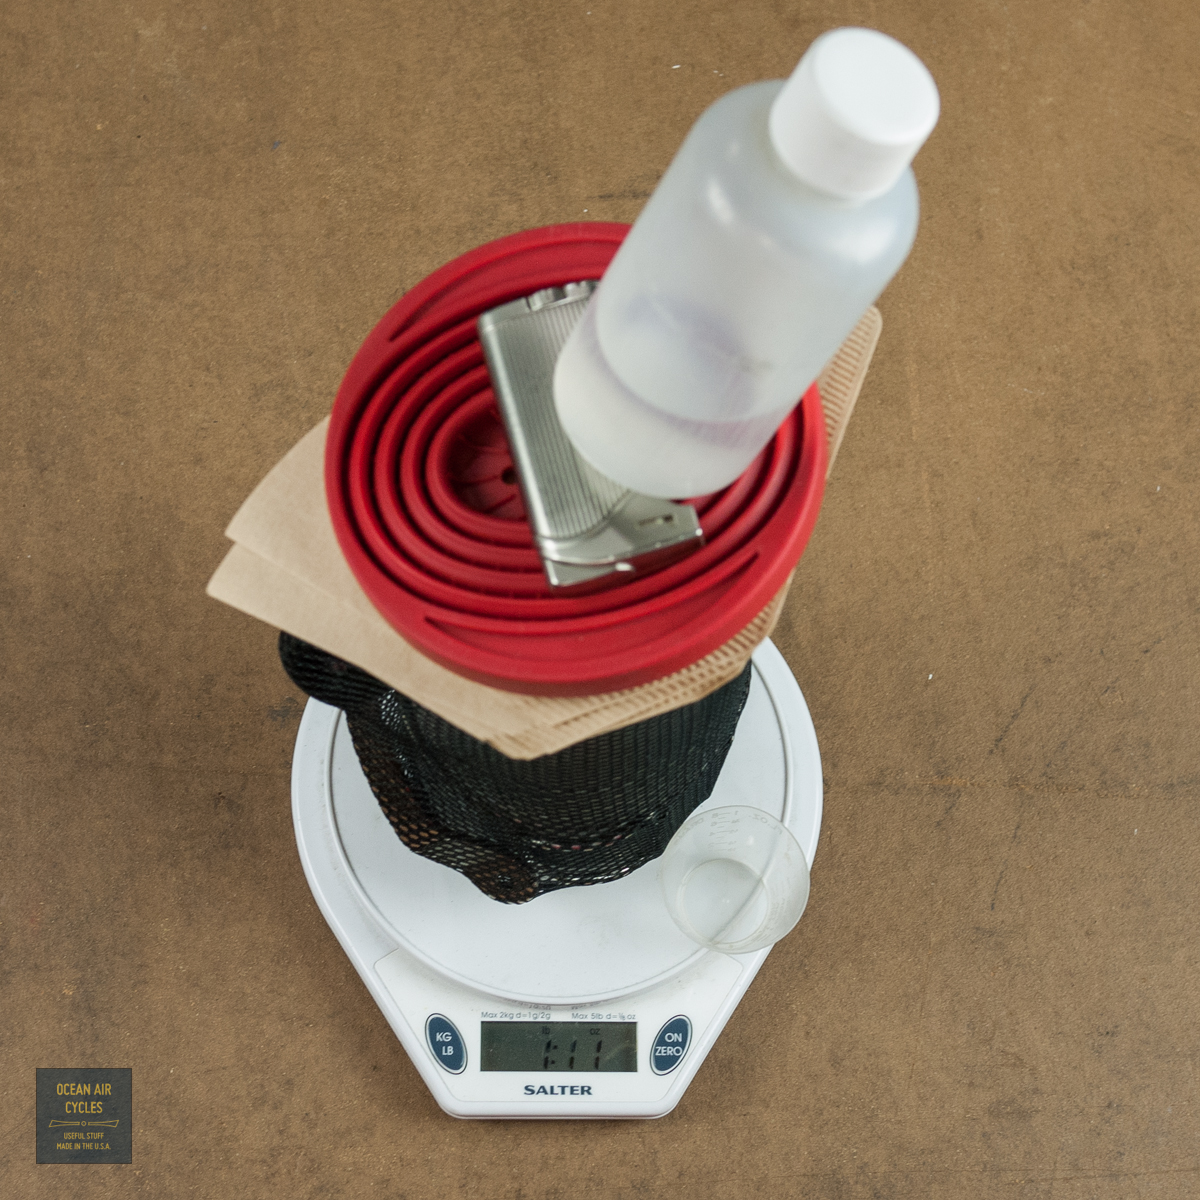
The most frequent question I get regarding the coffee outside routine is "what gear are your using?". While getting my kit ready for tomorrow I took a few minutes to make some pictures and prepare some notes.
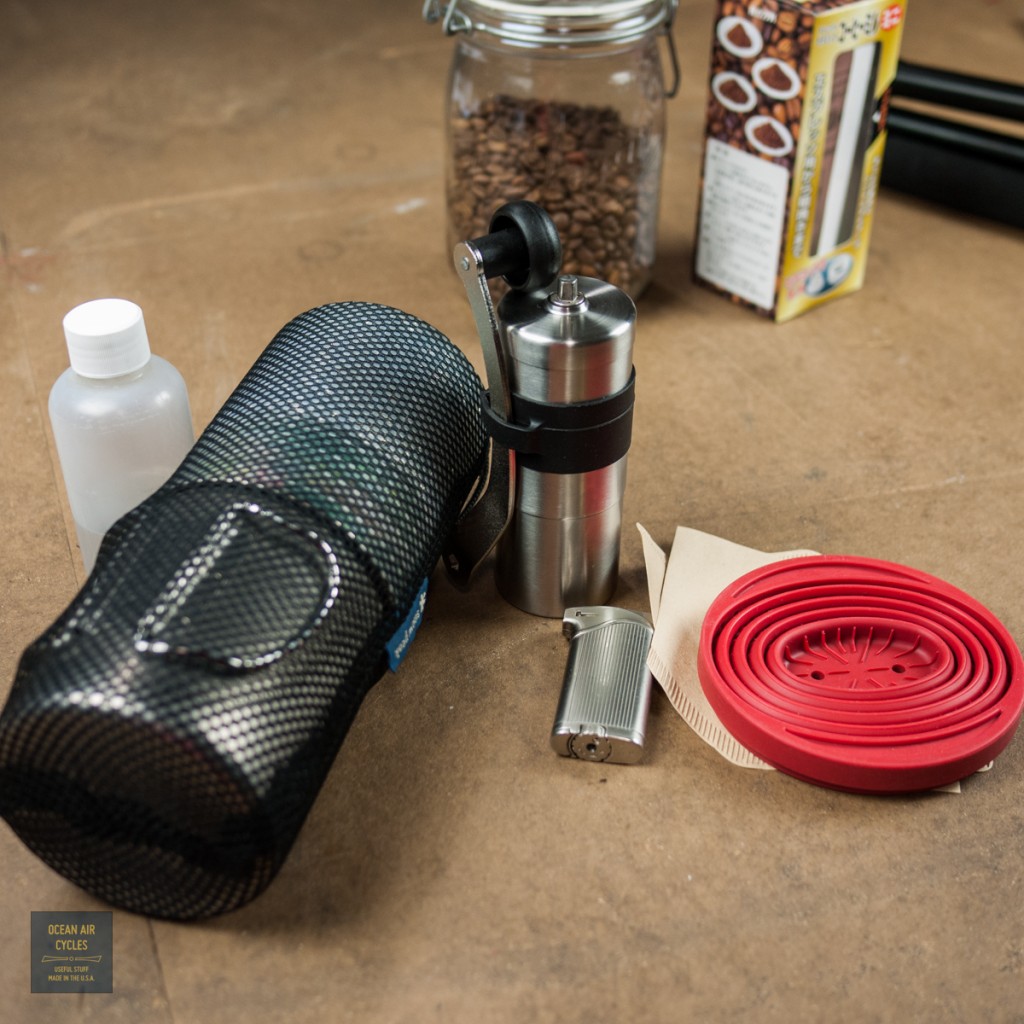
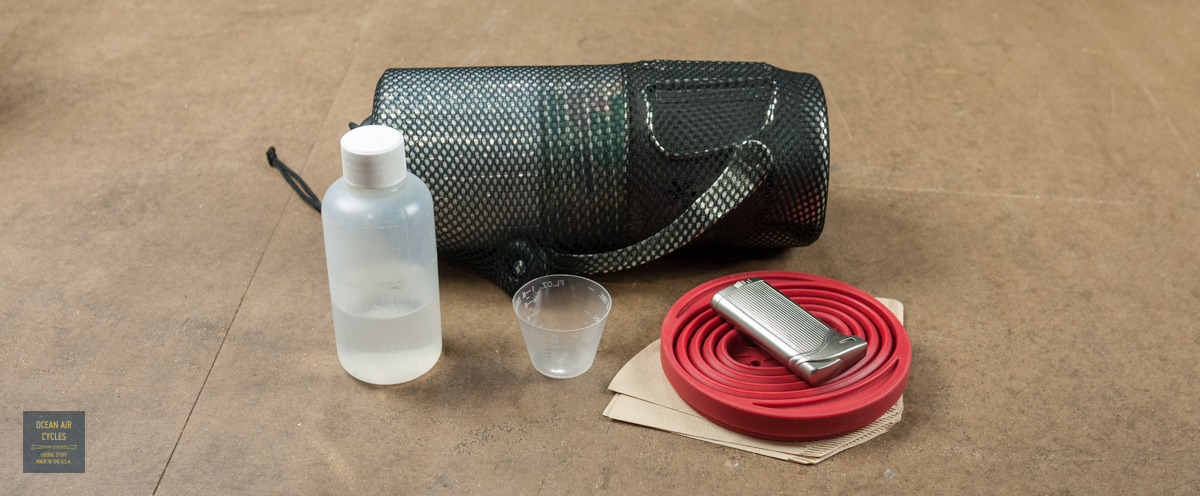
The contents of the kit reflect my preference for pour over style of brewing. I have tried everything from cowboy coffee to a small french press, and for me, the best results have been pour over. My usual stove and cook pot for boiling water has been the
Caldera Keg Kit. The kit is super light, compact and has everything I need to boil water quickly. I brew the coffee into a 600ml titanium mug that replaces one end of the keg kit's container. I support the paper coffee filters with a William Bounds Sili coffee cone. after testing out a few options I find it hits a sweet spot for function, weight and portability. The kit is rounded out with a
bandanna, lighter, grinder and occasional breakfast snack
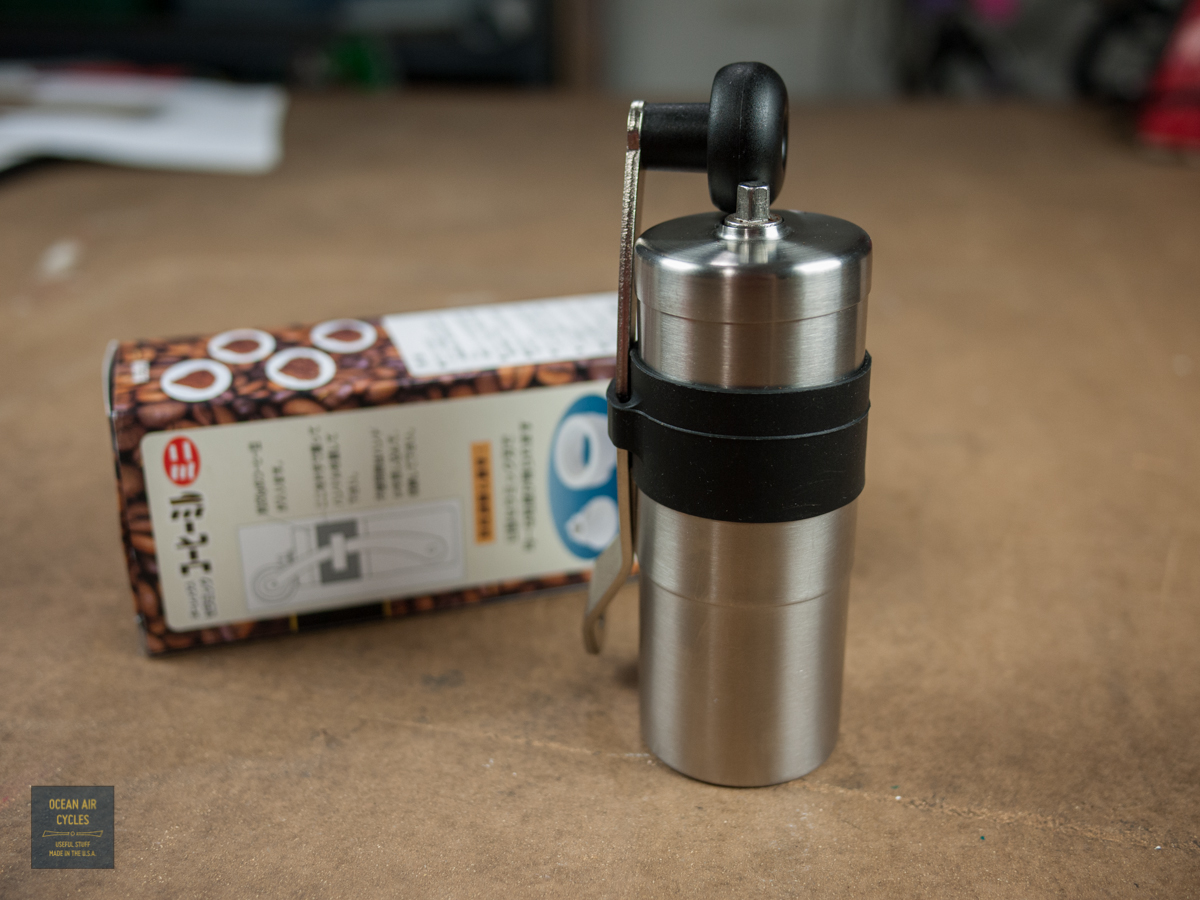
The latest addition to my kit has been the Porlex portable grinder. It adds a bit of weight to the whole package, but the quality of the brew jumps way up with beans ground at the time of brew.

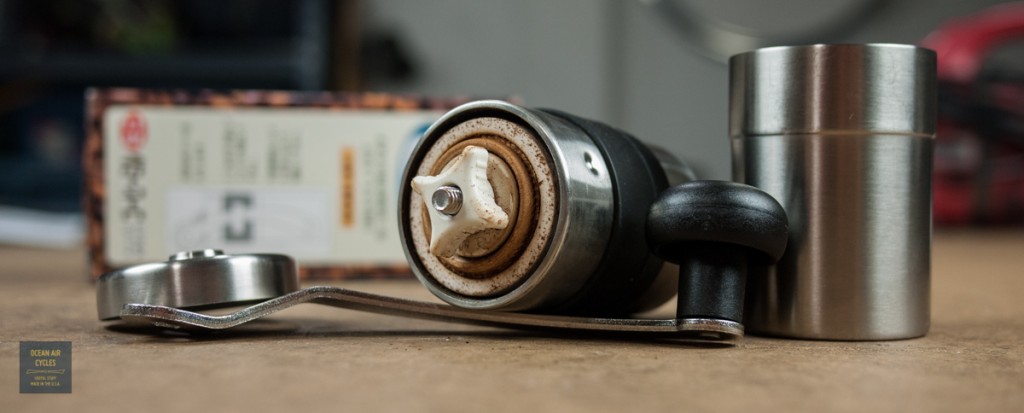
This was an awesome birthday gift this year from my wife and her parents, and has seen daily use for a few weeks now. The bur grinding mechanism is robust, easily adjustable, and provides an incredibly uniform grind. It holds the perfect amount of beans for my large mug. Thus the increase in brew quality and ability to carry the fresh beans justify the added load.
All spread out it looks like a bunch of gear
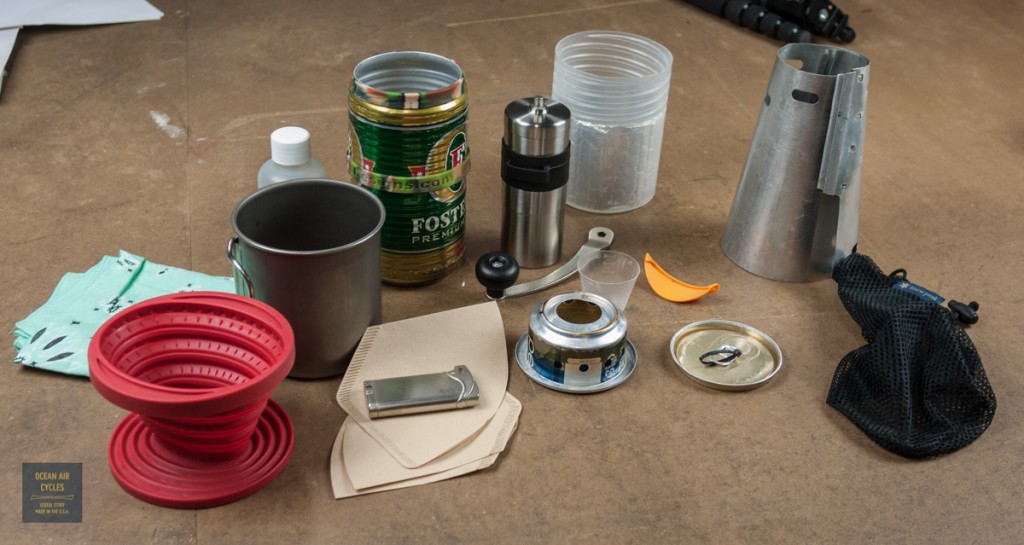
but most of the components nest into the stove caddy and it is travels quite compact in the handlebar bag. I was pleasantly suppressed to even fit the grinder on the inside of the kit.

Over all weight is still respectable as well considering how much utility is crammed into that little space.

It is that simple, under two pounds and you have all the tools needed to brew a better cup of coffee than most people will at home, and you can do it just about any where you would like. True coffee/bike nerd stuff.
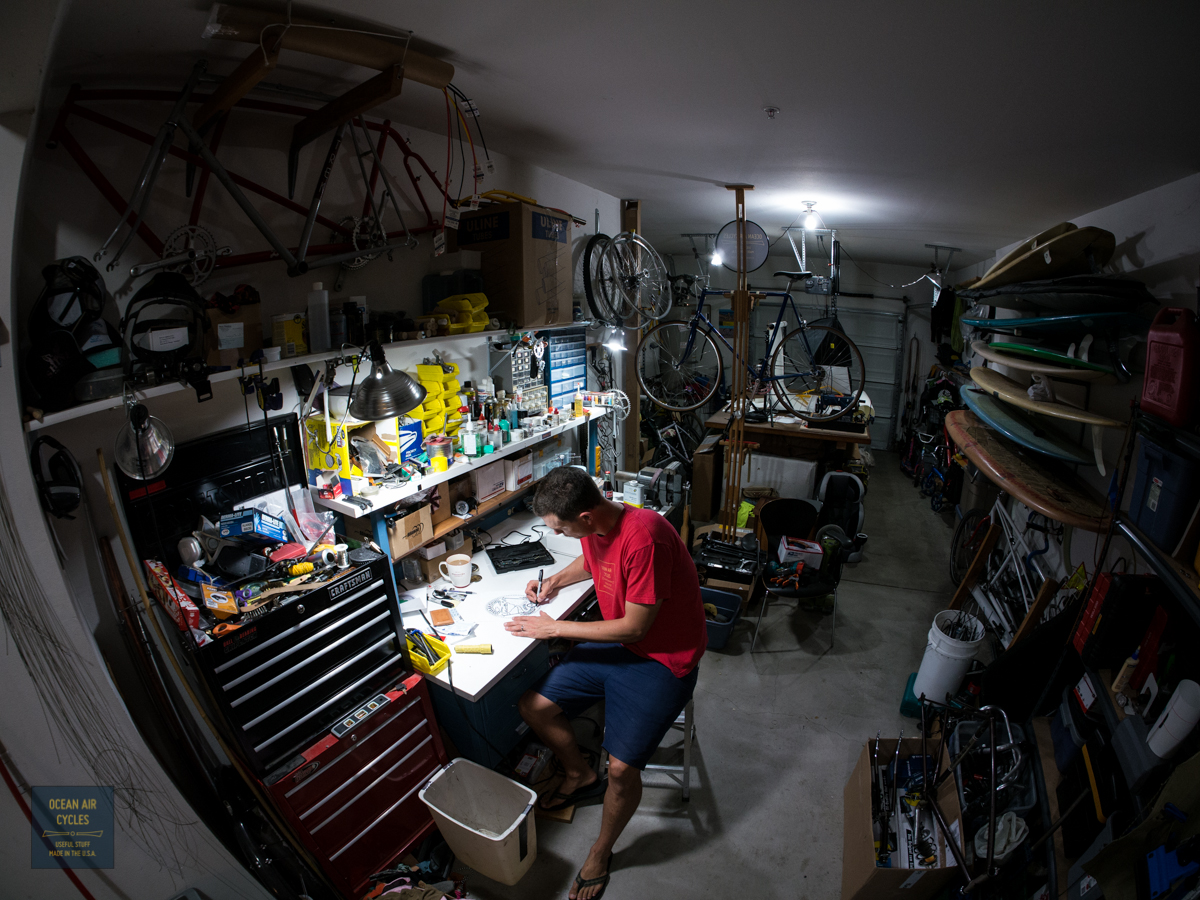
Keeping all the plates spinning in a small business can be exhausting some times, all in a good way of course. Being creative, hands on and analytical often feels like a pack of trapped squirrels trapped in my head all fighting for time and space. This morning I took pen(s) to paper, dusted off an old creative project and restarted the art for T-shirts that need to happen soon.

And yes, it is amazing how much you can cram into a two car garage to get a business going. Time to pack some boxes and ship some of it off to other folks garages.
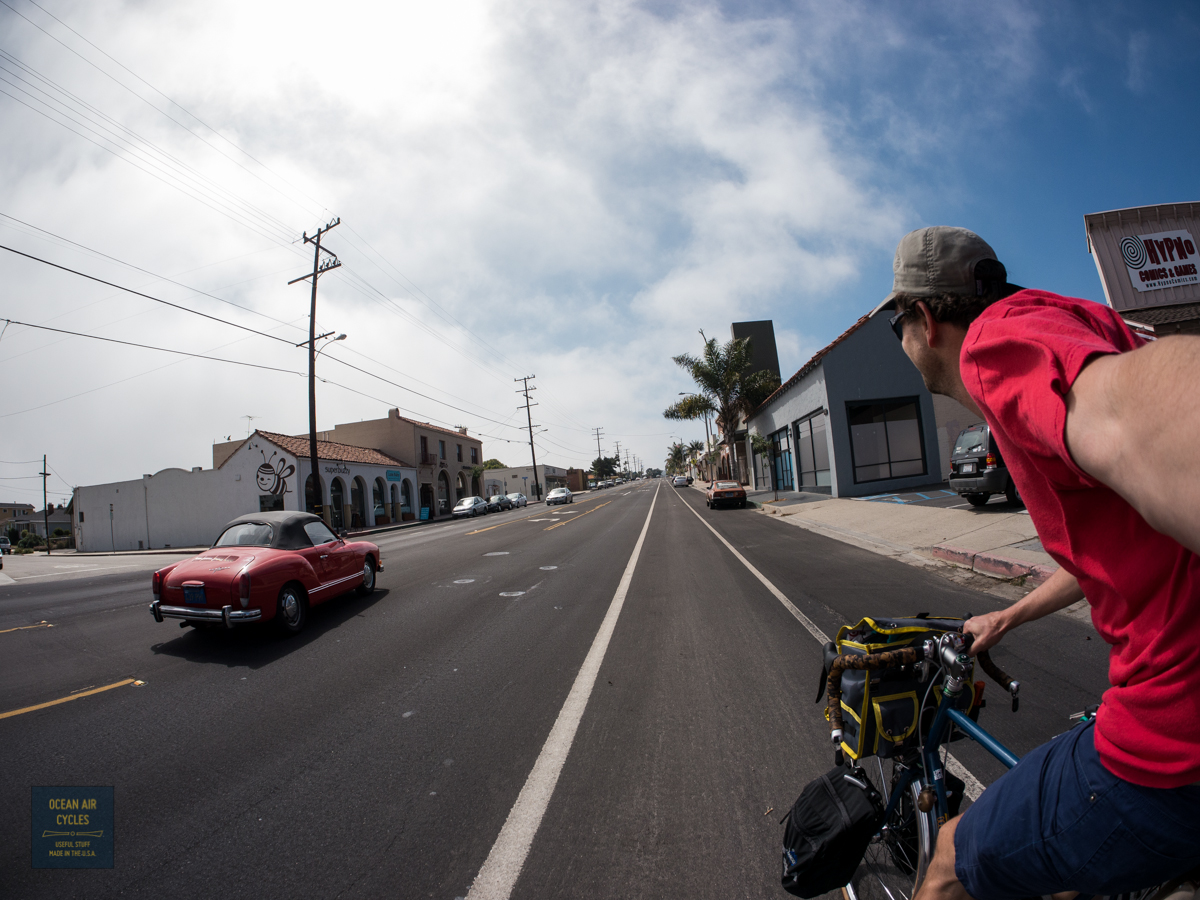
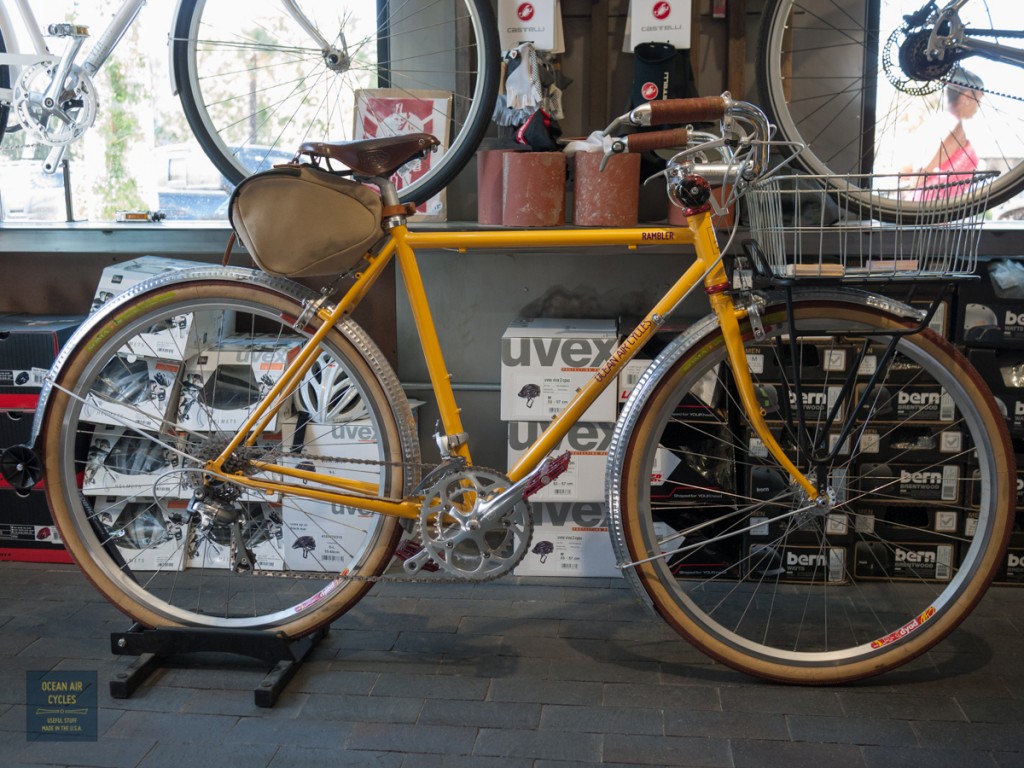
Back when the OAC blog started the whole thing was about getting out on the bike every day, and how easy that was if you use the bike as your basic mode of transport when you leave the house. While a few things have changed here over the years and we have grown, the bike, Rambler, is still the main way I get around town. Hundreds of pictures of myself riding around, and the pictures of me have tapered off a bit this year. Today I made the time to shoot some while I was out. Same loop around town and same basic errands, life is that way sometimes. None the less, it is a hell of a lot more fun picking up odds and ends at Target and the food stores by bike.

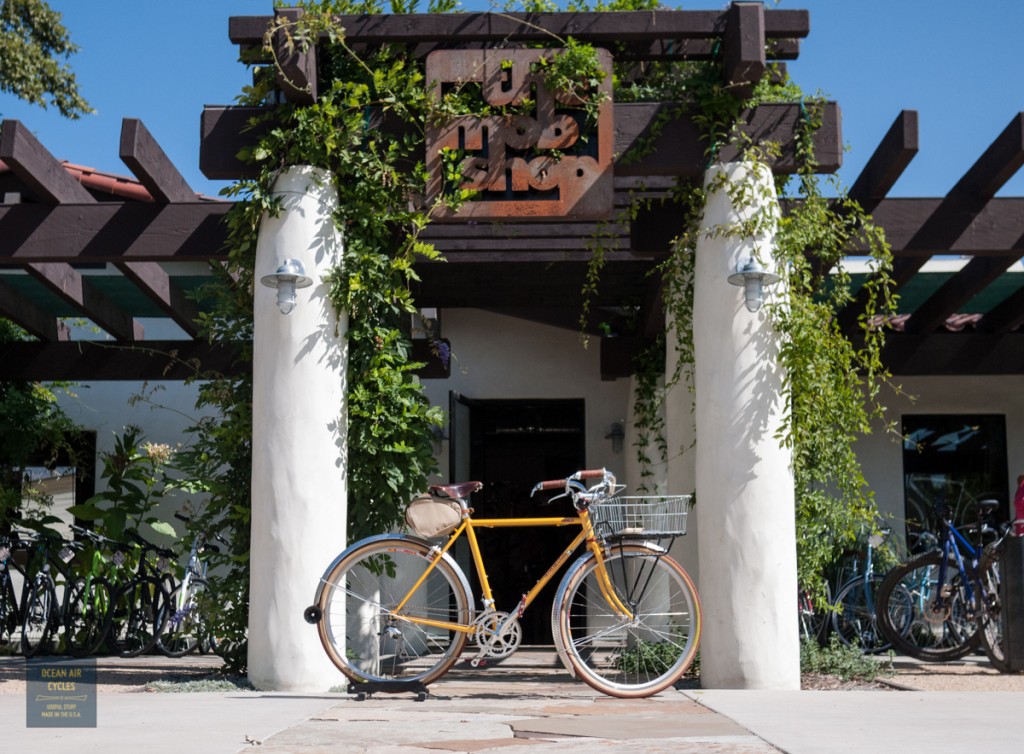
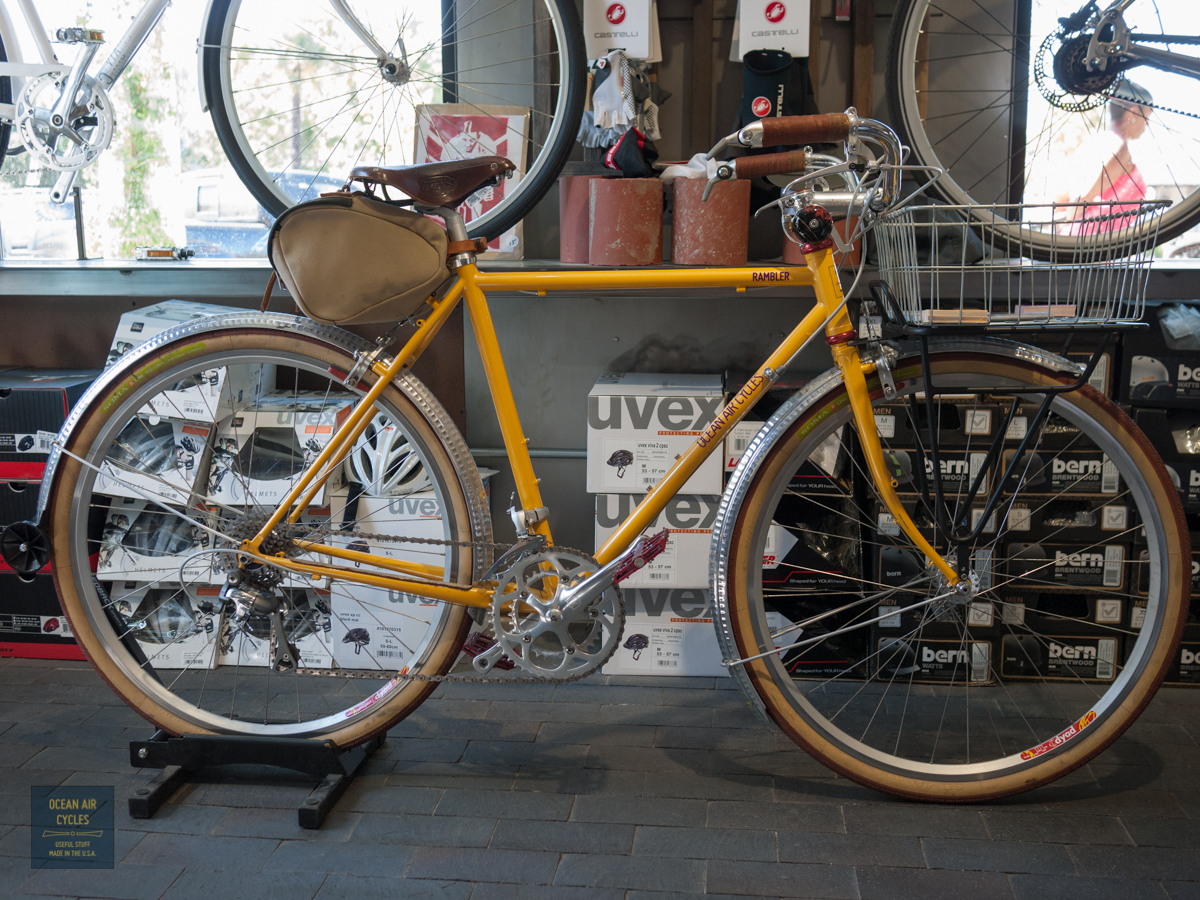
Starting this morning we will have Ramblers at The
MOB Shop in Ojai, CA available for test rides over the coming week. Right now there is a Size 51 Rambler ready to roll as a test vehicle for anybody interested. This evening we will be heading over to partake in the
Slow is Fast event promoting Dan Malloy's book and movie release. These events are always an awesome party with food, beverage and music. I highly recommend bending the schedule to be there. We will be bringing a size 57 and 63 for test rides tonight, and the 57 will be staying at the shop for at least a week. We are looking forward to adding our friends at the MOB to our select list of retail outlets.
Hopefully we will meet some existing fans tonight and make some new ones.
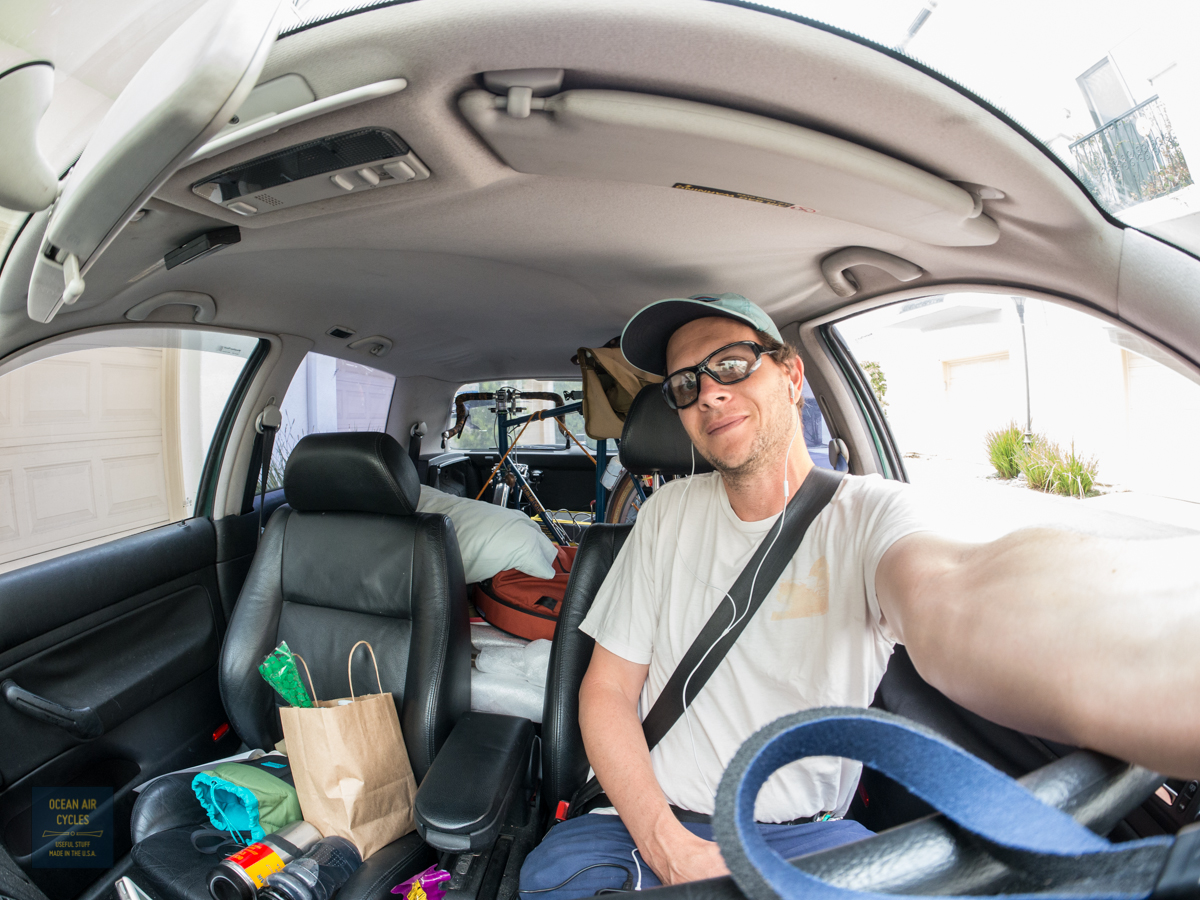
Last week the plan was to head north and get the Ramblers rolling out to vendors and customers with a stop in the SF bay area on the way up. Well, that was the plan, things slipped a little with the powder coating schedule, and I ended up working out a plan b solution. Packed and ready to go on Friday I headed up late in the morning.

The old Golf TDI does pretty good for these trips getting 45 mpg and just enough room to squeeze a 63cm bike on the inside. I had made it to Gilroy when the message came in that the frames would be ready closer to the end of the upcoming week instead of Monday as planned. That was a bit of a bummer deal, as I had already left home, and with Aly pushing into the end of her 6th month of pregnancy it is not really feasible for me to leave her at home with the three-year old and the dog for more than one week at a time. I pressed on to Oakland working out a plan b for the trip as I rolled north.
I am lucky beyond imagination to have an internet friend, turned customer, turned good friend with a place to stay in Oakland, and cool house mates, with a stream of interesting people passing through every time I am up there. The cherries on top are a room with a view and fresh eggs every morning.

Jason has been helping with everything from backend web site stuff to schlepping bikes around on the last Seattle trip and now our pedal powered sales missions through San Francisco, Alameda and Oakland. While I could have probably done this alone it would have been harder, way more $$$ out-of-pocket and not nearly as fun. Thank you, and the whole family at the compound.
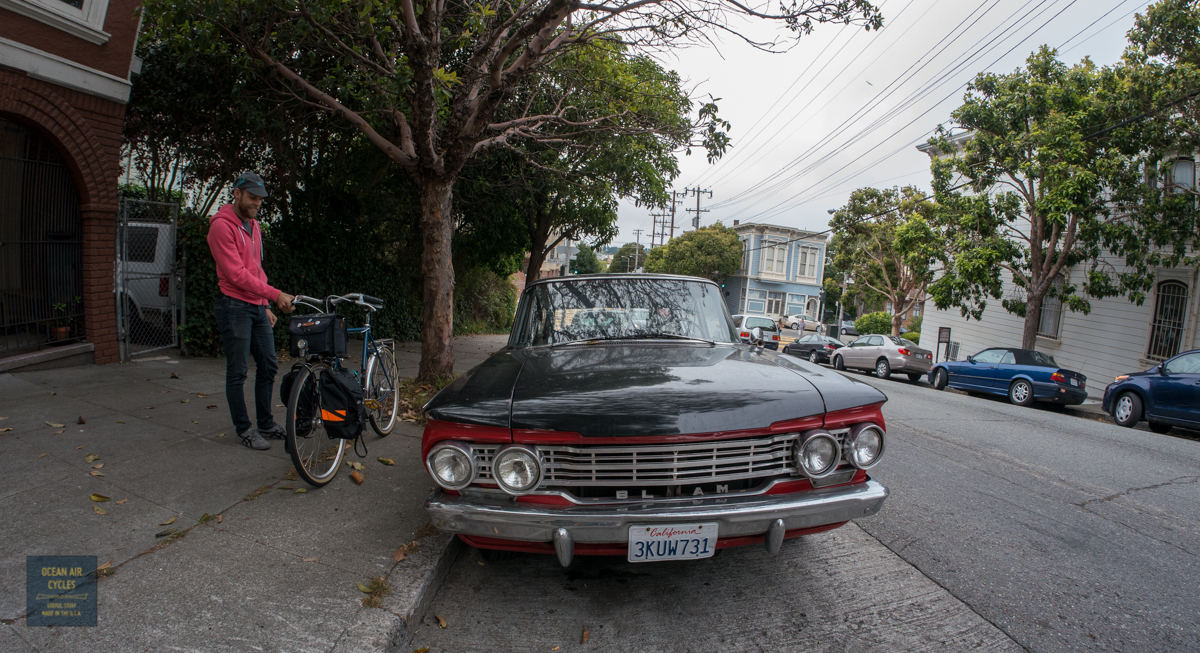
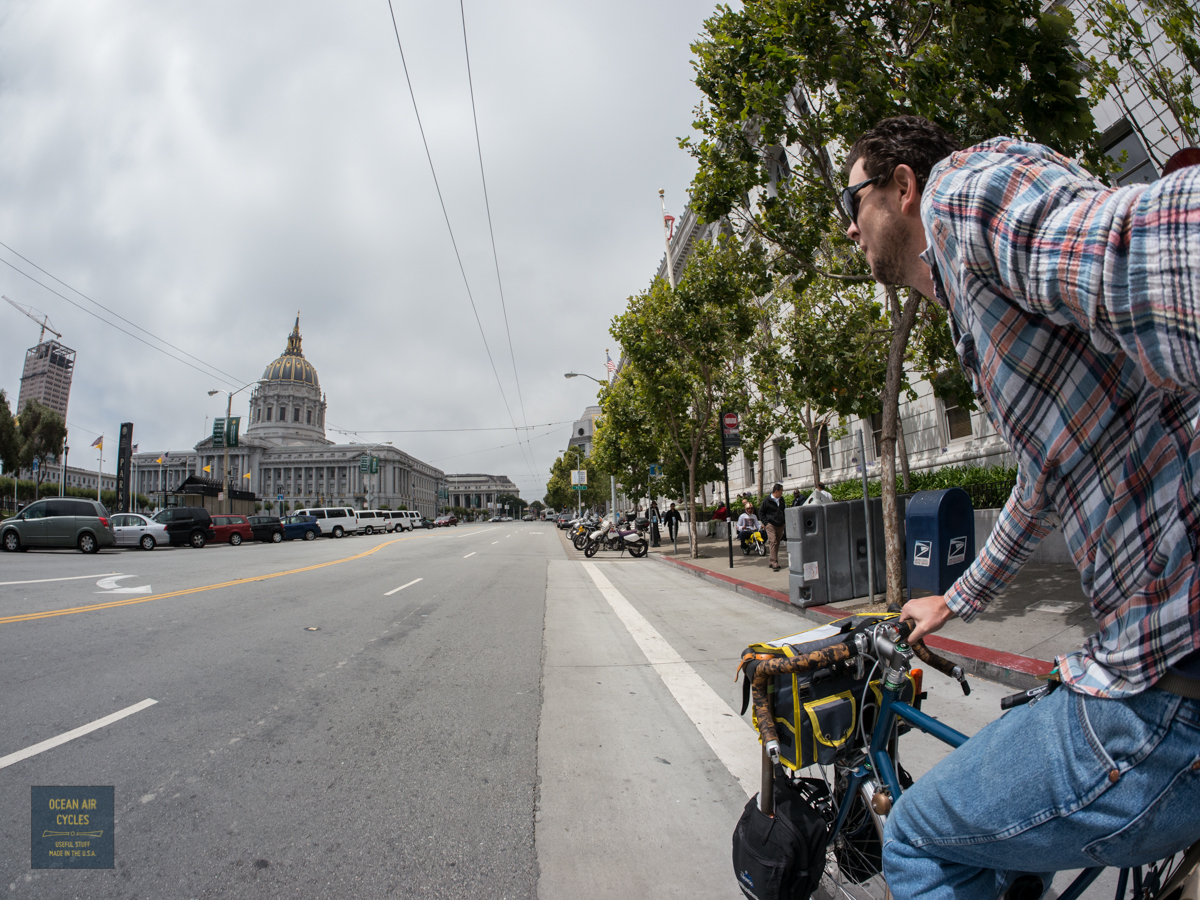
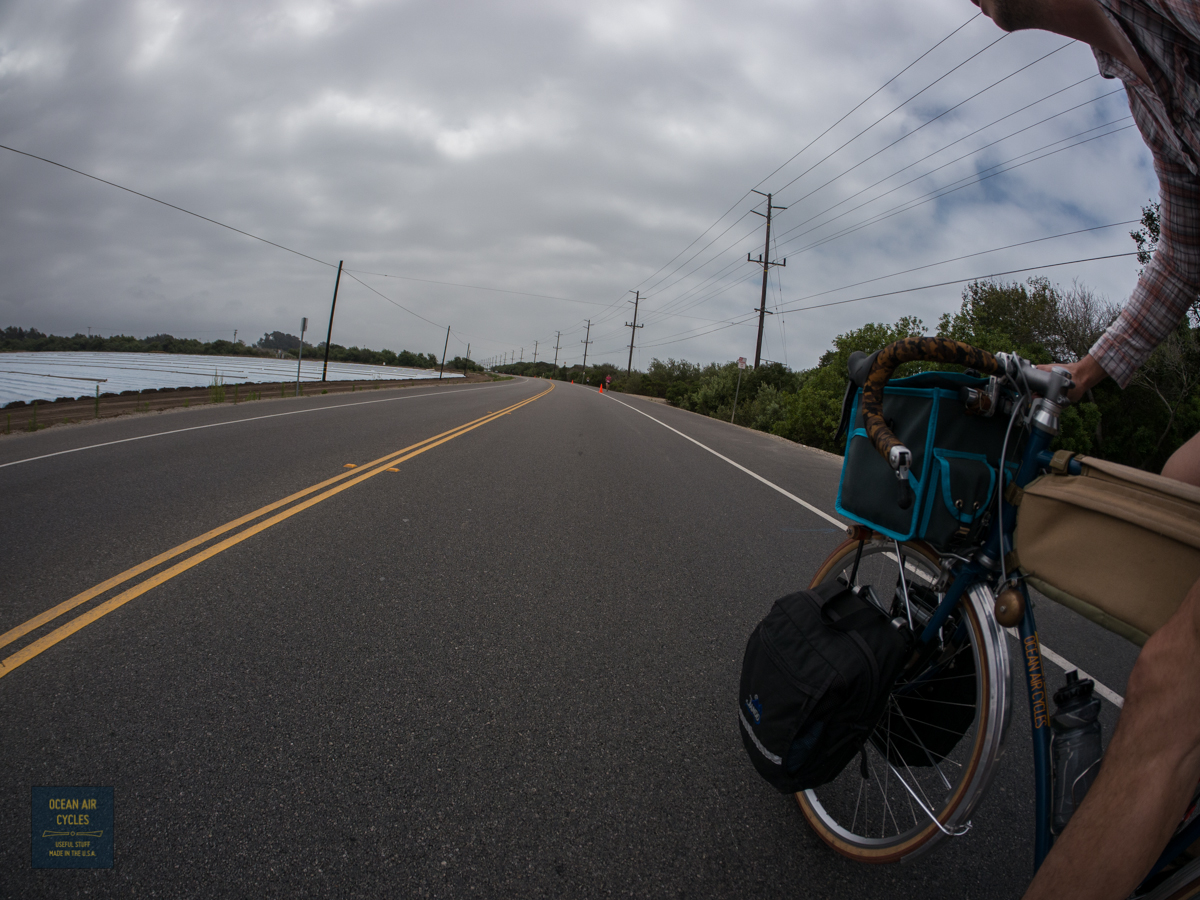
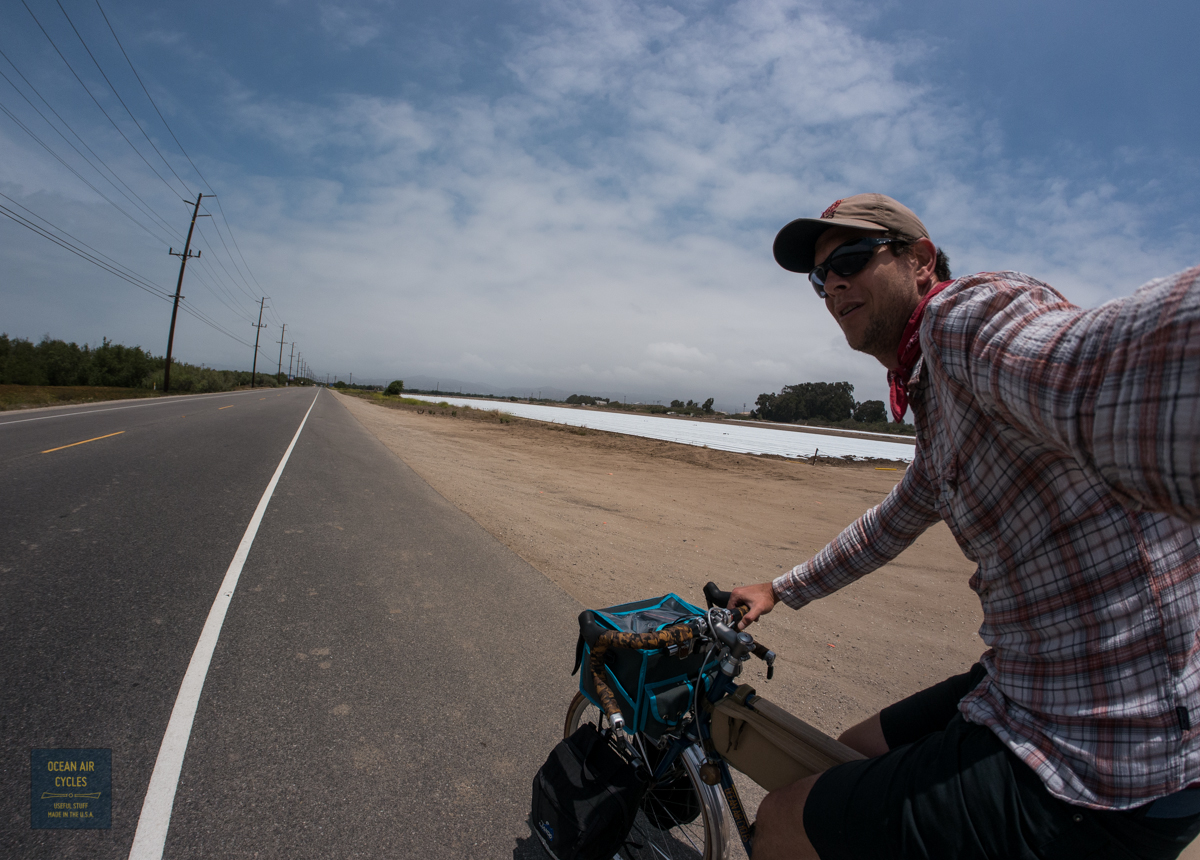
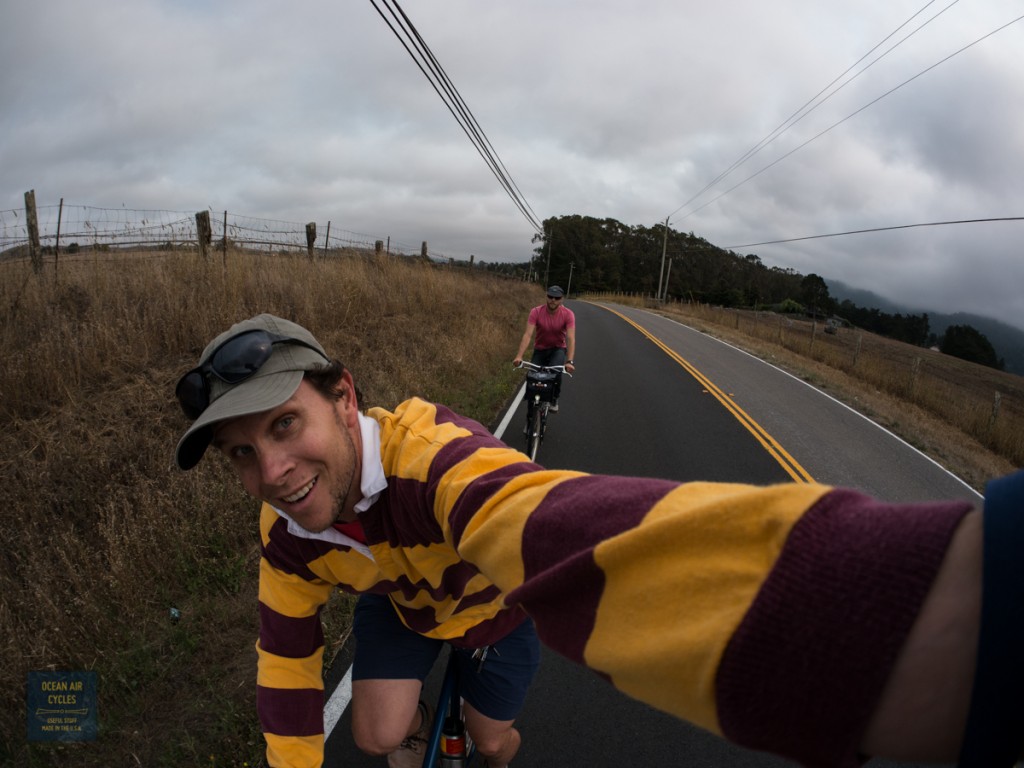
With traffic and parking being what it is in the Bay Area the decision was pretty obvious to do as much as possible via Rambler. I may not be the first, but based on impression, there are not many sales reps, or owners, making the rounds via bike, particularly the one they are promoting. I can not imagine selling something that I did not use as much as my Rambler, perfect city transport. Loaded with forks in the panniers as color samples and sales gear in the Docena we hit the City for a few days in a row. With stops at Stones, Mojo, Huckleberry, Citizen Chain and a bunch more we had a ton of interest, but no bites on retail placement. The upside was all the incredible mechanics, fans customers in waiting and new direct customers that we were able to meet, share time with and get out on test rides. The overall level of stoke was high, new friends were made, and we were able to get the word out there about our product. I know this is going to be big, really big, but getting the word out is taking time on the street. Fringe benefit was all the nerd photo ops like a real Rambler wagon from the 1960's and the 650b street address.
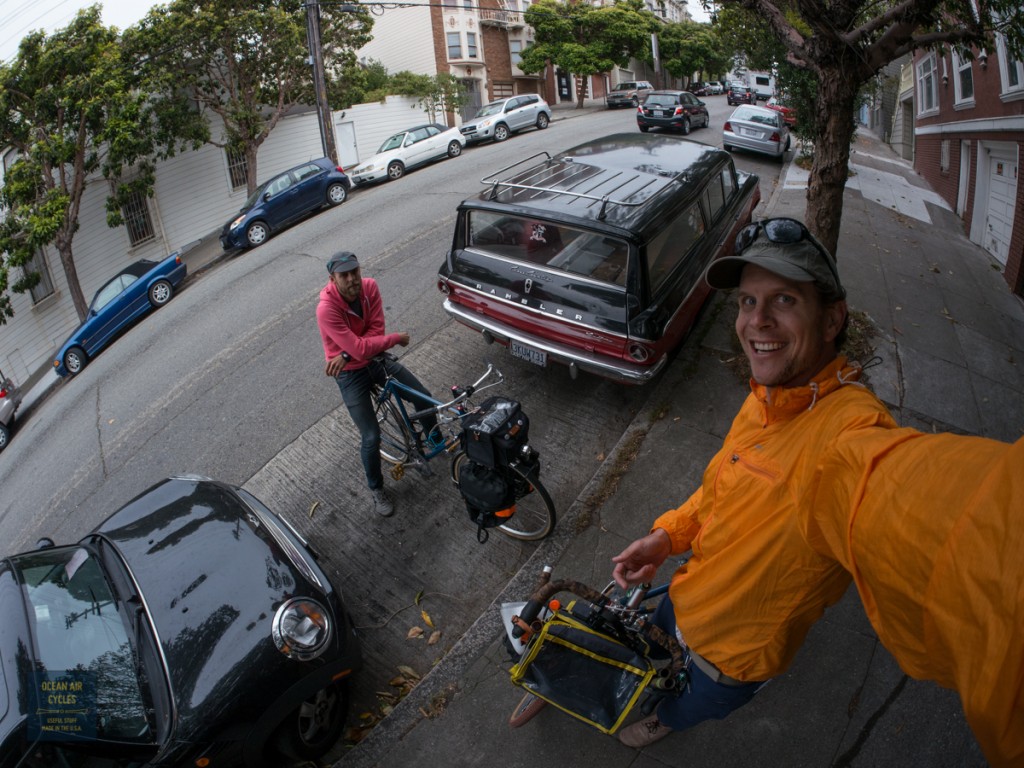

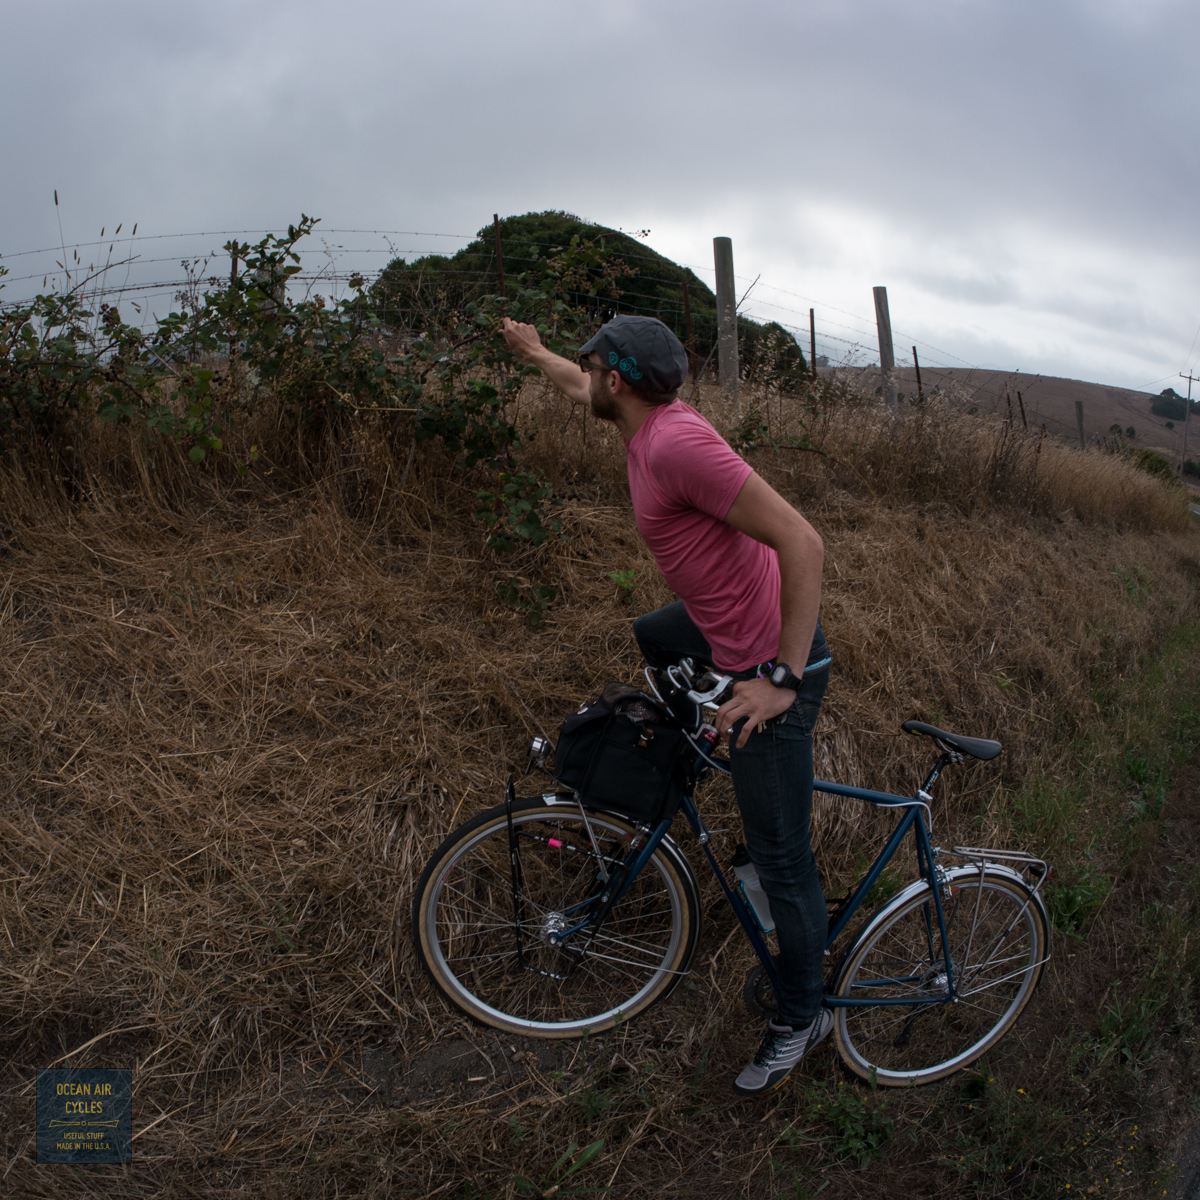
We made it out to Point Reyes Station to meet long time internet friend Mike at
Black Mtn Cycles, rode a little and scored some berries

We met some builders, saw some well thought out cargo bikes, and were able to explore a bit

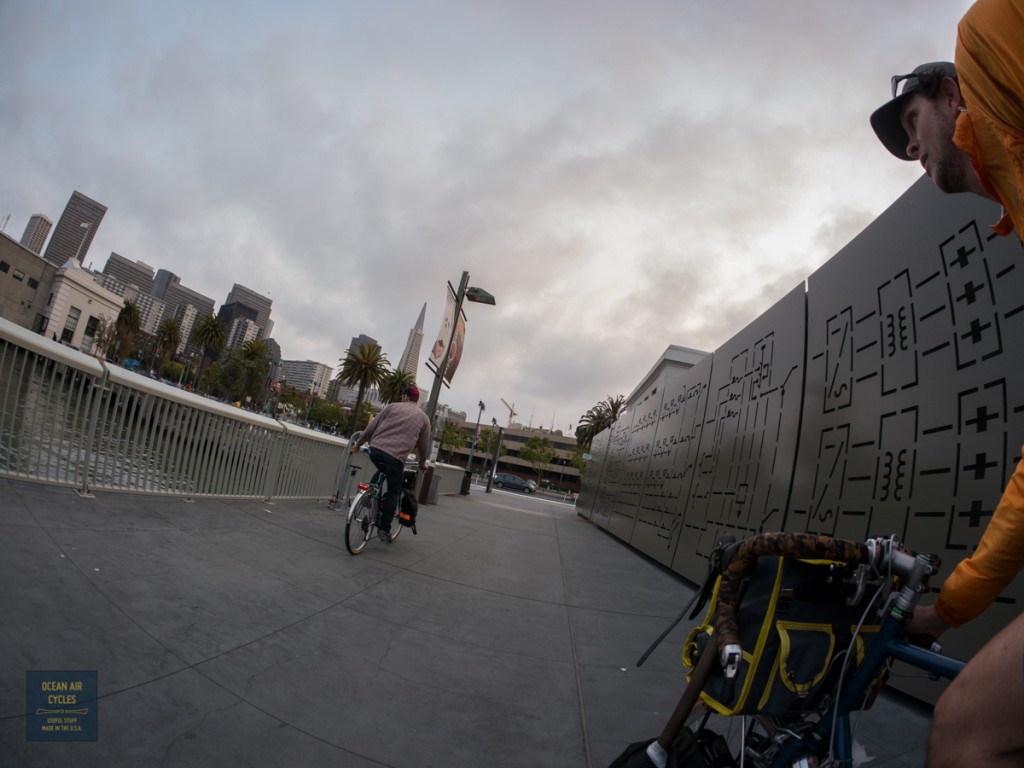

The exhibit above is on the pier at the
Exploratorium, and was fabricated by Jeff at
Monkey Like Shiny. As a kid, never in a million years would I have guessed that my path would lead me to a bicycle company of my own staying with friends that have friends designing and making wicked cool museum exhibits and the Red Bull trophies for things like the America's Cup youth races. Very stoked to have met Jeff.
On the last day I made one more round of follow-up visits around SF, it was great finally having the fog pull back for a bit, and then it was time to head home.

Thank you to everybody who helped make this trip a success, even if it was no remotely near the original plan. The San Francisco Bay area is our largest market at the moment, even with Portland and Seattle making the push, The East Bay will have the most Ramblers rolling in the coming weeks.
Pick a Color July 09 2013, 0 Comments
I am northbound this afternoon for final QC on this round of 50 Ramblers. These are exciting times, delays are almost all in the rear view mirror. By Monday the final color selection matrix will be submitted and color is going on.
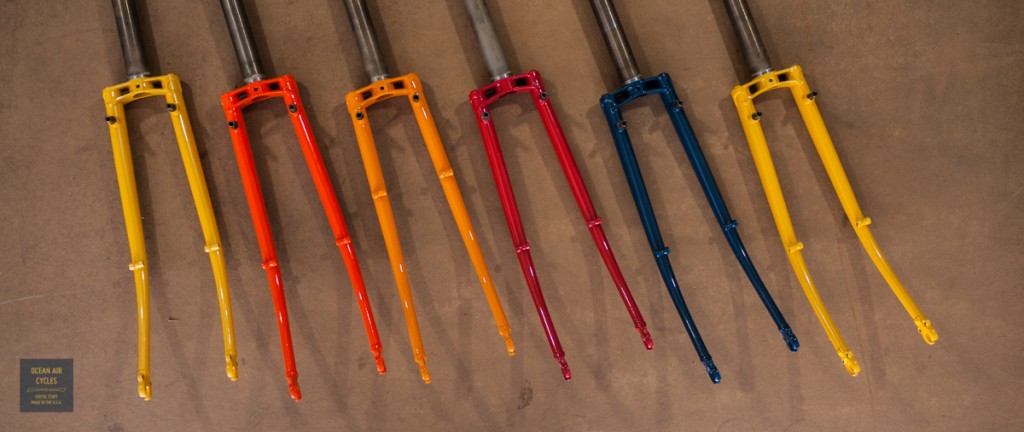
What does that mean for you? If you are planning on a
Rambler this Summer and have a strong color preference this is the time to act. There are 50 bikes in this run, and with 7 sizes, there are between 6 and 8 frame sets per size. There are currently 3 colors: US Blue, Sunflower and Orange Soda(second from left). The red may come back if there is demand, and it looks like there is. All that means that there will likely be 2 bikes per color in a given size. Once they go, it is either second choice on color or wait till winter or spring for the next round. This is the double-edged sword of color options, it differentiates the Rambler from other bikes in this market, but it also means there are limited supplies of each.
The best way to get what you want? Hop over to the
storefront and get your deposit in place.
This trip is going to be a fast one, then a second trip North later in the month. Keep an eye on the
Instagram and
Facebook feeds for updates, local rides etc.
What used to be the old standard ride every Sunday is not so standard lately. There has been a bunch going on the last couple of months and we still manage to make it to the farmer's market when we are in town, but not me alone on the bike. Today I was free to make the ride happen. It quickly became apparent that summer is in full swing, and I am no longer as punk as I was years ago. Rolling out of the neighborhood, Warped tour had moved in while I was sleeping, and I had no idea until it was in front of my face.


It looks like they are going to have a busy day inside. The whole neighborhood is plugged up. I remember when I was the drunk kid showing up in someones neighborhood, sort of, and it seems like a long time ago. Now it is my back yard (mental note, the apartment by the beach and fairgrounds seemed like such a good idea in the fall). Things thinned out a bit before finding out just how much the triathlon between me and the farmer's market was clogging things up. On the plus side I managed to poach a "closed" road and get the the whole lane for a few miles.

Mission accomplished with a week's worth of fresh food in the bags, the sun was coming out and time to get home.

This is about as good as it gets. It lasted a few miles before diving back into the fog, and a completely plugged up neighborhood. Cars backed up over a mile headed to the concert and the highway plugged as usual on a Summer Sunday.
One of those days I am so happy Home is by the beach and I can ride a bike just about everywhere. I hope you made it out this weekend, solstice and all, it has been quiet on the web, and that is probably a good thing.
The new
Busch and Muller Luxos dynamo headlights are setting a new standard for high-powered LED lighting, both in brightness and distribution of light. The Luxos U takes it one step further with a remote switch and USB charger.
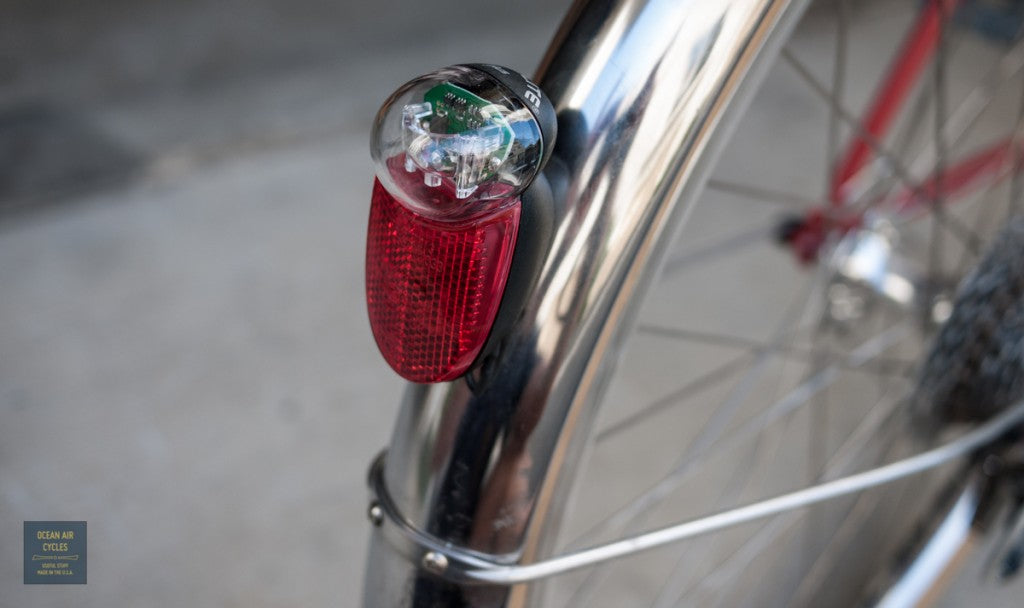
All of the Luxos lights are able to be paired with a dyno powered tail light. The catch is that the tail light cannot be grounded to the frame or fender through the mounting screw. The will cause a fault circuit that detects a problem in the tail light. There will be problems with the functionality of the light and possible damage to the circuitry. This is a is a challenge because most of the popular fender mounted tail lights currently available offer the option of grounding through a wire or the mounting screw. My current favorite for both function and looks has been the
B&M Seculite plus.
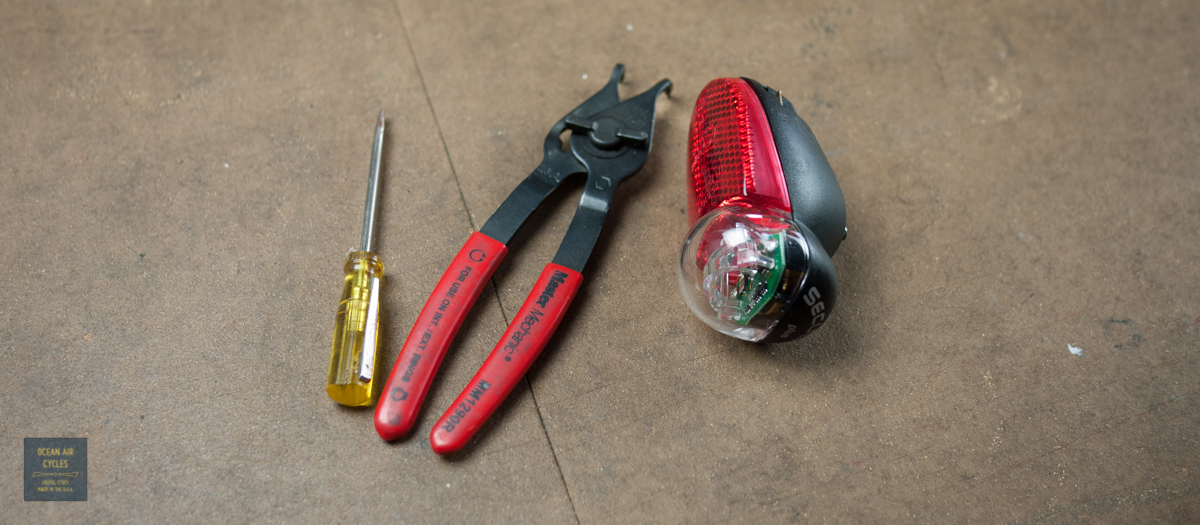
I had already gotten my sample Luxos wired up and going when I became aware of the issue with a grounded tail light. At first I was a little bummed, then the challenge was set, and I decided to figure out how hard this was going to be to fix. It turned out to be fairly simple, and I have outlined the steps here for you.
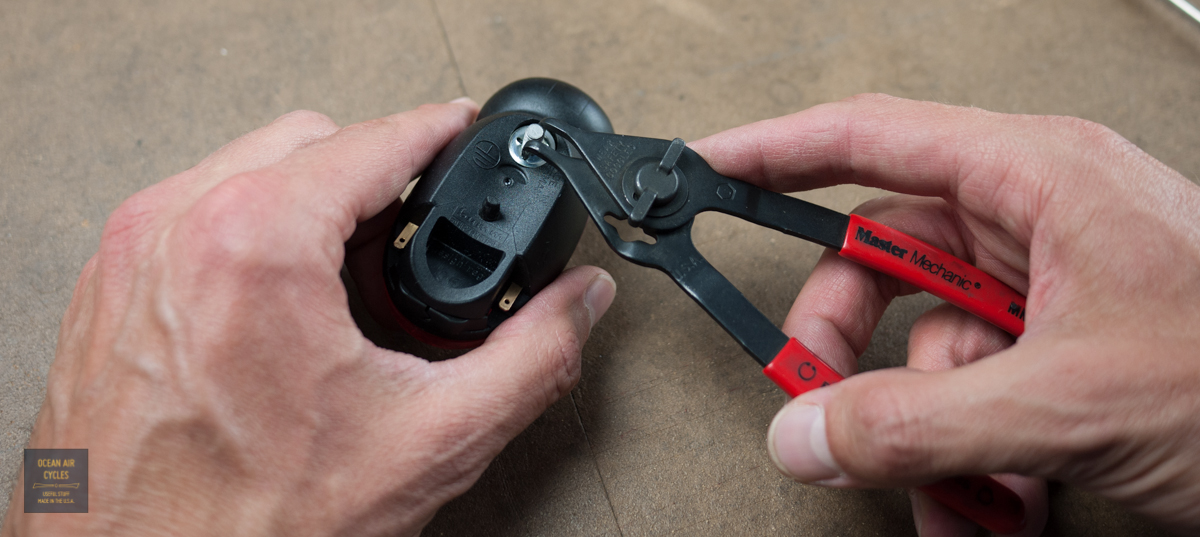
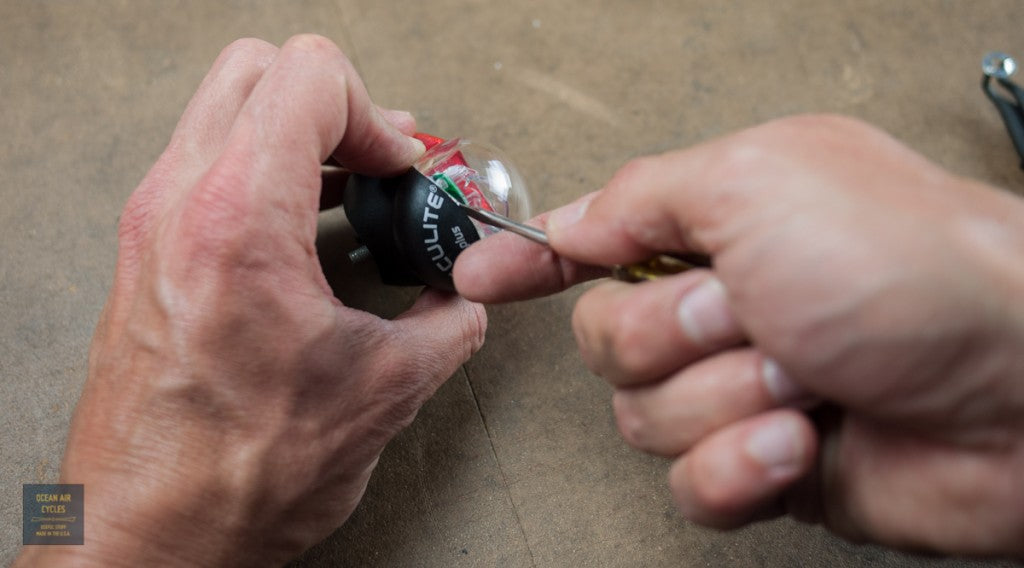
You will need a few basic tools: small flat head skew driver and small wire cutters will get you there, cir-clip pliers and a small Phillips head screw driver help make things a little easier.

The first thing I did was remove the nuts and washer from the mounting screw. The first is the standard hex mounting nut. Then there is the round washer style nut that holds the bolt to the light body
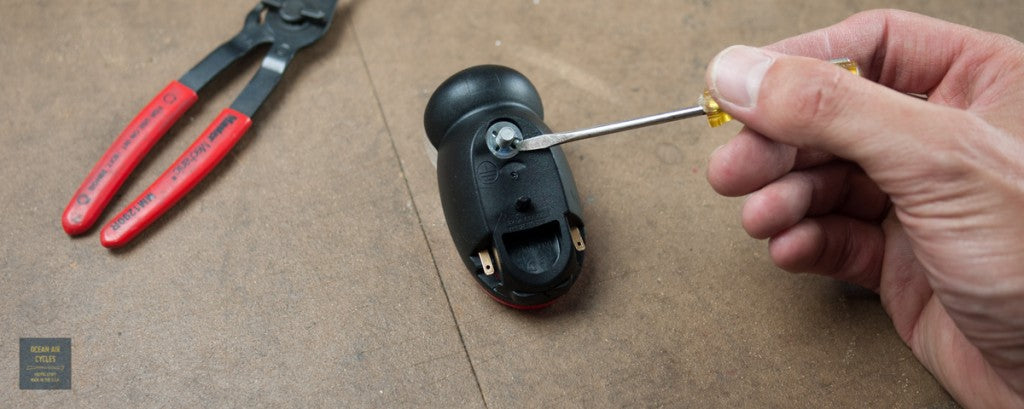
You can get this one off by carefully pushing it around counter-clockwise with the tip of your flat head screwdriver, but the cir-clip pliers made it a little easier.

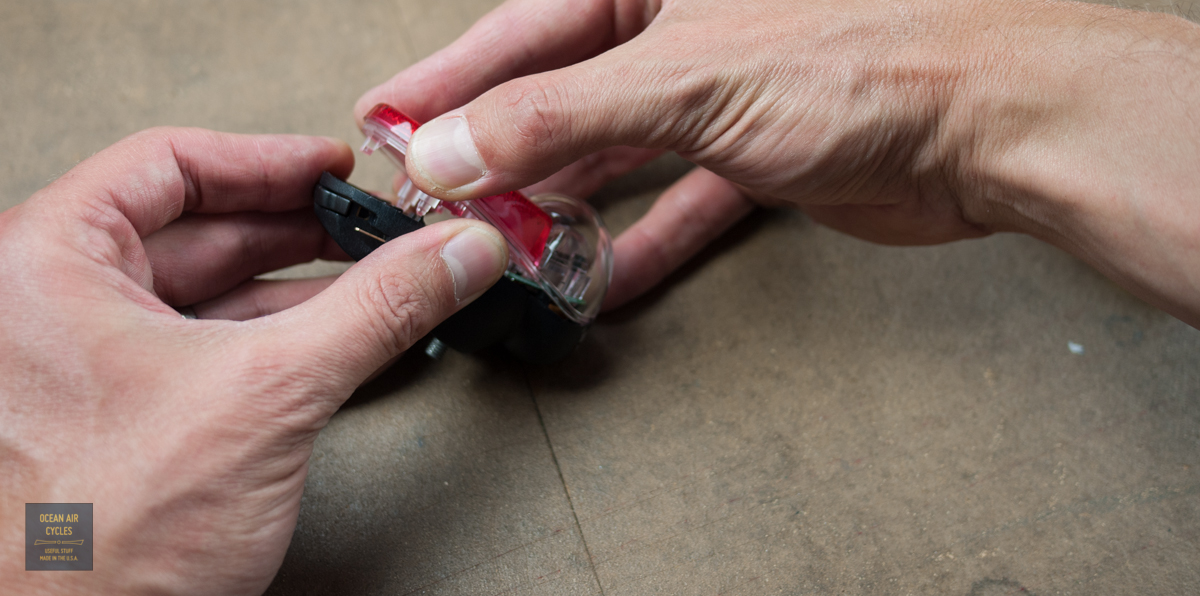
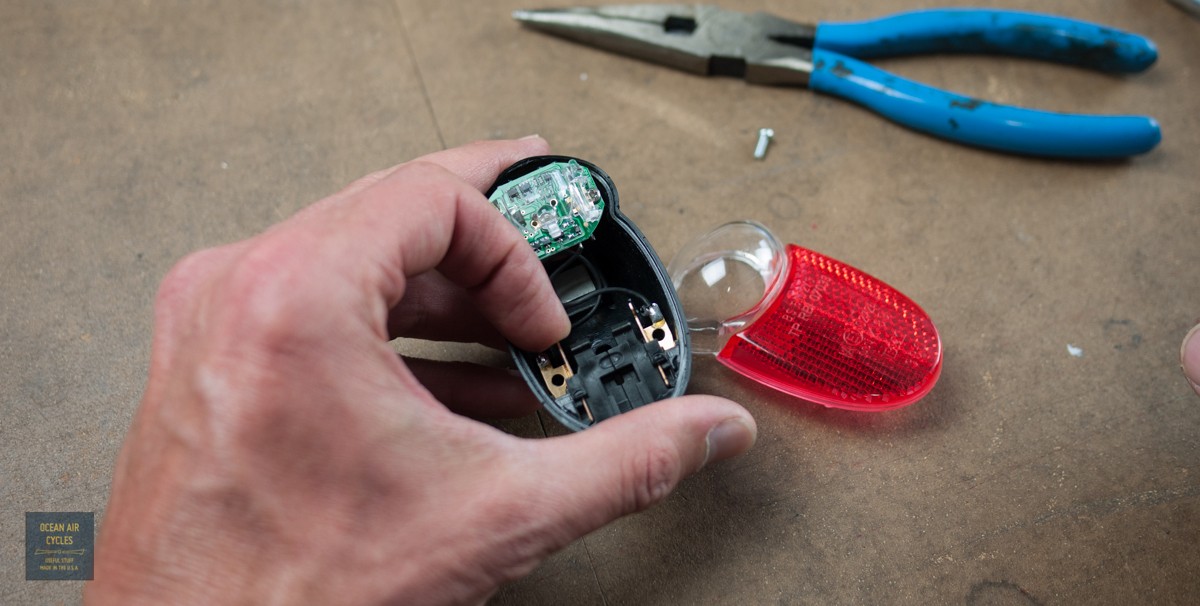
Once done you will be opening the light housing. Carefully work your way around the edges, starting from the bottom. The two halves of the housing are a press/snap fit together and can come apart safely as long as you are careful. I inserted the tip of the screwdriver into the thin gap between housings and lightly twisted to get it going.
As you approach the top you need to be extra careful. This is where there is a small tab that indexes the two halves together. At this point I stopped using the tool and gently separated the two halves with my hands

Once opened, you can easily see the above mentioned plastic tab.

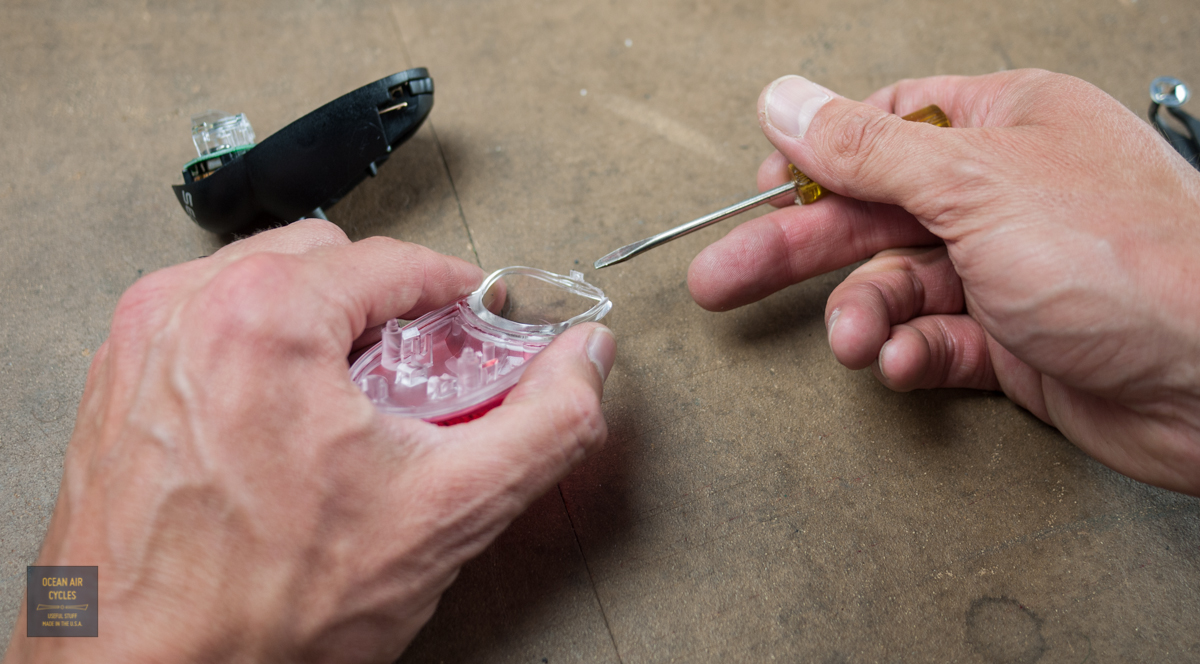
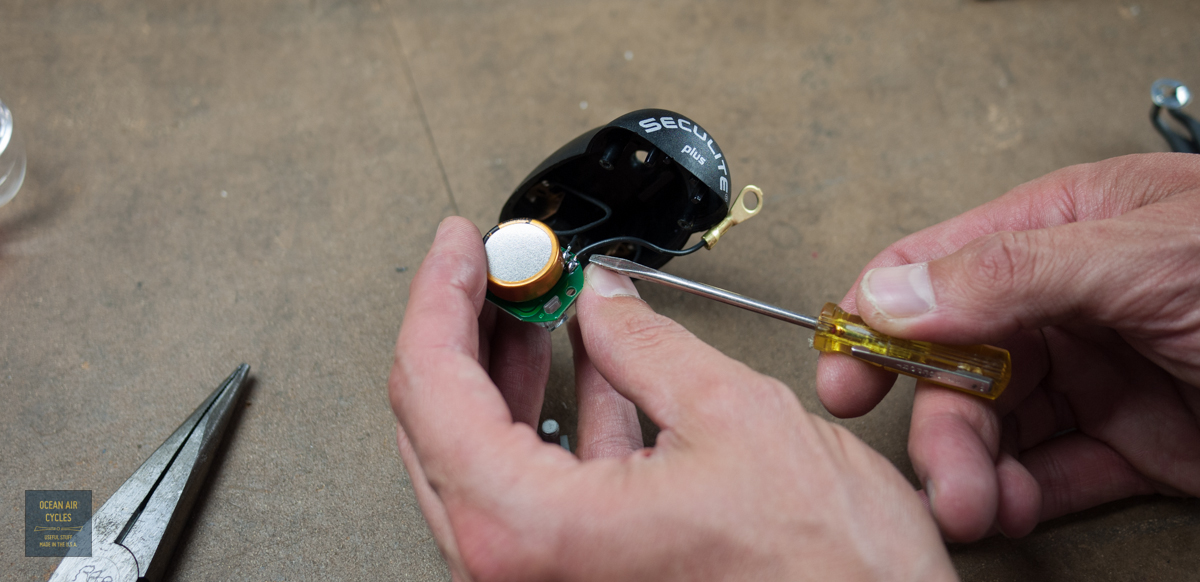
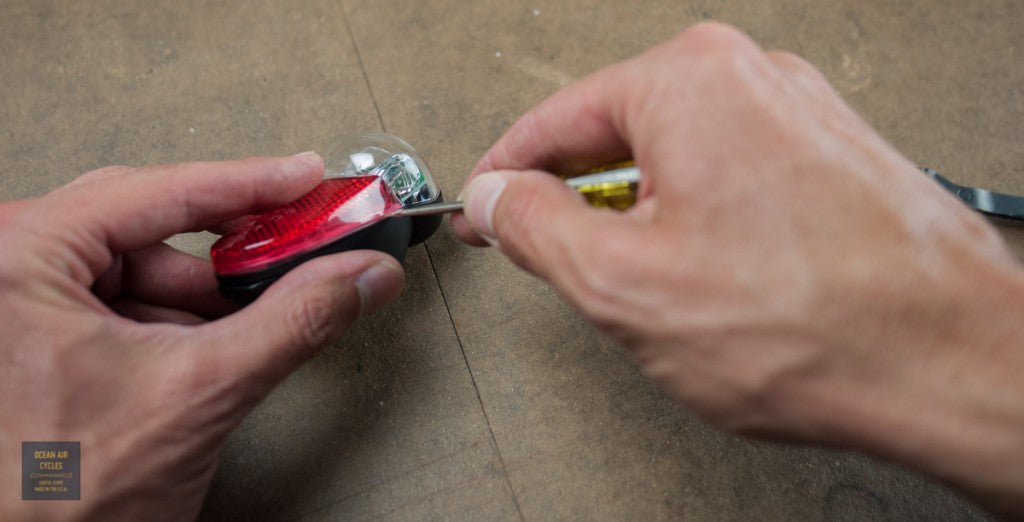
Moving on to the grounding of the light. The Seculite plus has two possible grounding paths. For most common installations involving a B&M headlight you will be wiring the tail light tot he front with a paired or co-axial conductor. The other grounding path is through the mounting screw. This is only used in cases where the frame of the bike and associated hardware are used as the grounding path. looking at the circuit board you can see both of the internal grounding wire options on the left side. The single wire on the left is for the positive lead.
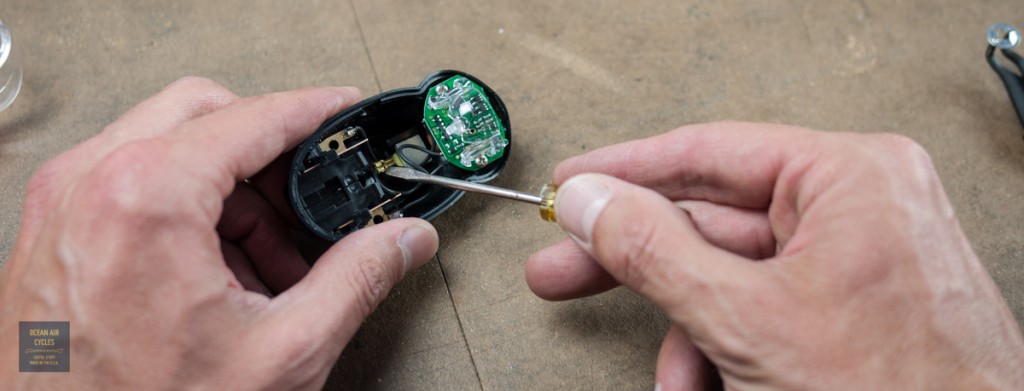
The grounding wire to the frame mount needs to come out. It is connected to the mounting bolt with a ring connector. I was able to get the bolt out of the housing with the LED circuit board in place. If this is too tight for your comfort, you can remove the two Phillips head screws securing the board to the housing and you will then have plenty of room to work.


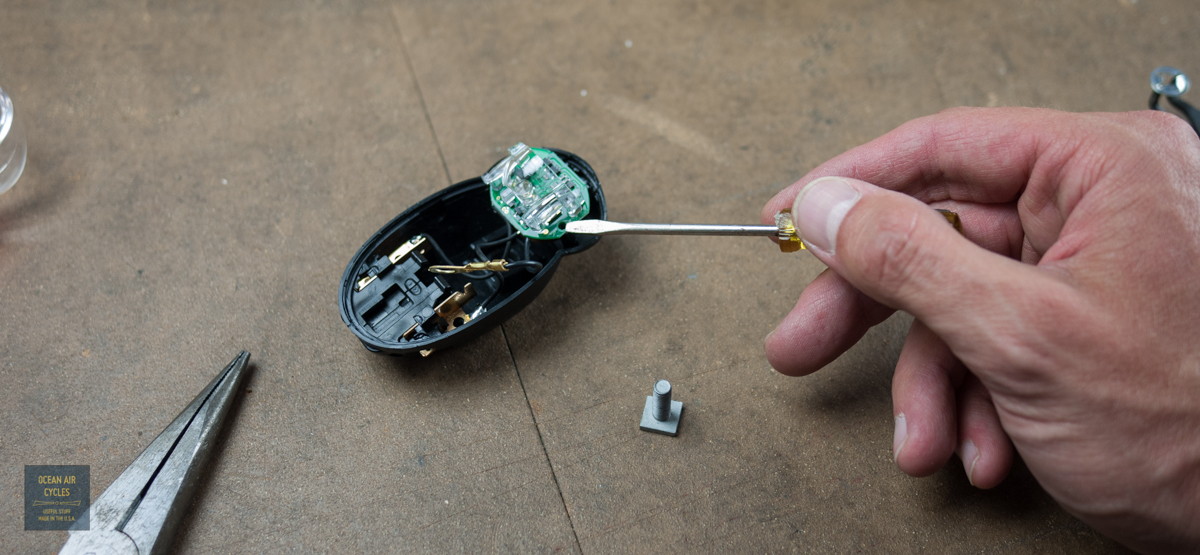
With the board out, you will want to snip the wire with the ring connector as close as you can to the board.
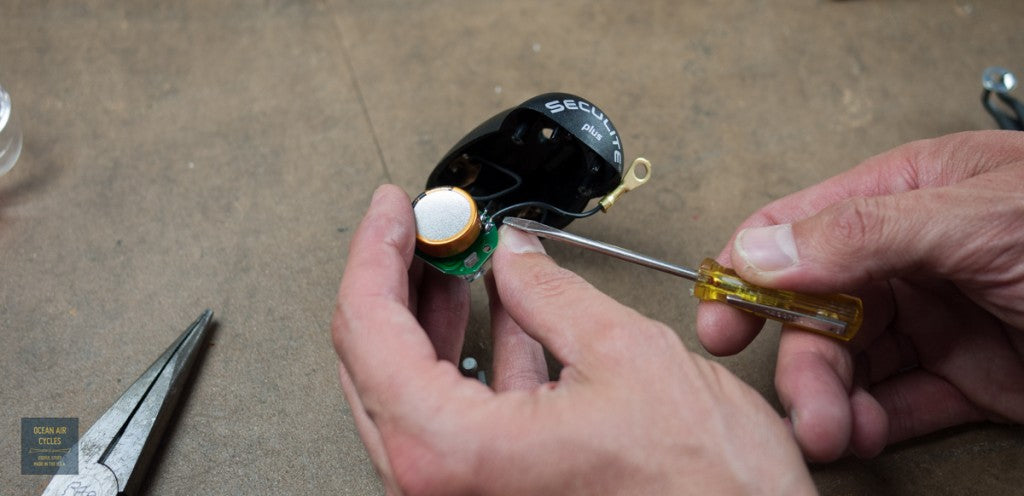
In theory you could leave the connector inside and isolate it, wrap it in electrical tape or shrink wrap, so that the process could be reversed. For this light I am pretty certain that it will never be wired with a frame ground path, so I snipped. While I had things appart I wired the Seculite into the Luxos U and confirmed that everything was as hoped.

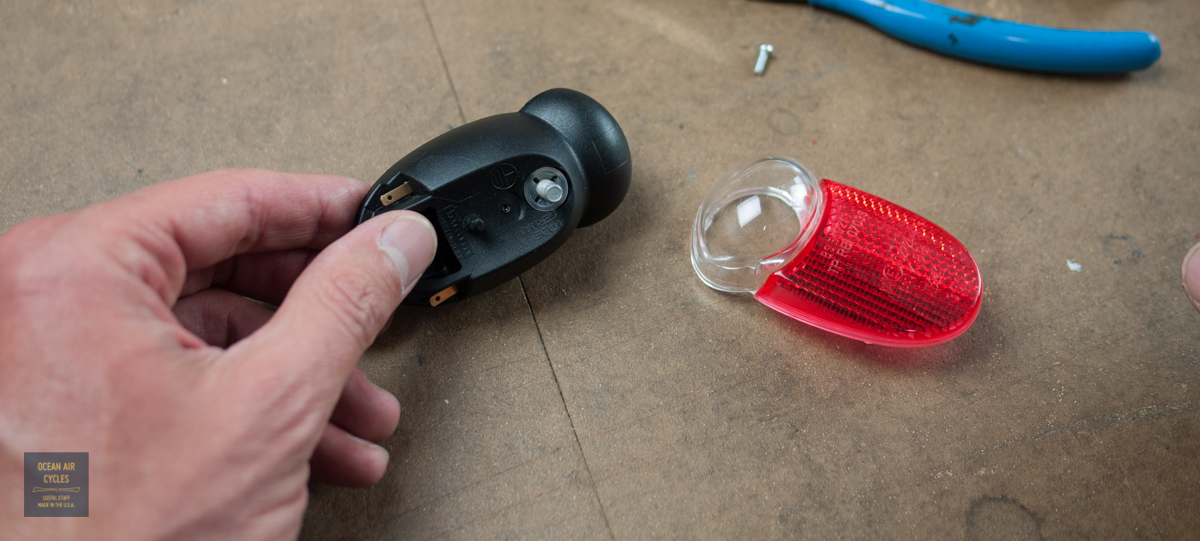
The re-assembly is a pretty straight forward reversal of the above steps. Double check that the remaining wire connection points are fully seated in the housing.
Insert the mounting bolt and fasten in place with the thin nut.

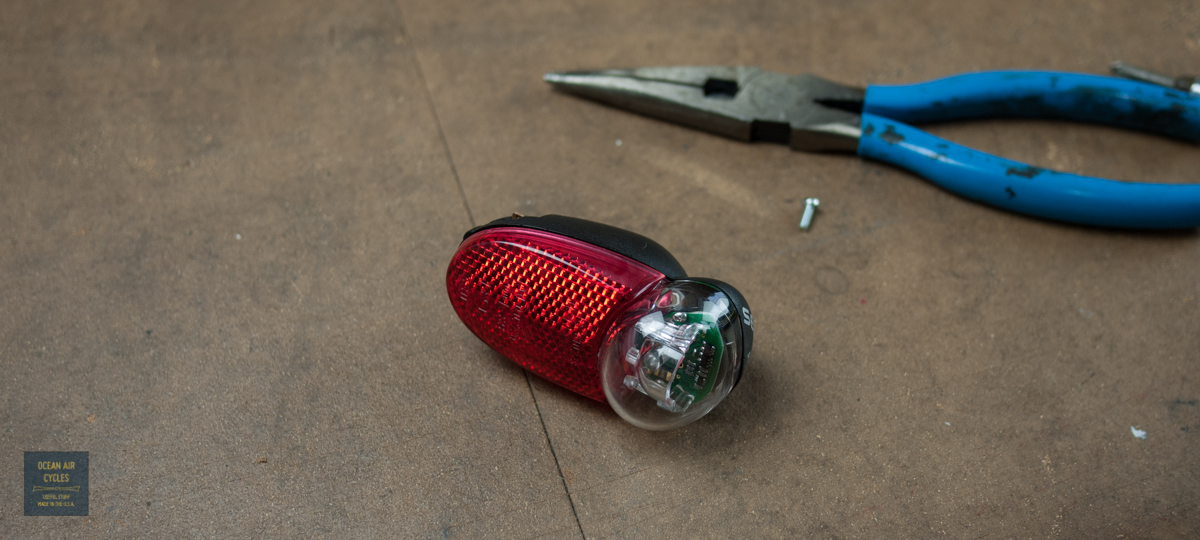
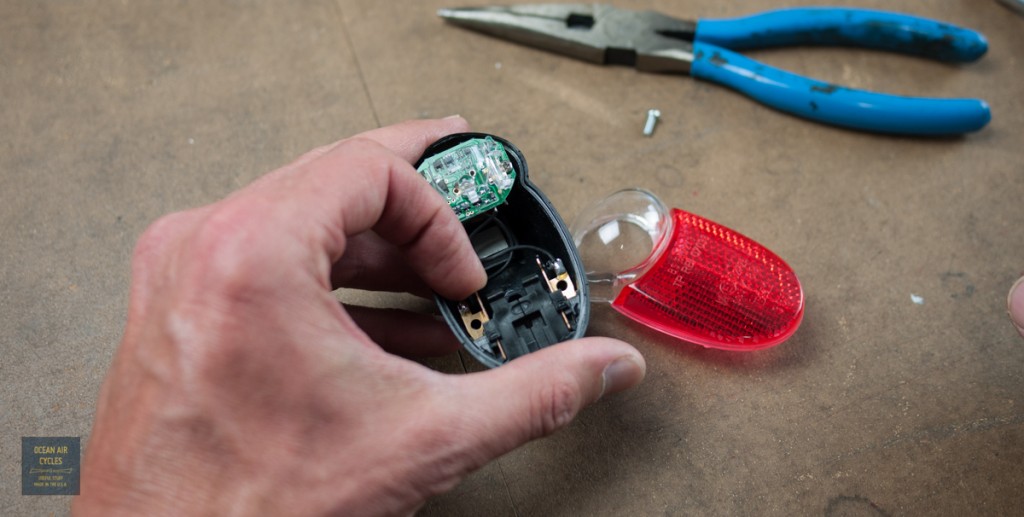
Carefully align the two housing halves and squeeze together, they should snap into place and the light is ready for wiring and mounting to the bicycle as usual

For the home mechanic that is comfortable with electrical work this is not too bad of a project to take on. If you feel that this is above your skill level, and want a Luxos Seculite combo from us, I am more than happy to perform this procedure for free.
 A fully bike powered and volunteer driven event. There new space is awesome and will get them the exposure they need to grow.
 The next steps in local advocacy have been a move up to organizing at a County level. The City of Ventura has been doing pretty darn good, as have some of the other 10 cities in our county. The trick will be learning from each other and developing tools that can be used to improve not just all 10 cities but the unincorporated portions of the county as well. There is no reason why Ventura County as a whole should not be setting the standard for human-powered transport. We have tight-knit communities, industry and year round awesome weather.
As a Coalition there has been one official meeting. We all came away inspired, and with a few questions to answer as we define our path. The first is if we should be Bicycle only or "Active Transportation"? After that comes the volunteer based efforts of setting up Web Pages, Mission statements, by-laws, organizational structures, and pushing on to things like County wide maps and governmental activism. All of this would never have made it this far if not for that hard work of Rachel at VCCool, Thank You.
I am reaching out to all of you that have ridden this path before. Any advice or experiences you would like to share are welcome. We will need lots of help, everything from the above mentioned web designers to fundraising, shops and people who work within the city and county infrastructure. The next meeting will be Thursday September 26 6:30 P.M. at the Fillmore High school. I hope to see some of you there.
The next steps in local advocacy have been a move up to organizing at a County level. The City of Ventura has been doing pretty darn good, as have some of the other 10 cities in our county. The trick will be learning from each other and developing tools that can be used to improve not just all 10 cities but the unincorporated portions of the county as well. There is no reason why Ventura County as a whole should not be setting the standard for human-powered transport. We have tight-knit communities, industry and year round awesome weather.
As a Coalition there has been one official meeting. We all came away inspired, and with a few questions to answer as we define our path. The first is if we should be Bicycle only or "Active Transportation"? After that comes the volunteer based efforts of setting up Web Pages, Mission statements, by-laws, organizational structures, and pushing on to things like County wide maps and governmental activism. All of this would never have made it this far if not for that hard work of Rachel at VCCool, Thank You.
I am reaching out to all of you that have ridden this path before. Any advice or experiences you would like to share are welcome. We will need lots of help, everything from the above mentioned web designers to fundraising, shops and people who work within the city and county infrastructure. The next meeting will be Thursday September 26 6:30 P.M. at the Fillmore High school. I hope to see some of you there.