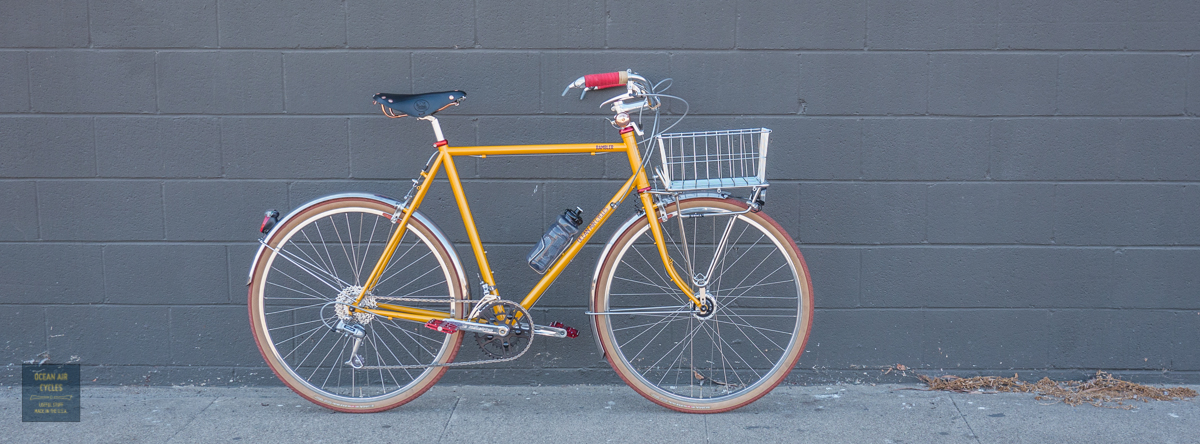
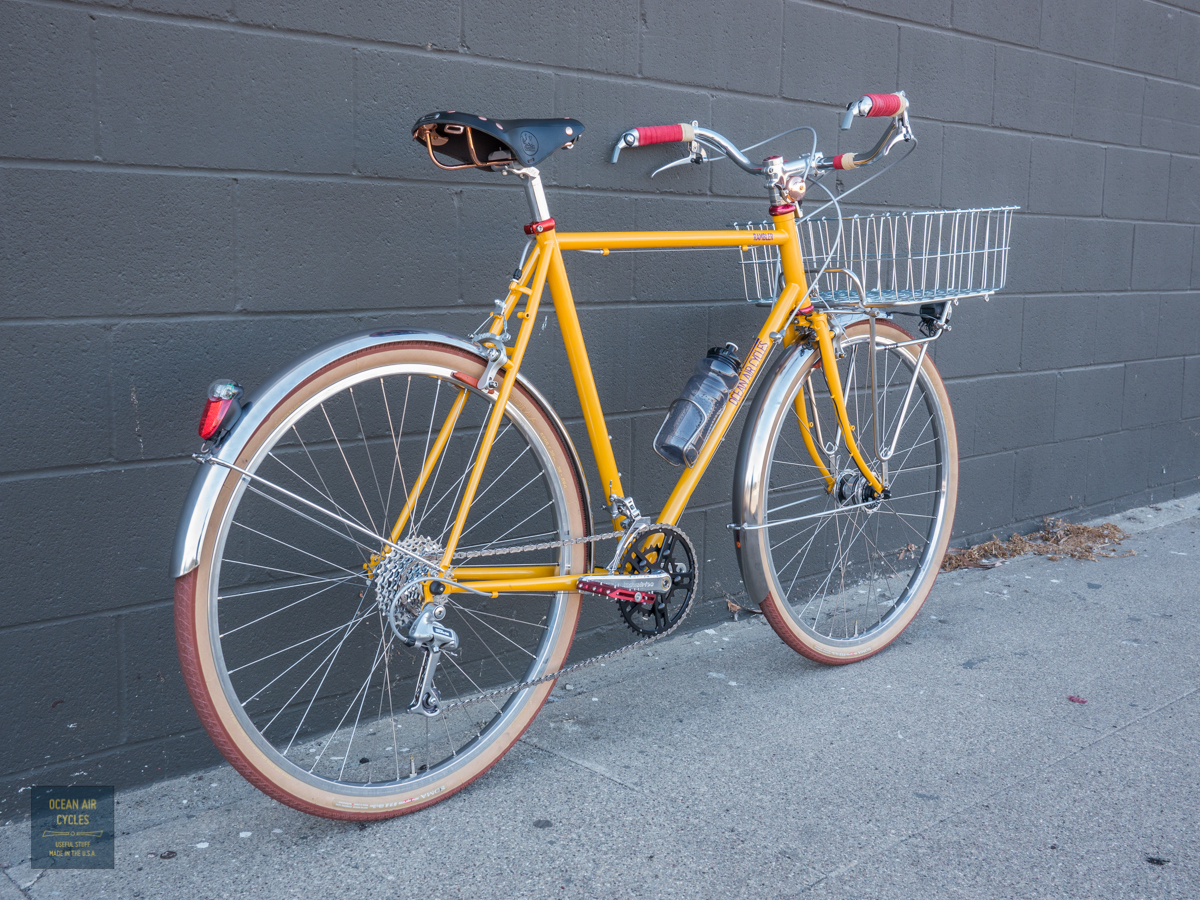
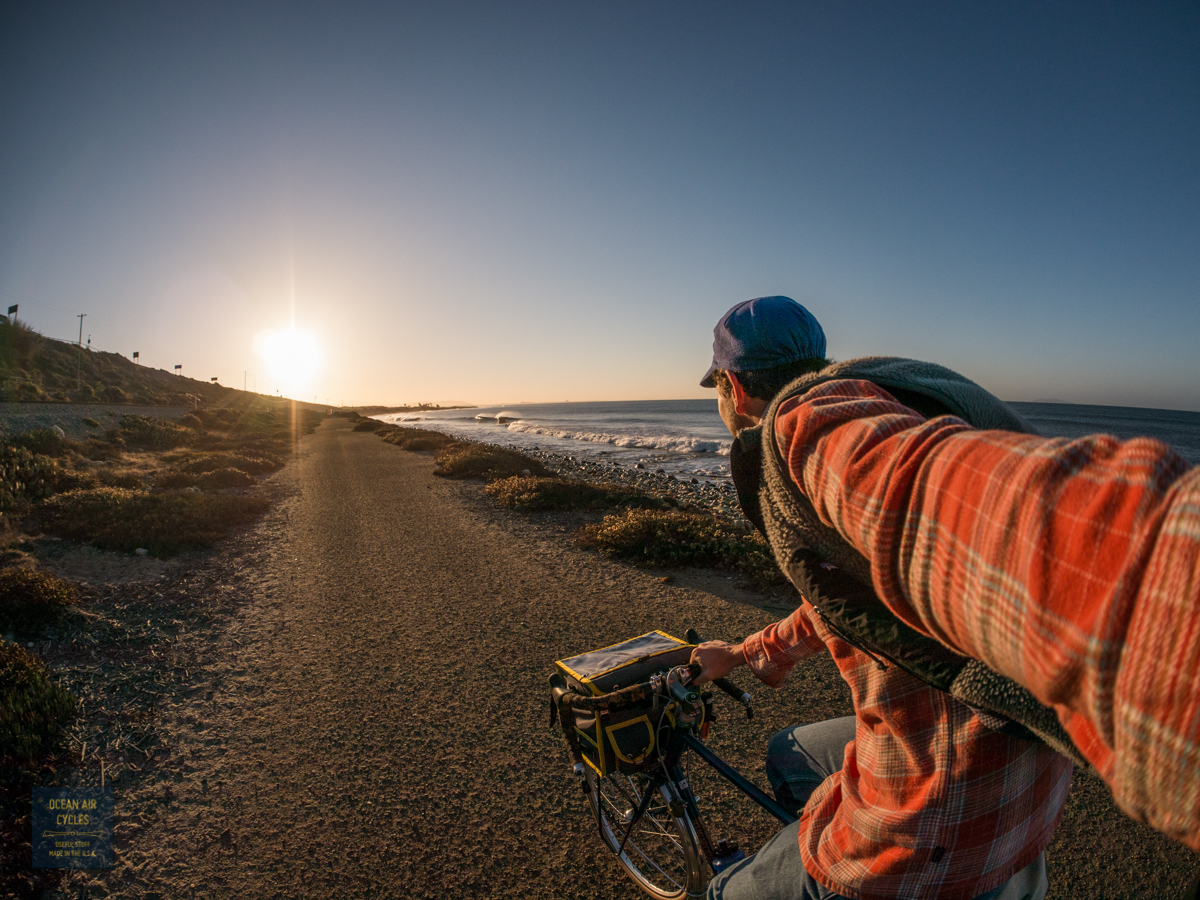
One of the most heard questions around here is “how do I get a complete Rambler, as in ready to roll?”. There are a few ways to answer that….
The easiest way is to have your local Bike shop contact us, and you can buy the frame through them, or you can purchase the frame set directly through us, and have it drop shipped to your local bike shop. If they have any questions on assembly or specifying the component choices we are more than happy to help them out. Our stocking dealer in Seattle is Free Range Cycles, and Velo Cult in Portland has had at least two Ramblers pass through their work stands already. Likewise if you are, or know a local shop, that would like to become a dealer do not hesitate to contact us for a dealer agreement.
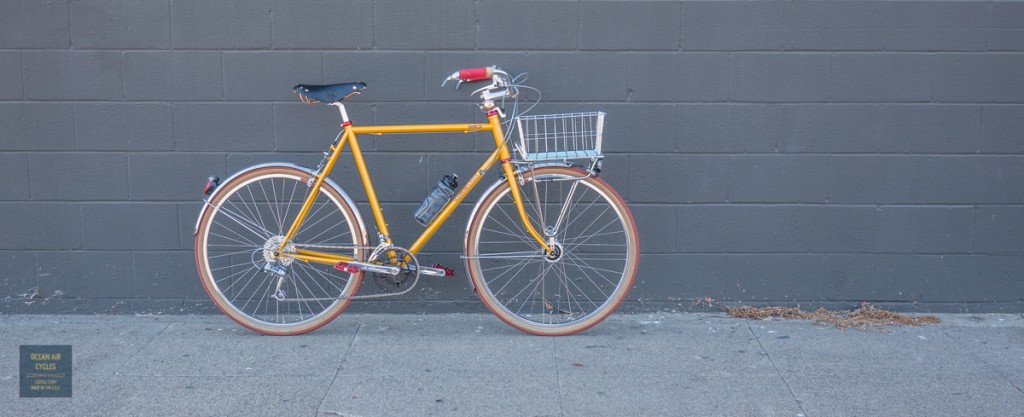
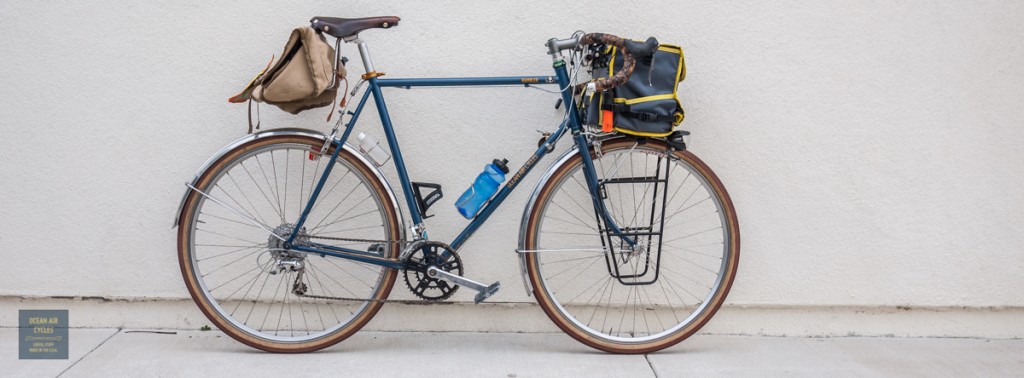
The other way to get a complete build is directly through us. We will work with you do get the perfect fit, for both you and your budget, to ensure that you are rolling on the Rambler of your dreams. Once we get through the size and color aspects, the component specification is next. Do you know if you would prefer the “Porteur” or “Rando” build? We can help. Likewise, many of the details like lighting systems, racks and bags will depend on how you most likely will be using the bike. Complete builds average between $4000-$5000 but can go higher or lower depending on what you need and want.
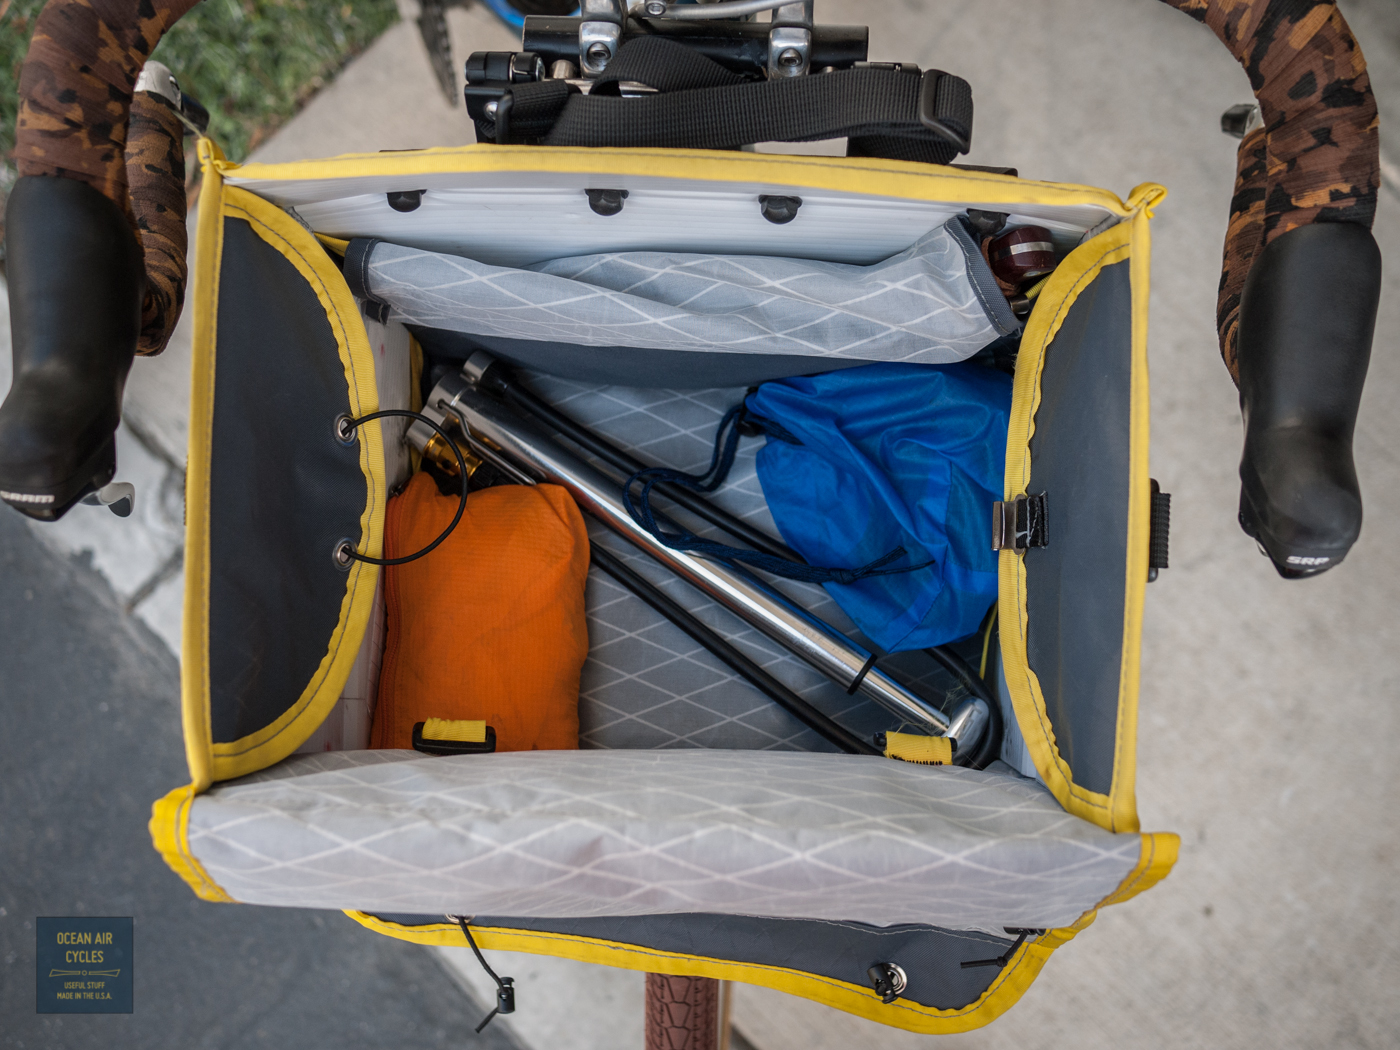
We are still working on the details of our house brand of luggage, but in the interim we can also facilitate custom luggage through Swift Industries, our fabrication partner and craft builder in Seattle.
 Thanks for your continued interest in the Ramblers, and we look foreword to getting more people rolling soon.
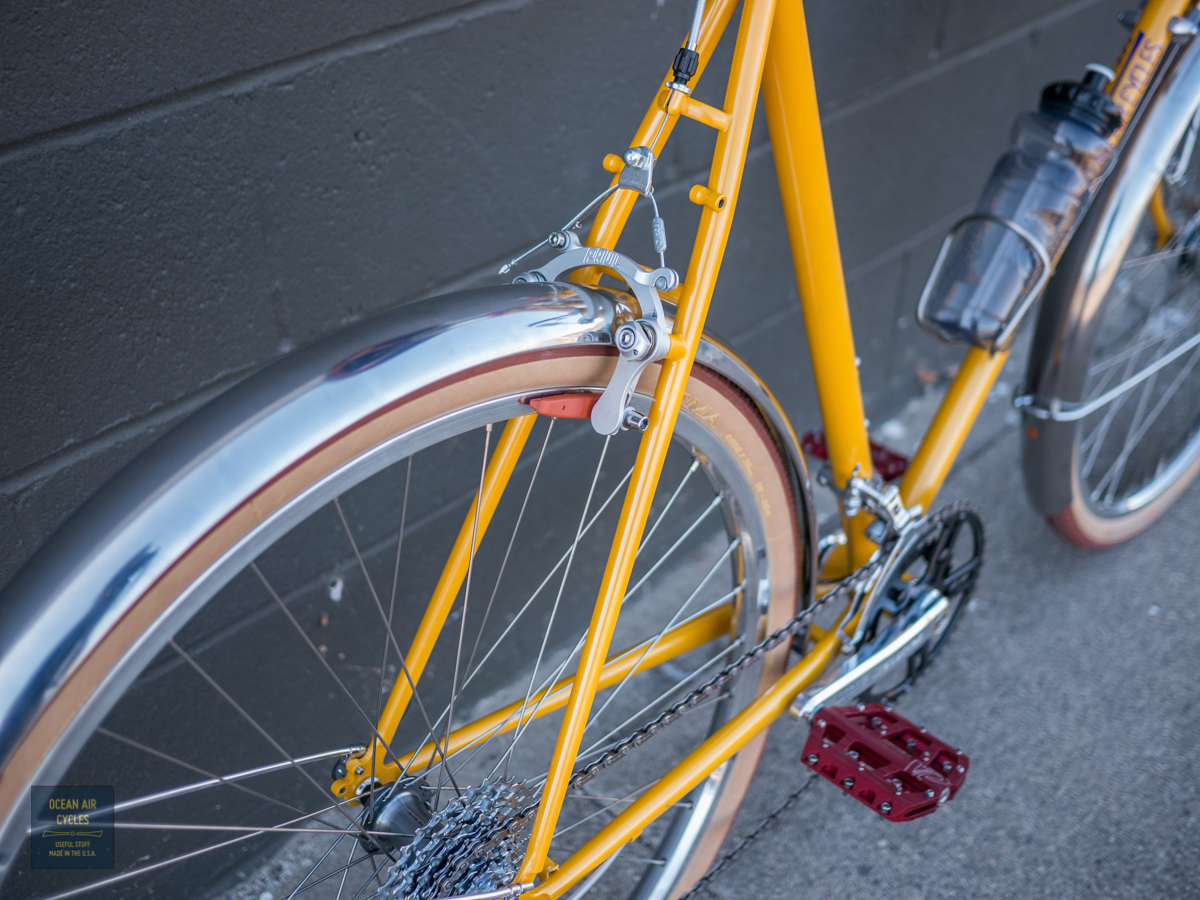
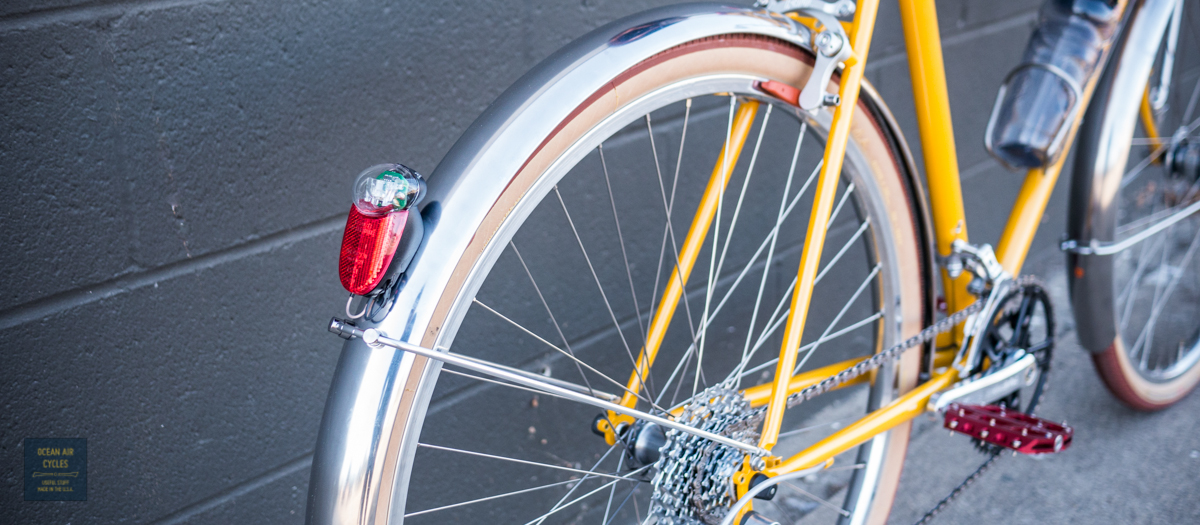
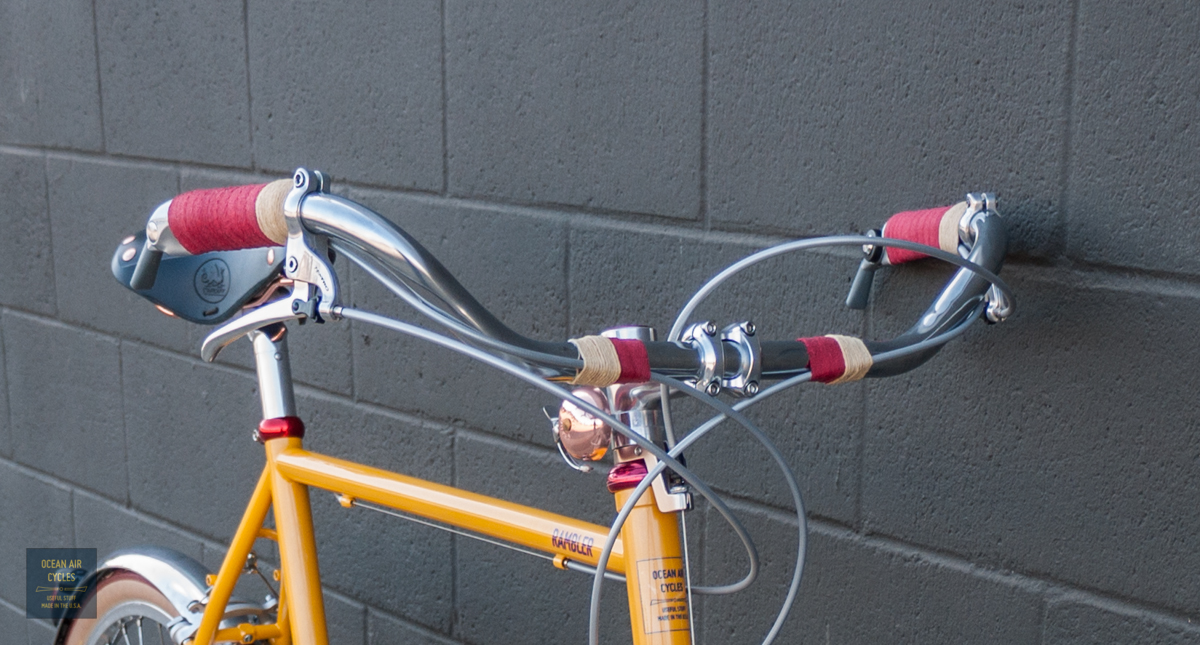
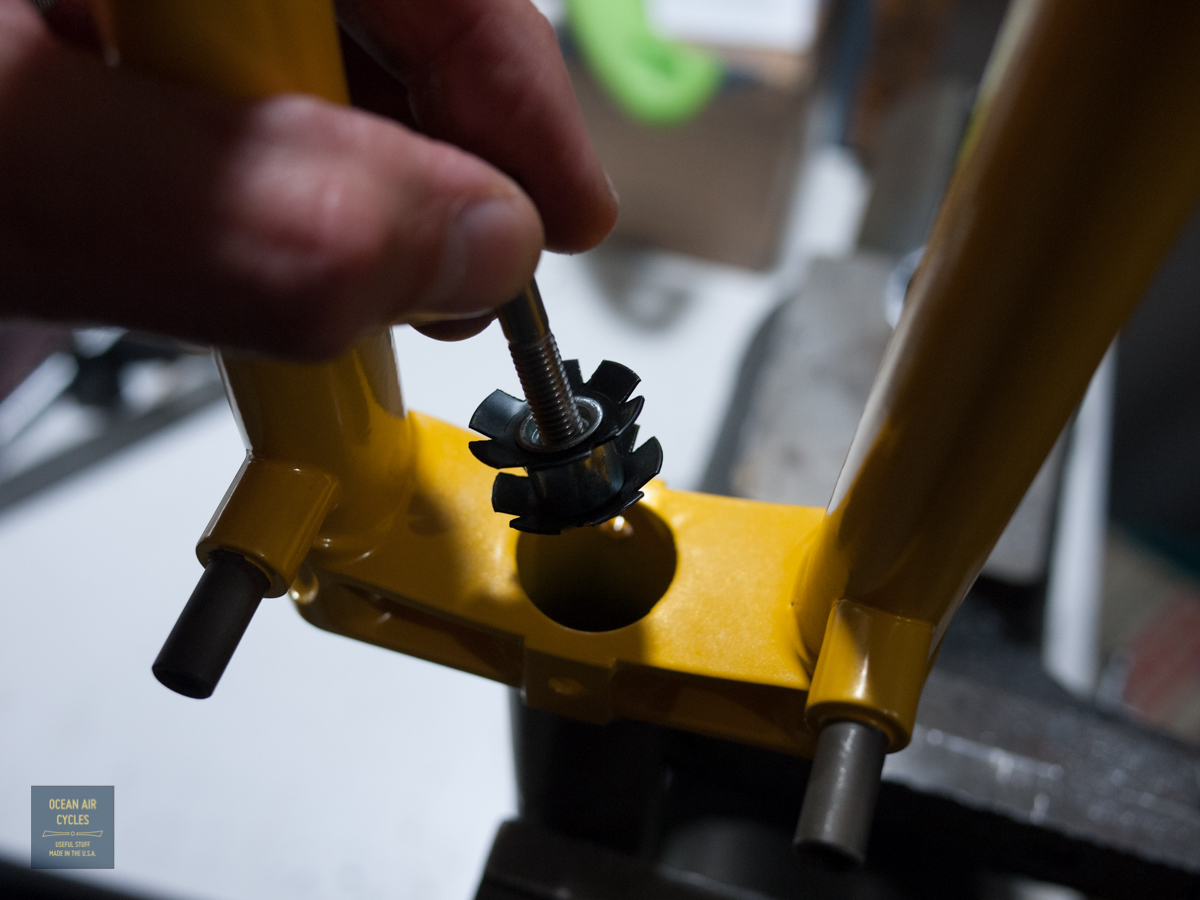
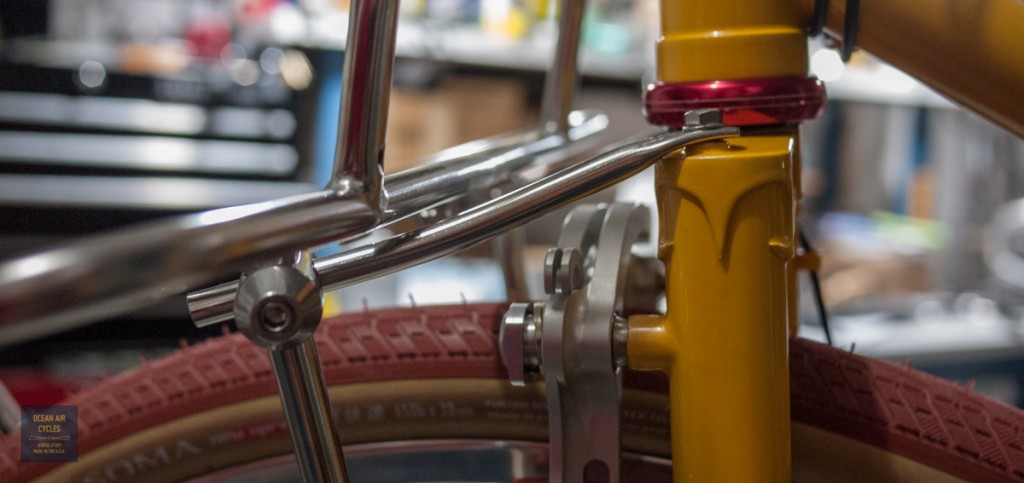
There are more than a few ways to mount the front fender to the crown of the fork, ranging from the modern angle bracket to the vintage daruma bolt. Most of the common solutions involve a joining piece of some sort that holds the fender to a bolt running through the fork crown. All of these work well with Ramblers and are safe and good when properly employed.
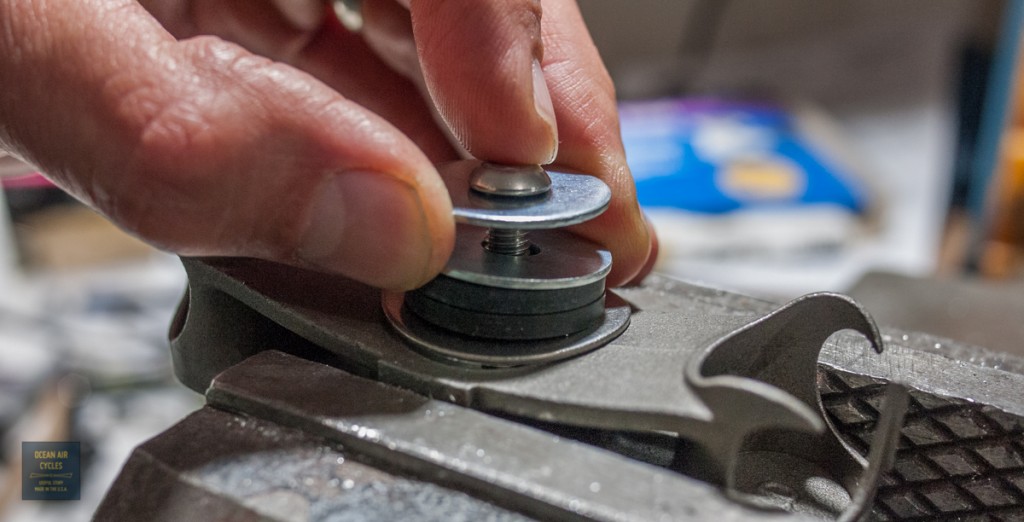
I have been using an alternate method for a while now with great success. Common star fangled nut is mostly used to preload the headset in threadless steerer assemblies. This same nut can be inserted into the bottom end of the steerer and used as a fender attachment point as well. The bottom end of the steerer has a smaller inner diameter than the to for added strength in this highly stressed area. The standard 9/8″ star nut may be tight and the 1″ star nut a little loose. I prefer to adjust the blades of a 1″ slightly outward, but the 9/8″ gets the job done with a bit more insertion force as well. The standard star nut insertion tool is designed to slip over the top of the steerer tube, and will not work in this application. I thread in a M6x60 bolt and use it to steer the nut in with careful hammer taps. I set the nut in about 5-8mm deep and remove the bolt/insertion tool.

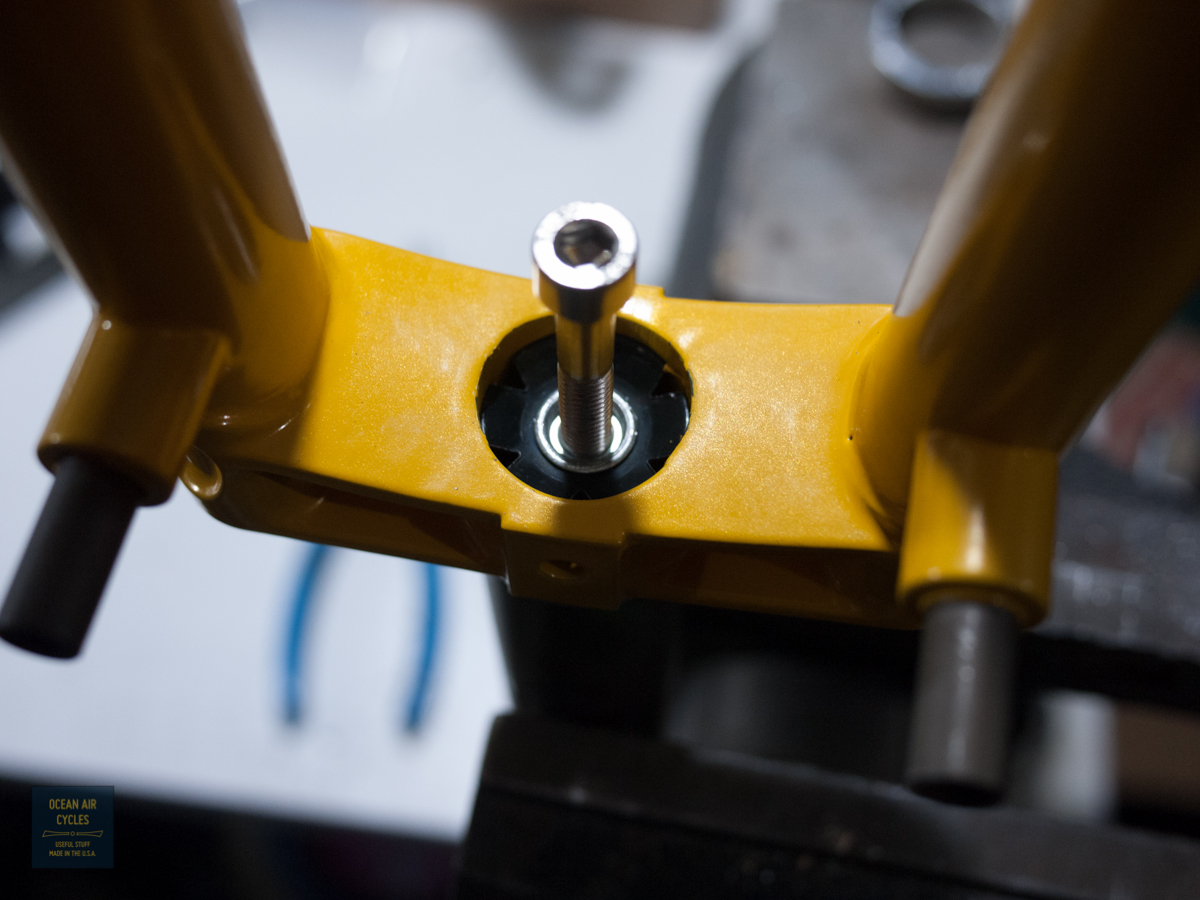
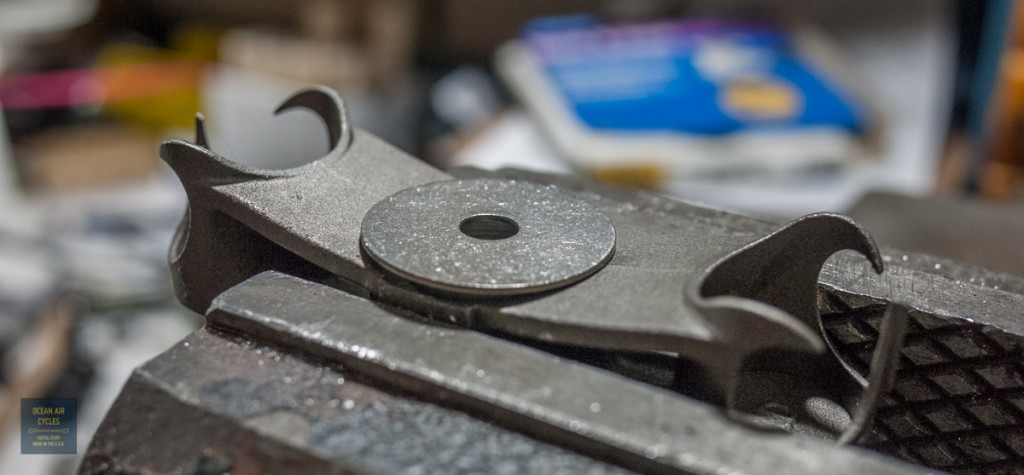
 The next hurdle is the washer stack between the crown and the fender. May fender mounting kits are designed around a 1″ steerer, and the included top washer may be to small to seat well against the 9/8″ steerer bottom on a Rambler fork.
 I replace this washer with a 1 1/4″ fender washer. A gentle tap or two with a hammer against the crown will shape the washer to the curvature of the crown for a nice even fit.
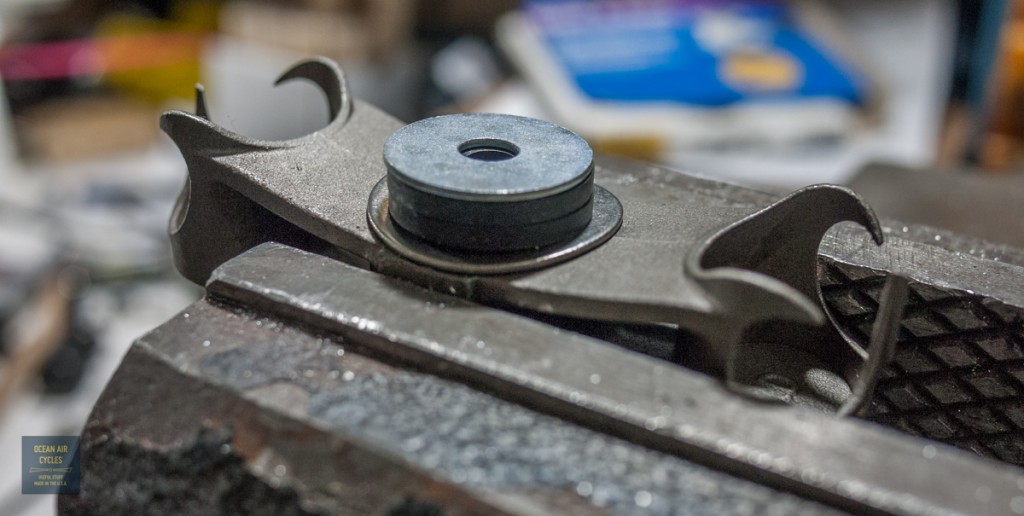
 The gap at between the crown and fender is a few mm on the generous side to ensure maximum clearance between tires and fender. This is easy to adjust with an extra rubber washer or two. For 38mm tires I generally use two 1/8″ rubber washers.
 Last in the stack is a 1″ fender washer between the rubber and the metal fender.
 The entire sandwich is then held in place from the bottom with a M6 bolt and a 1″ fender washer on the inside.
 This assembly has held fast on both older builds and recent Ramblers in the past year. As added insurance one could add locktite to the treads of the bolt. Also, as with all fastener based mounting systems, e.g. nuts and bolts, it is a good idea to check them regularly for any hardware that may be loosening in use.
The above washer stack will work with most daruma bolts included in fender hardware kits as well. The fender lower strut mounting is straight forward and will go together per the manufacturer’s instructions.
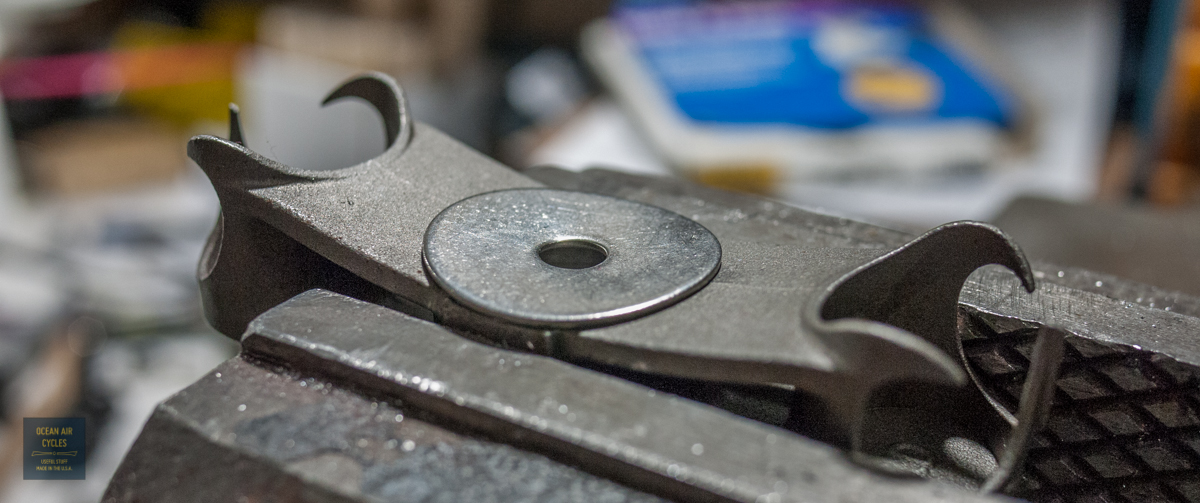
If you are riding rough road or dread the occasional rattle, you can add a third fender mounting point at the front rack. This will greatly improve fender stability, and is good insurance should one of the other mounting points come loose. There is no straight forward way to do this, short of a custom rack, and most if not all solutions will require a bit of ingenuity and a trip to the hardware store. Here is my combo of an unused fender mounting bracket and the Mark’s rack front tab.
 All of the above hardware can be found at your local hardware store, preferably the small sort with a well stocked hardware selection. I have been thinking about adding the above listed small parts to the storefront as a “kit”, let me know if there is sufficient demand, and I will make it happen
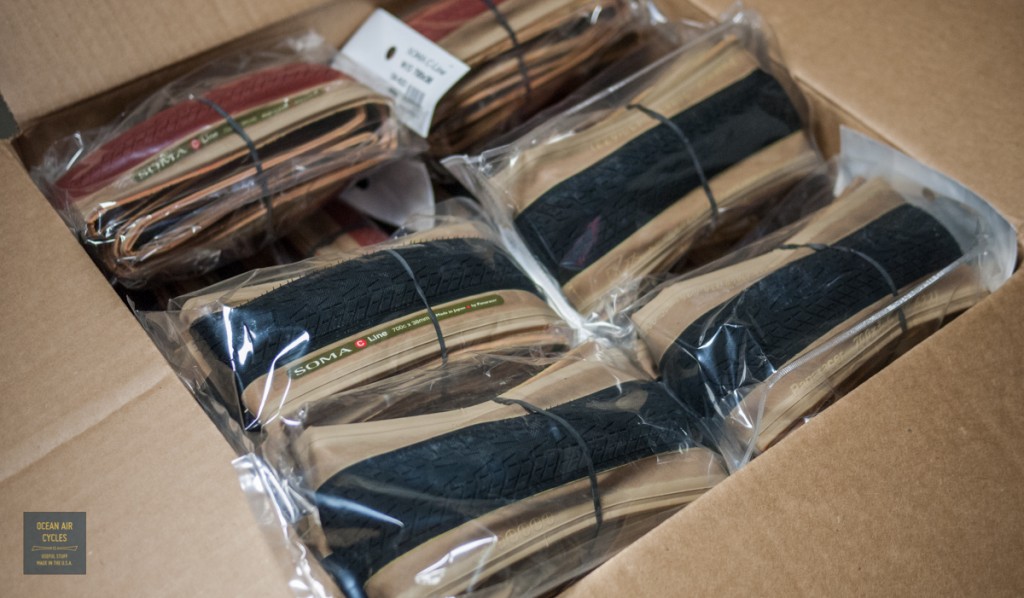
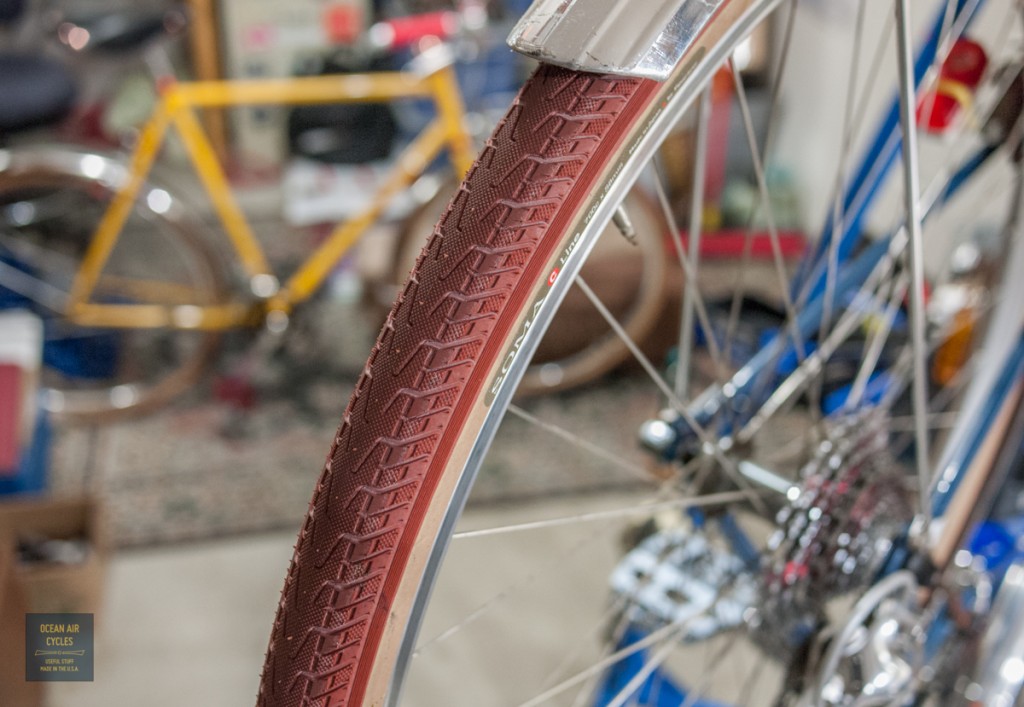
We have been working with soma since last Spring to bring some wide, supple, high quality tires to market. The results are in and the new C-Line tires are looking great out of the box, and on initial test rides.
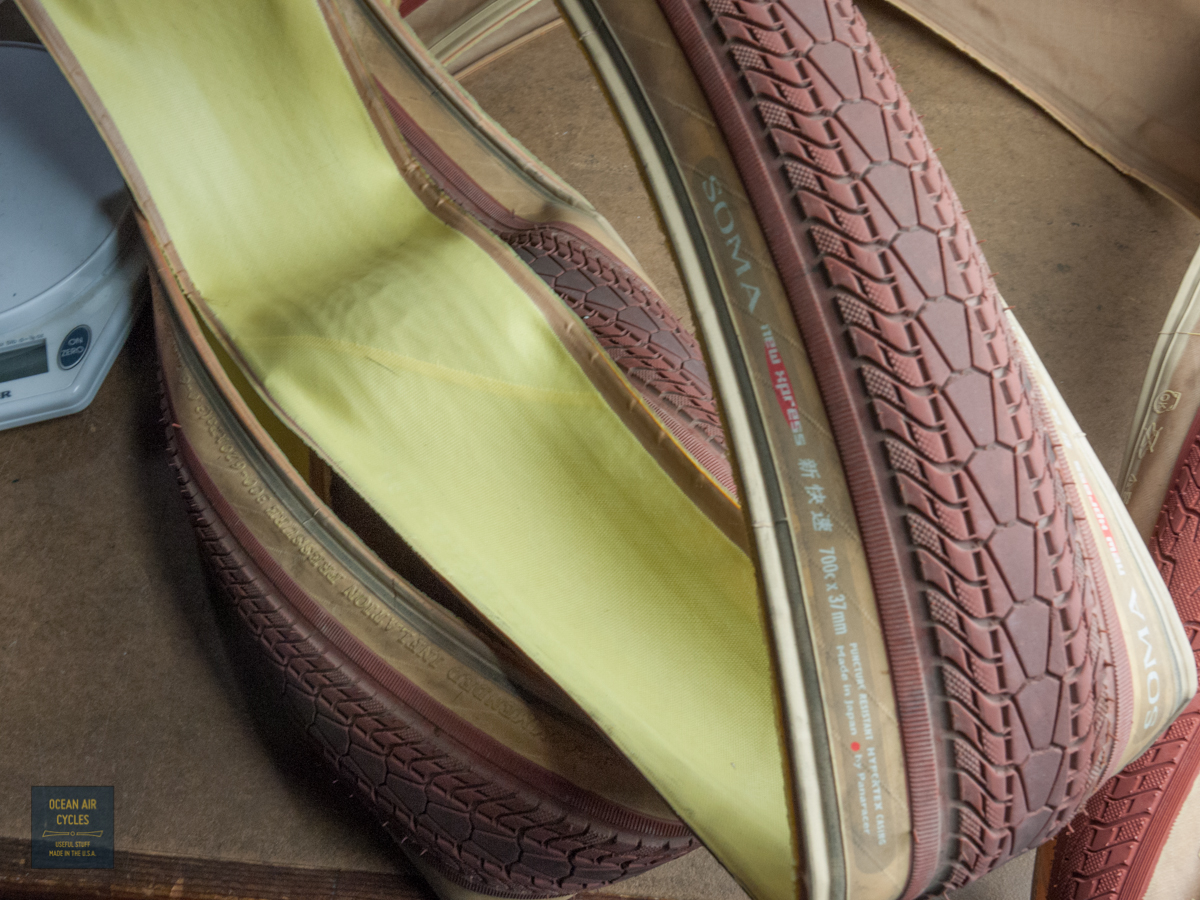
Background: There has been a bit of a hole in the market for a well made, light weight and wide 700c tire. I have been happy with their New Express 700×37, but having ridden both the NE and B-Line versions of this tire in the 650b size I knew that there could be more. Starting with everything good about the well-regarded Panaracer Pasela and New Express tires, the inquiry was made about the status of their 700x3xxmm molds. Apparently it had worn beyond use, they were in the process of making new molds and we were given a bit of a clean slate. Taking notes from the B-Line we asked for the tread width and pattern of the 35mm Pasela, the casing of the 37mm, No extra protective lining, a folding bead, and since we were going this far we asked for color options on such a relatively small run of tires. Panaracer said yes, and the wheels were rolling.
The first batch made its way from Japan to Soma and now us. Testing and distribution began yesterday. Using aspects of a proven design and partnering with a high quality producer like Panaracer we are confident that the tires will meet and exceed expectations. This batch has two color options, Terra Cotta with tan skin walls and Black with Tan skin walls. The color does not influence performance, and is only aesthetic. I will be riding a set of the Terra Cotta tires over the next few months.
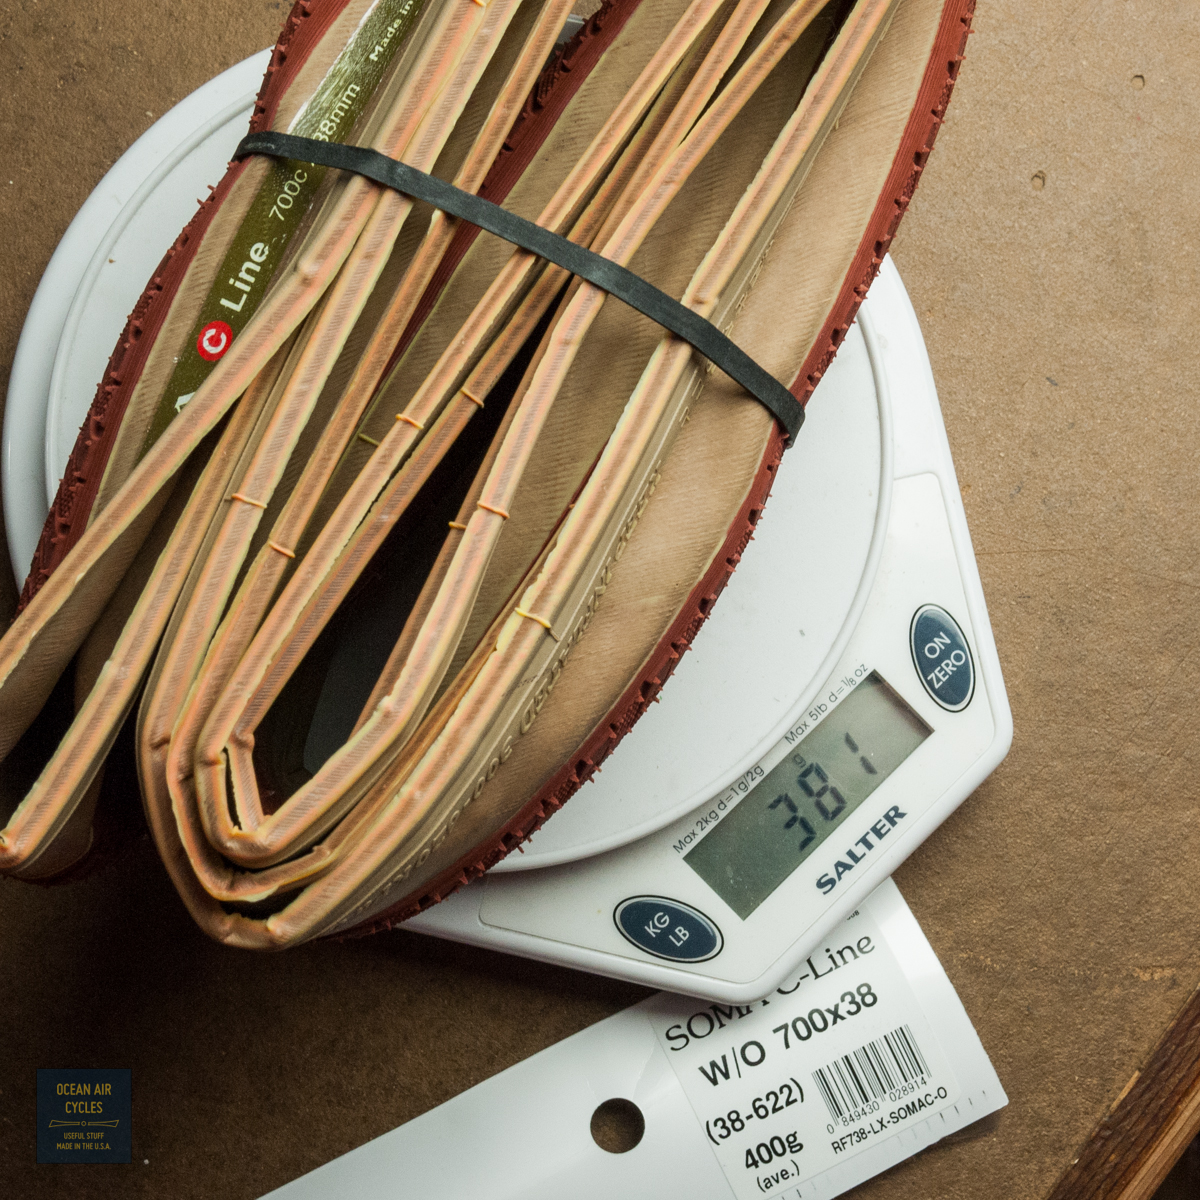
 Knowing that the question will be asked the first thing i did after opening them up was take them to the scale and compare the weight to an existing 700×37 New Express.

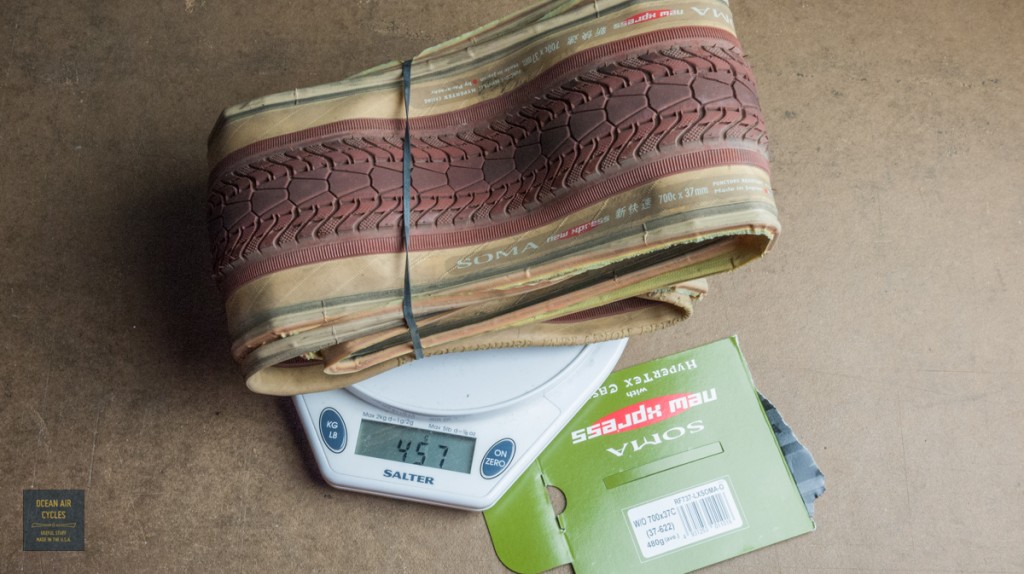 The 76g drop per tire totals up to a savings of over a 1/4 pound of rotating mass. Paired with a lighter wheel set like the Velocity A23 rims and some light weight tubes the weight savings can add up fast. The weight saving in the tire comes from two places. The C-Line has a different, slightly narrower tread pattern, as well as no hypertext protective casing.
 Both of these characteristics not only shave weight but decrease rolling resistance. This translated into a tire that is easier to accelerate to speed, keeps rolling longer, and delivers the silk pillow like ride that only fat tires can give. The days of wide tires being perceived as heavy and slow are quickly coming to an end.
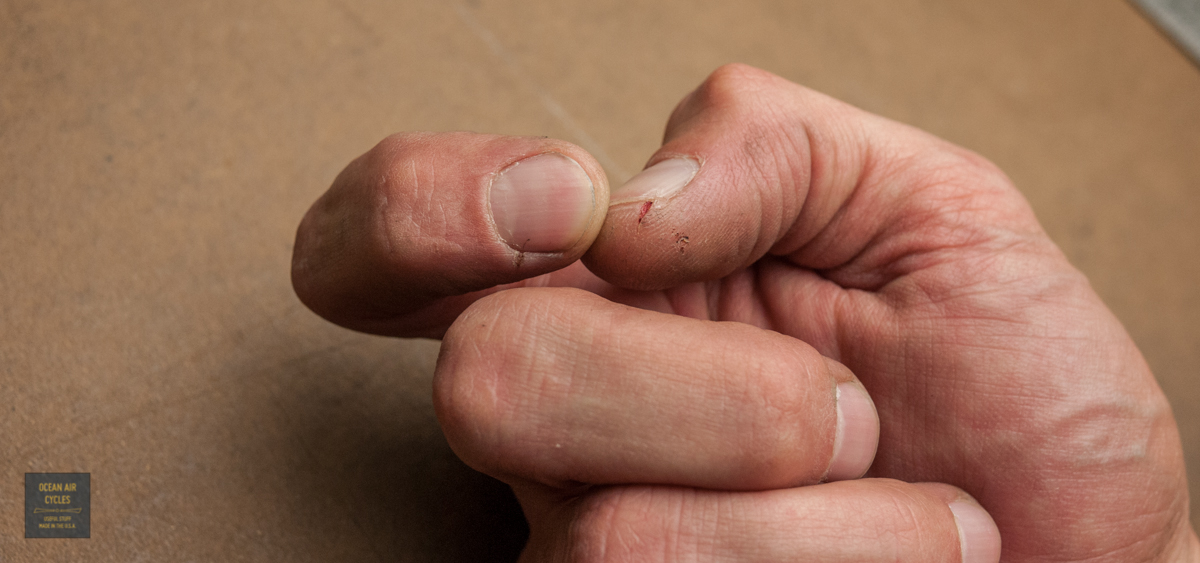
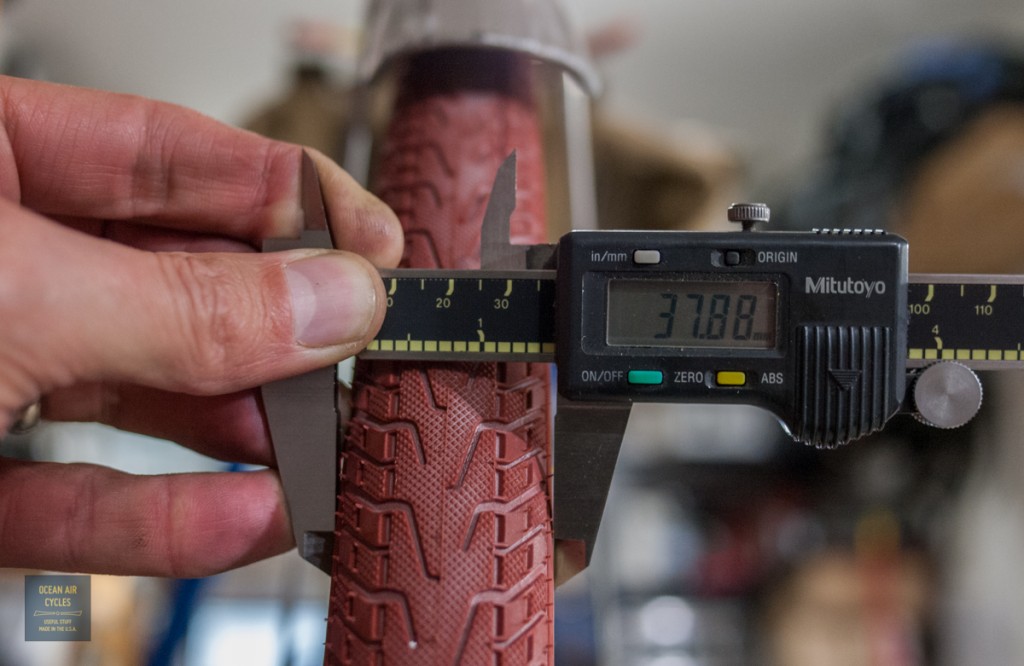
Next up was getting them mounted up on My Velocity A23 rims, which are known to have a tight fit, particularly when tires are new. I am happy to say that both front and rear went on with my hands only, no tire levers needed. They inflated round and evenly along the bead without talc on the tube or any of the other tricks like soapy water at the bead.
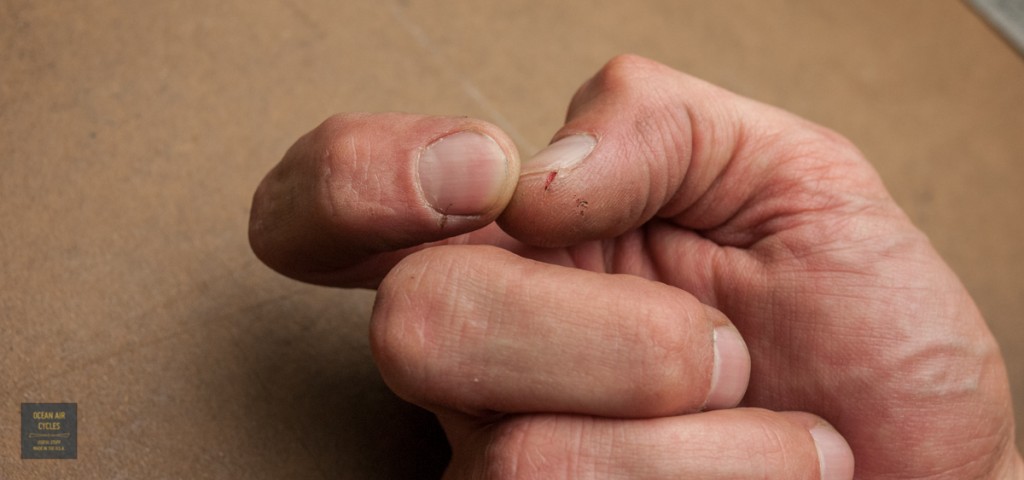
 Even with a week of my left hand attacking my right, there was new undue struggle or pain.
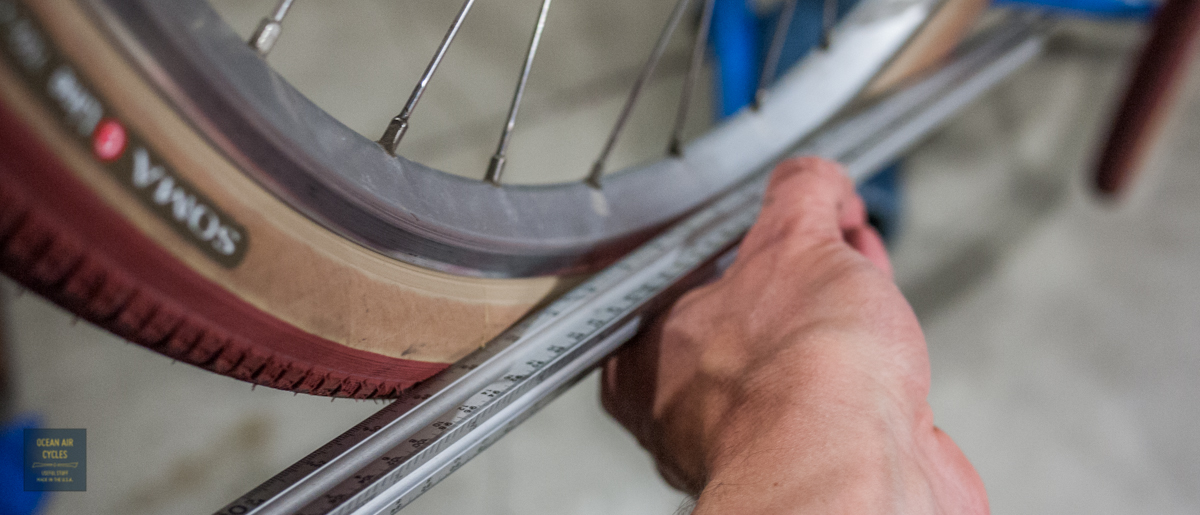
 the tires slid on, the bead popped into place around 60psi. I took them up to 110psi to give a bit of initial stretch and confirm evenness than backed them off to 60psi for a starting point to wide. Initial width on the 23mm rims is 37.8mm, and I am sure they will stretch a bit in the first weeks of riding.
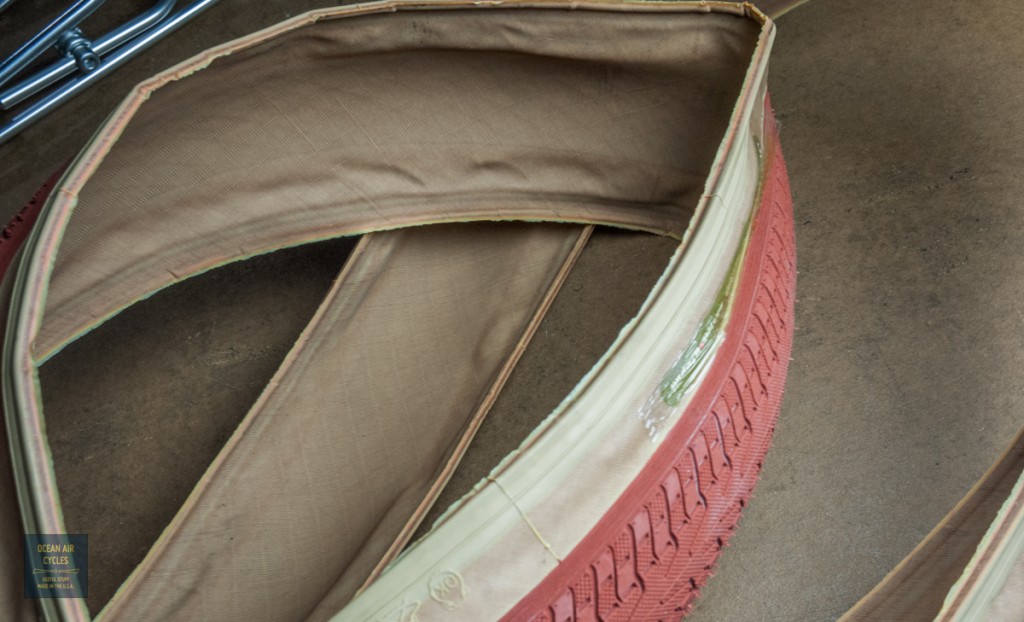
 The only downside I can see to these tires is the lack of sidewall protection. This is not a surprise and is part of the design. Only putting the tread rubber where you really need it. The thickened tread section wraps just to the road side of the tires apex or bulge. The price of improved performance on the road means that these may not be the best choice for dirt roads with sharp or tall rocks. Like all things in life there are tradeoffs, performance often coming at the cost of durability.
 I have been able to get out for a quick 8 miles or so, and am very happy with the ride quality. They feel in many ways just like the B-Line, as they should, but with the subtly different handling that the larger diameter brings to the equation. Like new “component” day often does I am excited to get out there and put some miles on these. Follow up impressions will come in a couple of weeks.
The C-Line tires are available through out storefront HERE at $98 a set
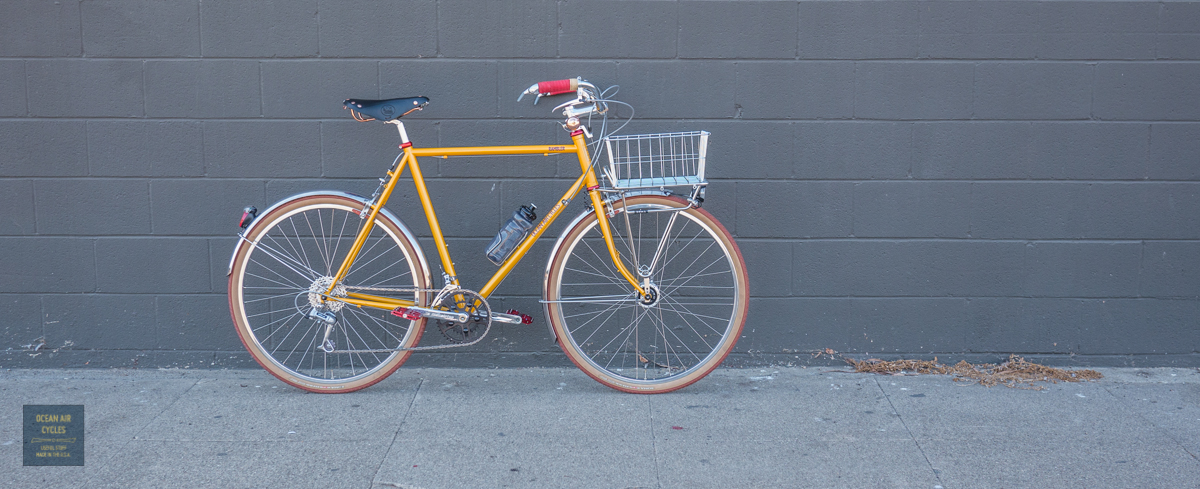
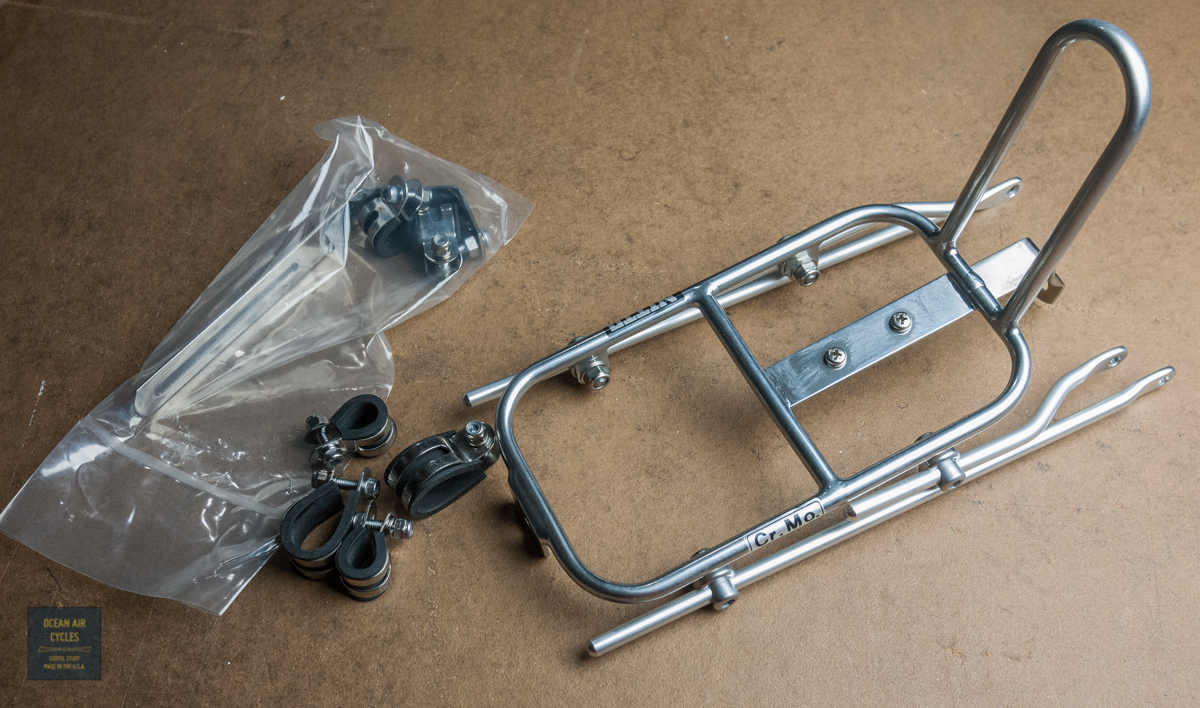
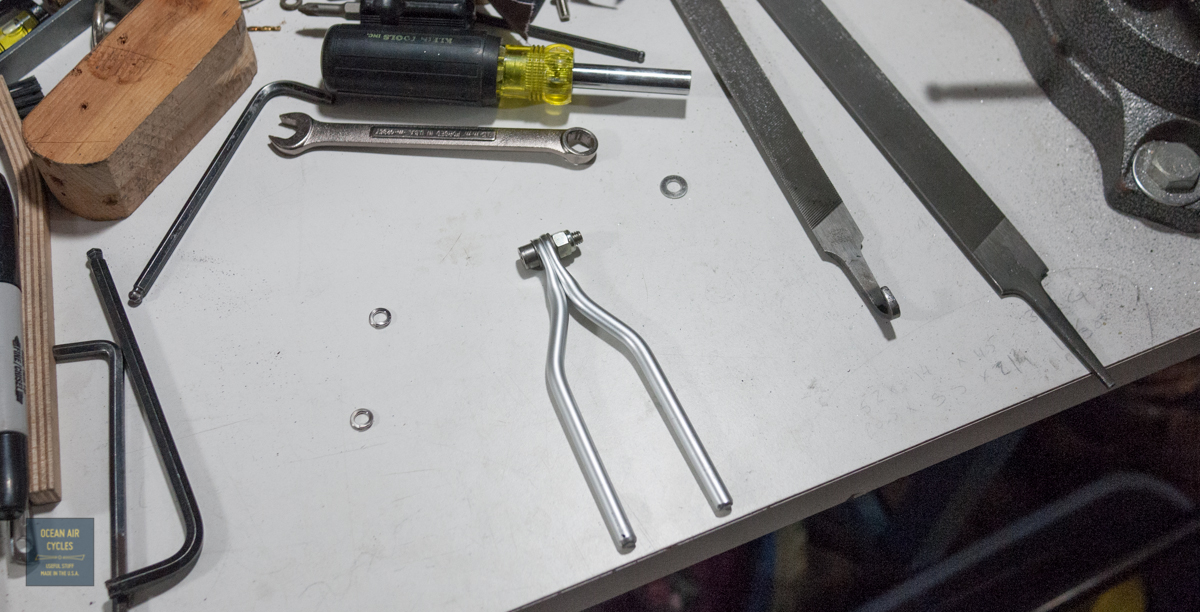
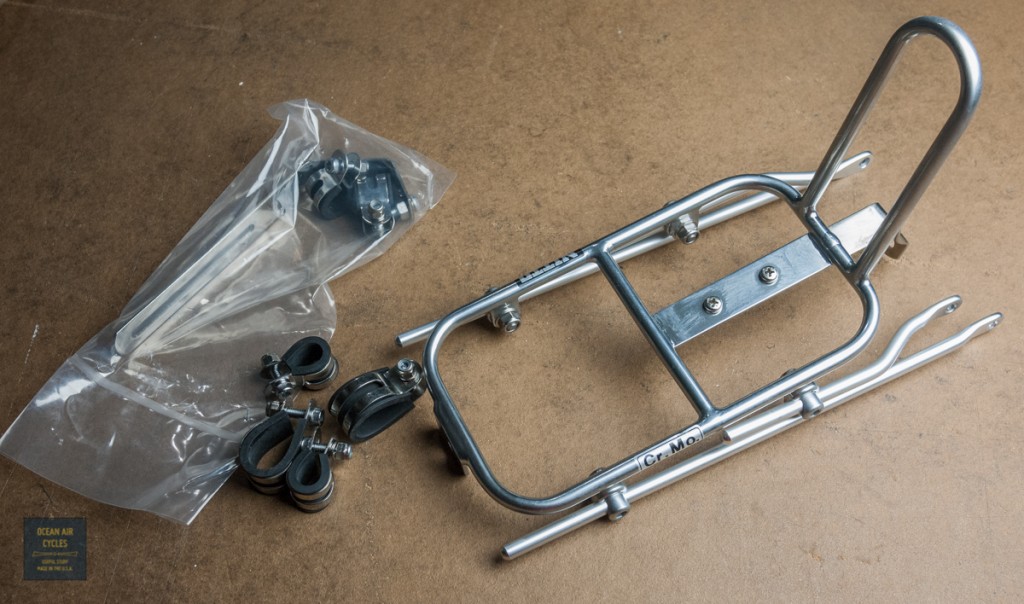
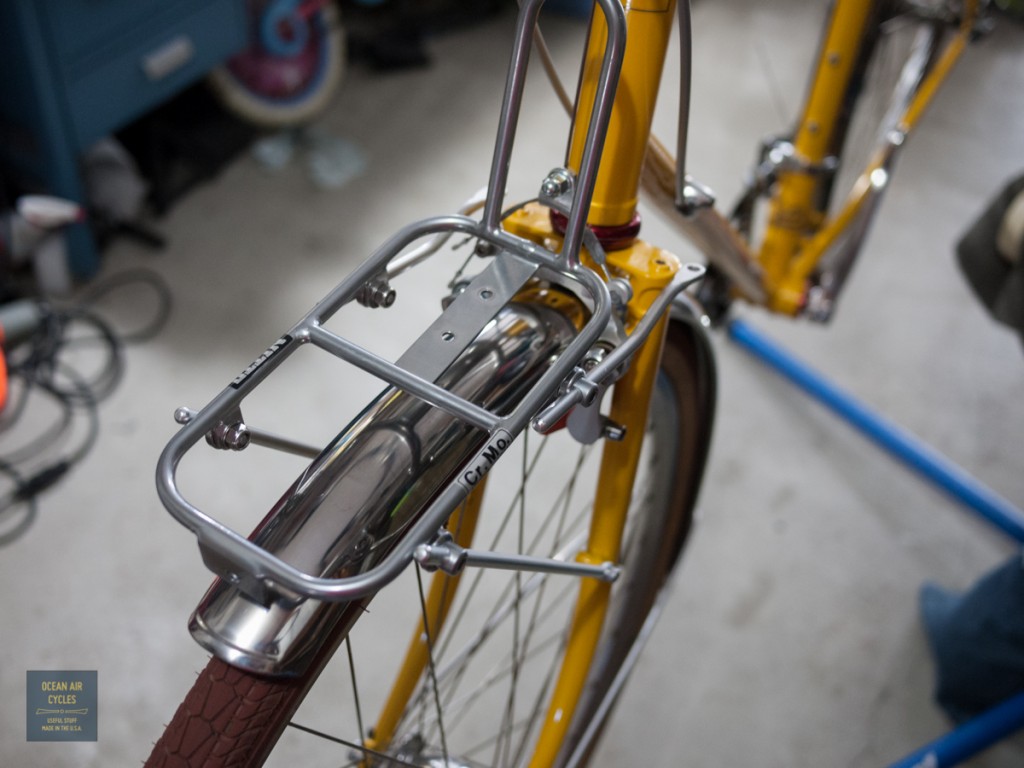
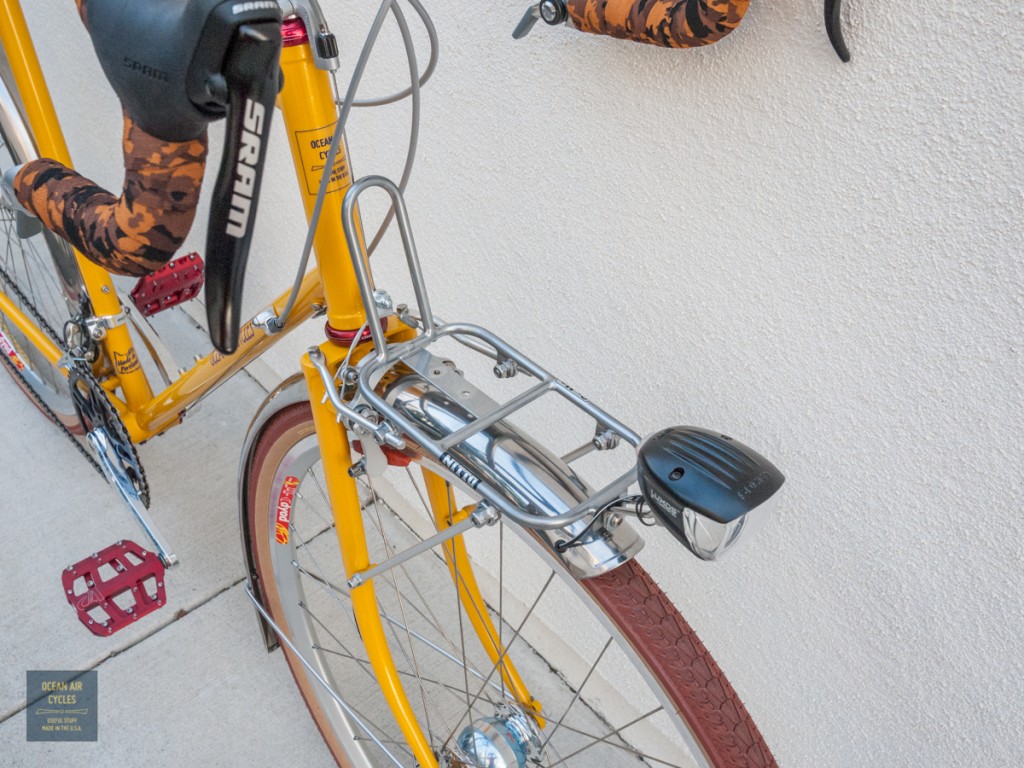
At the current time the Mark’s Rack made by Nitto is the best option available for fitting a small front rack to your Rambler as a bag or basket support. It has all of the hardware needed to mount and only needs the struts trimmed and slightly adjusted (bent) to fit the four point mounting system perfectly. The Mark’s rack is really a supreme value in quality and strength, yet versatile. Having one in your parts bin is always a good thing, they can be adapted to front or rear mounting on most bikes. When you buy one, this is what the standard kit looks like.
 Step one is stripping off everything but the four round mounting struts. Save all of this hardware for future projects as it is some of the nicest you can get your hands on. Next loosen the strut draw bolts, 10mm wrench, a bit so that you can move the struts without everything falling apart. Mount the two front struts to you mid fork rack mounts with M5 bolts while holding the rack in its approximate final position above the front fender.
 Gently tighten things into place so that approximate trimming needs can be determined. At this point you can also see about how much bending will be needed for the rear struts. Note the orientation of the struts. It can help to mark the inside, or direction of future bend. Once bent the struts are not the same, but mirror images of each other.
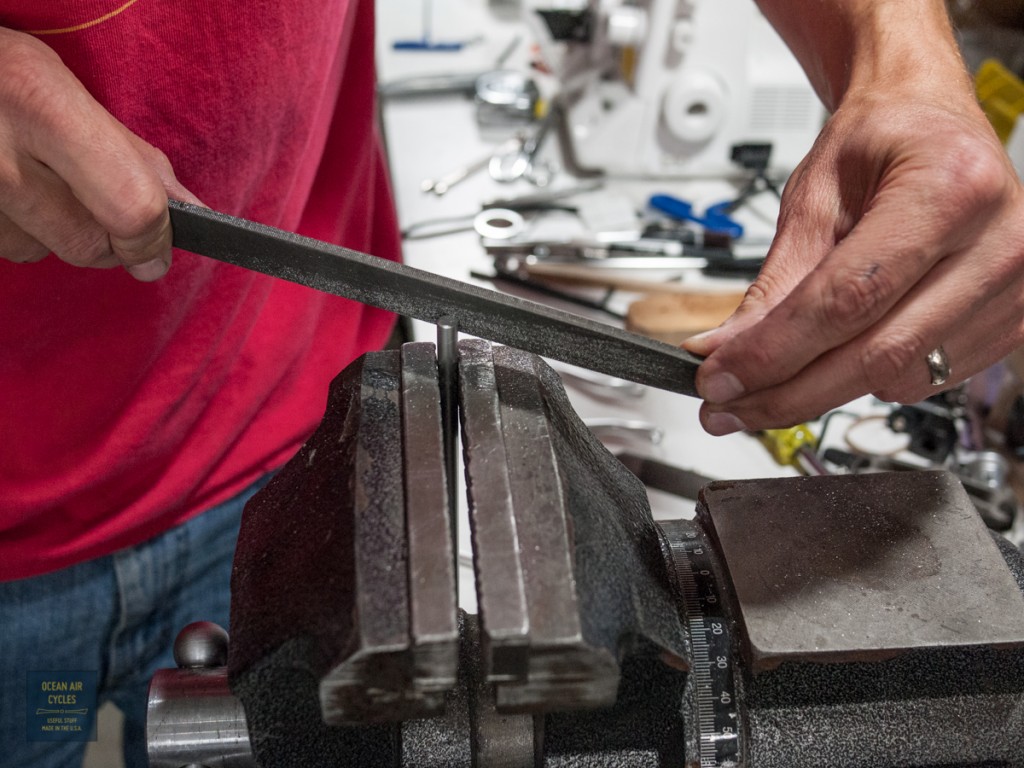
 Mark each of the struts for trimming. Remember you can always cut or file a little more off, but never put the metal back. In general I leave about 1cm of strut beyond the draw bolt for fine tuning fit.
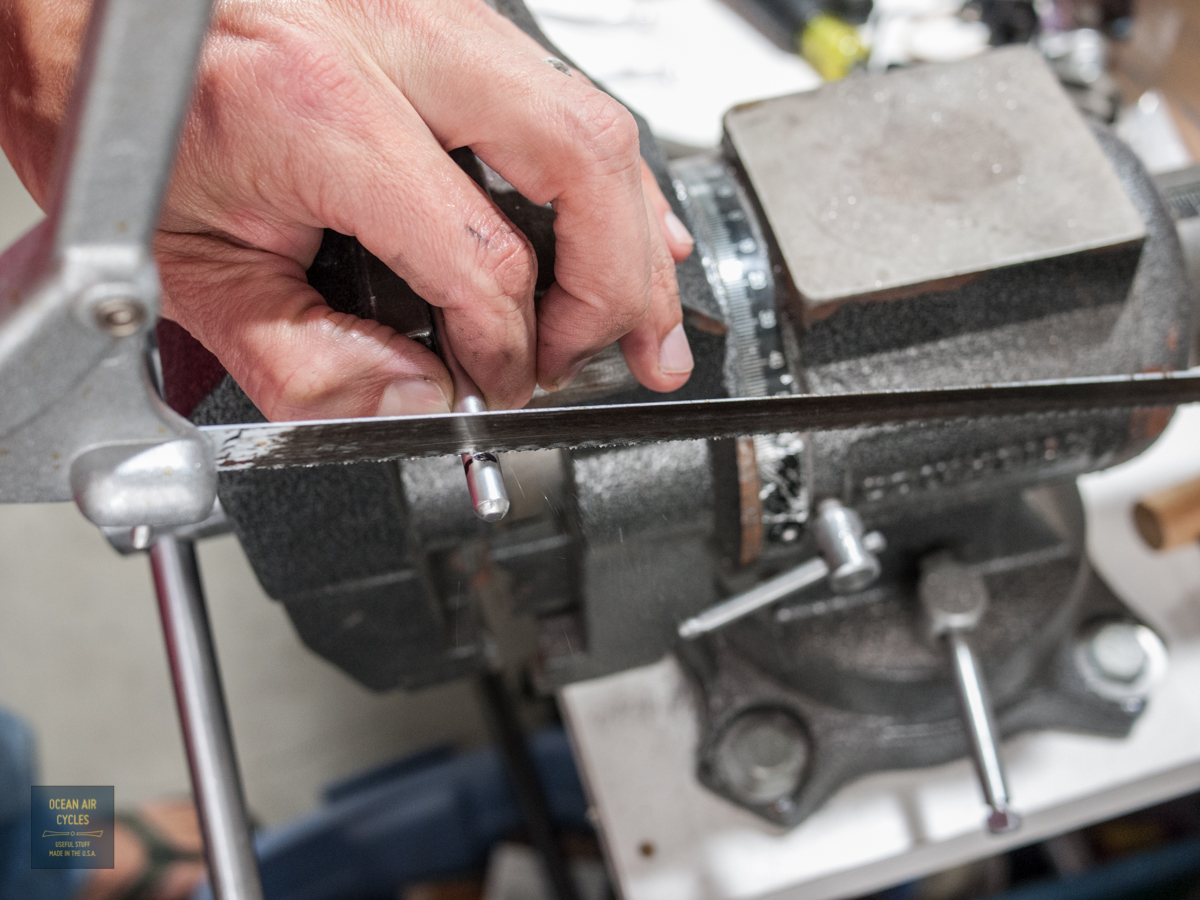
 Now dis assemble everything, careful not to lose any of the small parts. The draw bolt washers and struts will likely have you proving that gravity is indeed still working at least once during the install. Carefully clamp the strut in your vice. Soft jaws or a rag wrapped around the strut are optimum, but judicious clamping force will get the job done without marring the struts. I use a hacksaw to make the cut. Again, it is always easier to take more metal off than put it back.
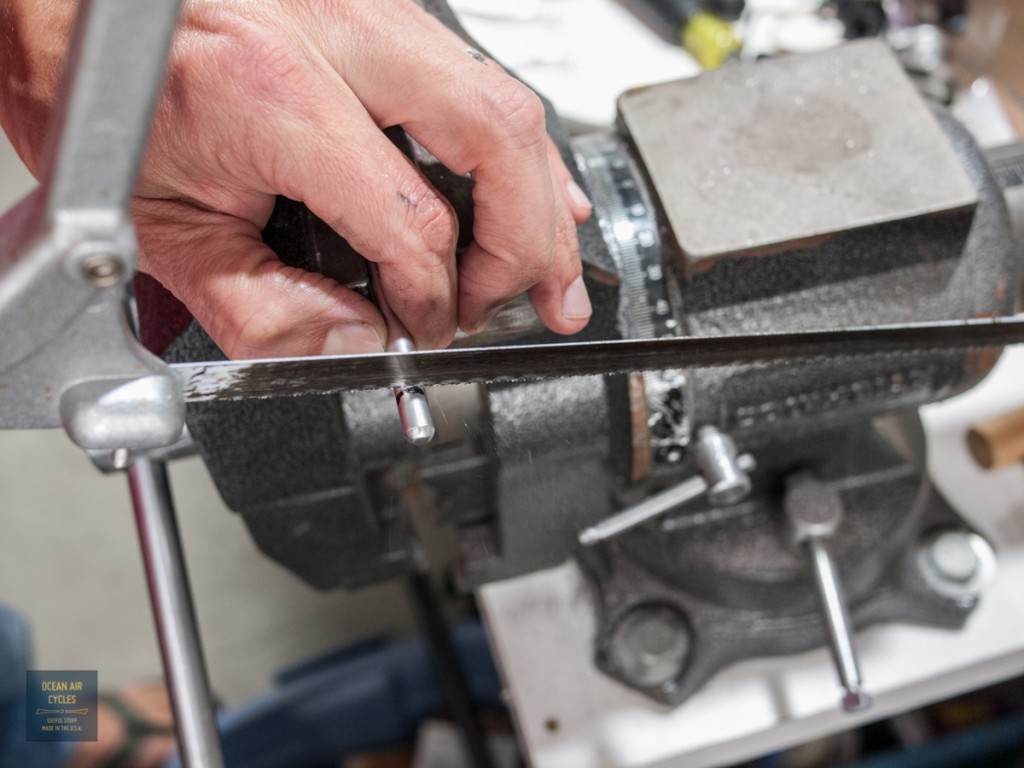
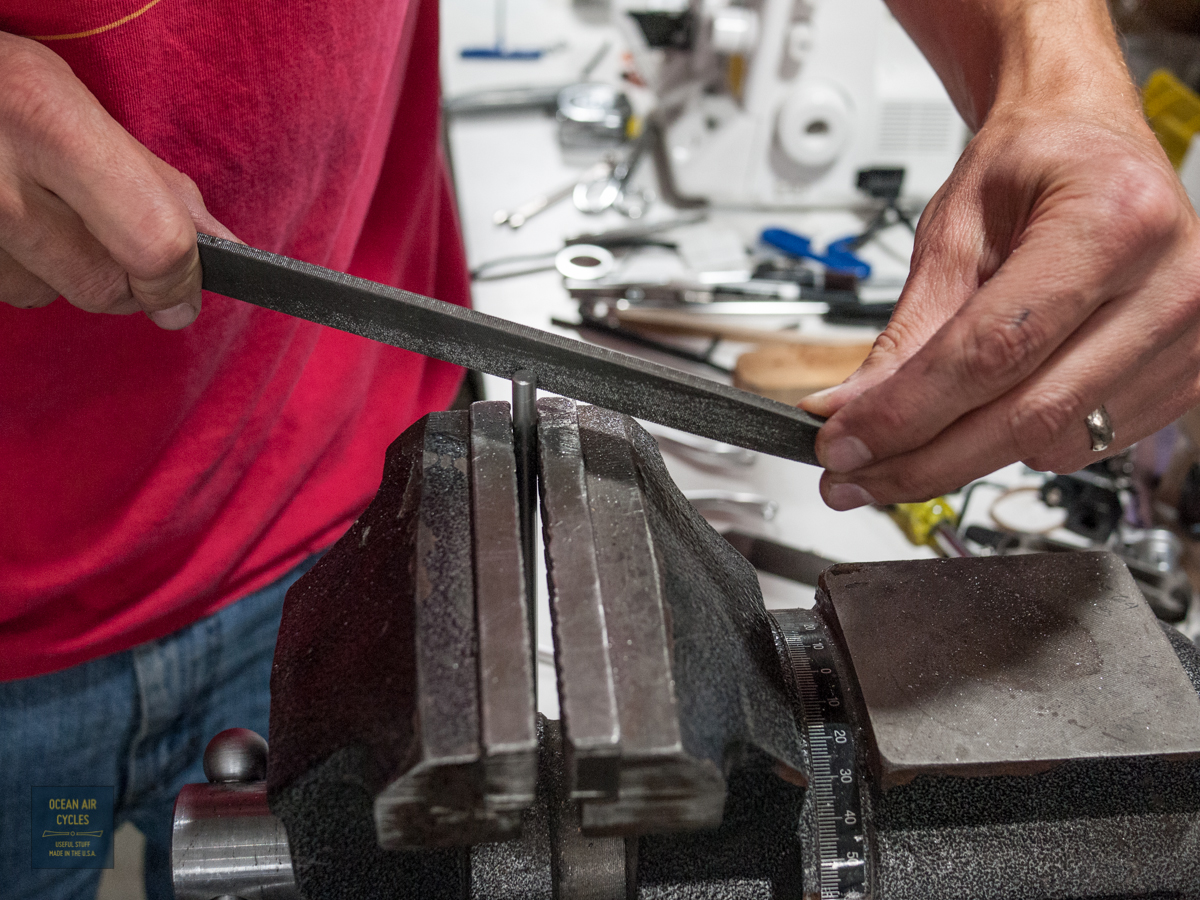
Next file the rough cut end flat, the file a bevel on the edge. For added detail it is nice to sand the end with fine grit and the matte finnish will be uniform.
 Once all four have been trimmed, it is time to bend the rear struts. Bolt them together at the end with a M6 bolt, nut and two washers. This will keep them in alignment during the bending process.
 Back into the vice, clamped just below the factory s-bend, with intended bending direction noted, it is time to move some metal. The force needed to cold set is less than you probably think. Work up to it, while you can bent them back the other direction a bit during final tuning, too much back and forth will wreck the strut.
 If things go fantastic you will get it all perfect on the first pass. Chances are that you will start back at the top and go through the process at least one more time to get the fit dialed in. That is why we leave a bit of extra metal on the struts. his is what it should look like as things come together. There is a sweet spot between tight and loose with the draw bolts and mounting bolts where you can adjust the position of the rack in 3d space with out everything coming apart. The goal is to have the struts cold set such that there are no spring forces in the mounted struts. This will help to extent the fatigue life of the system.

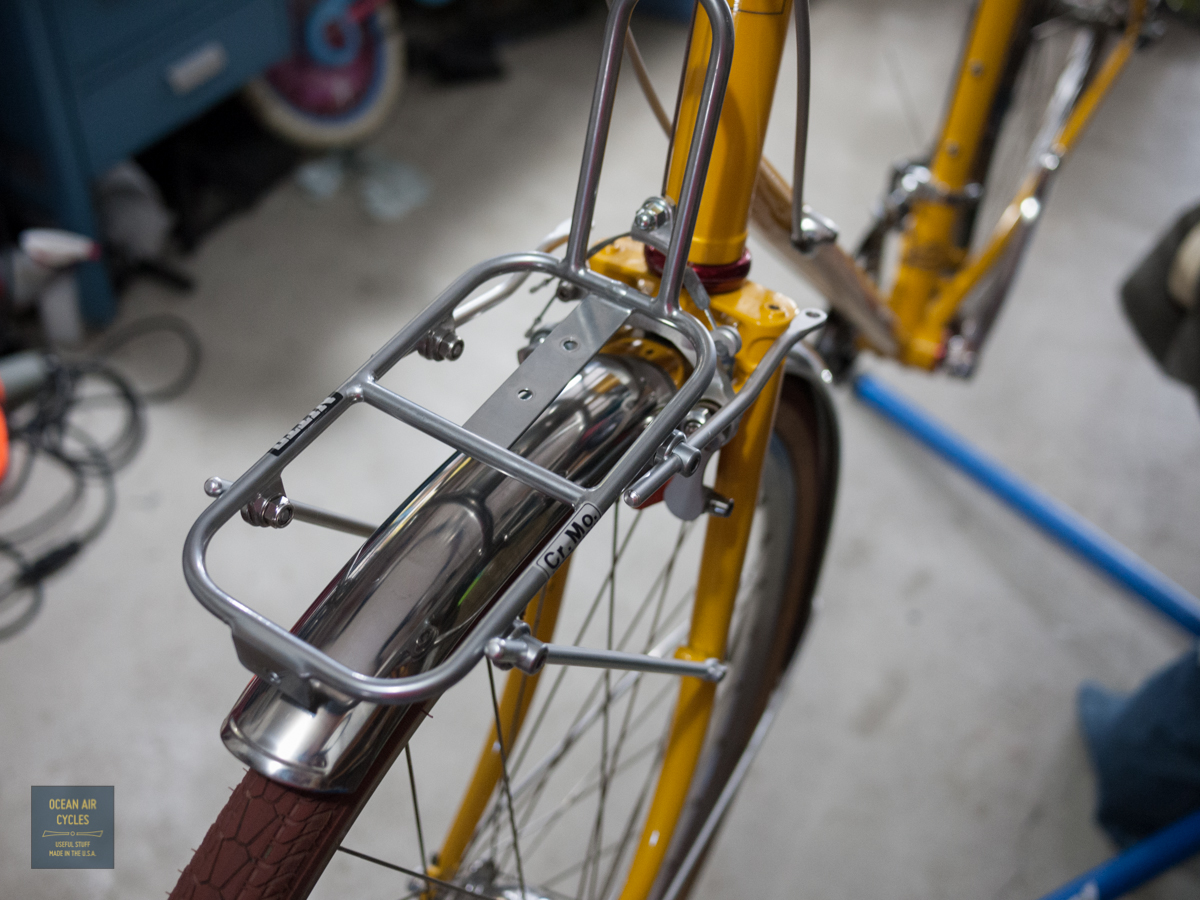
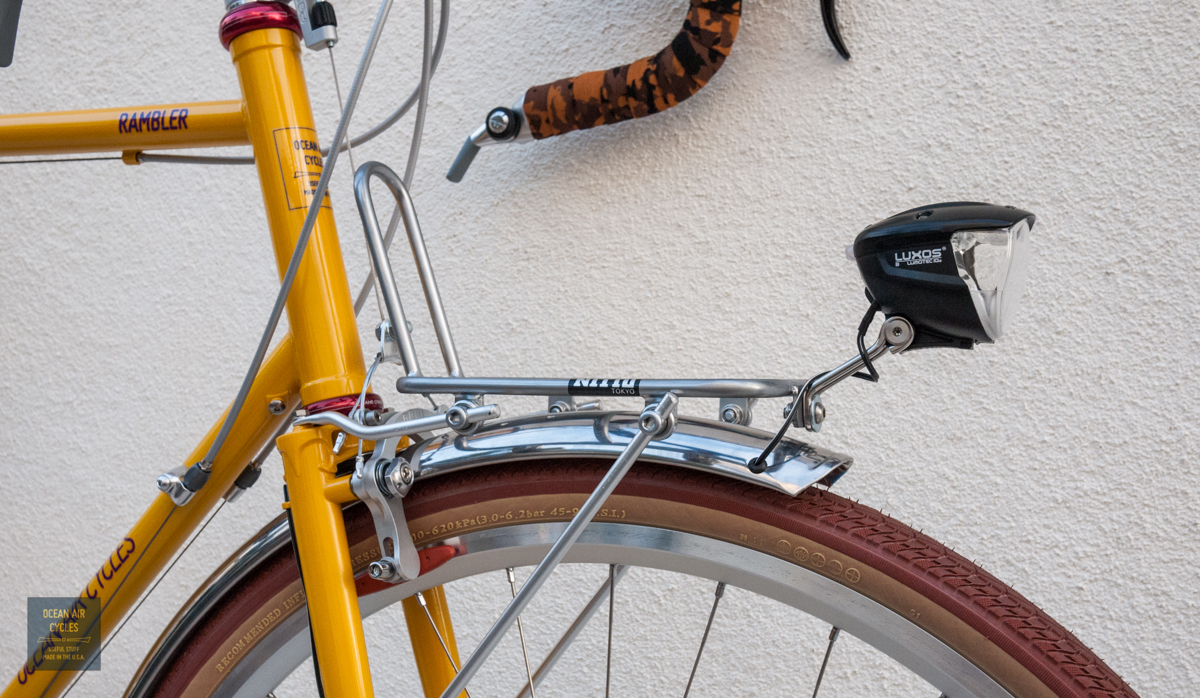
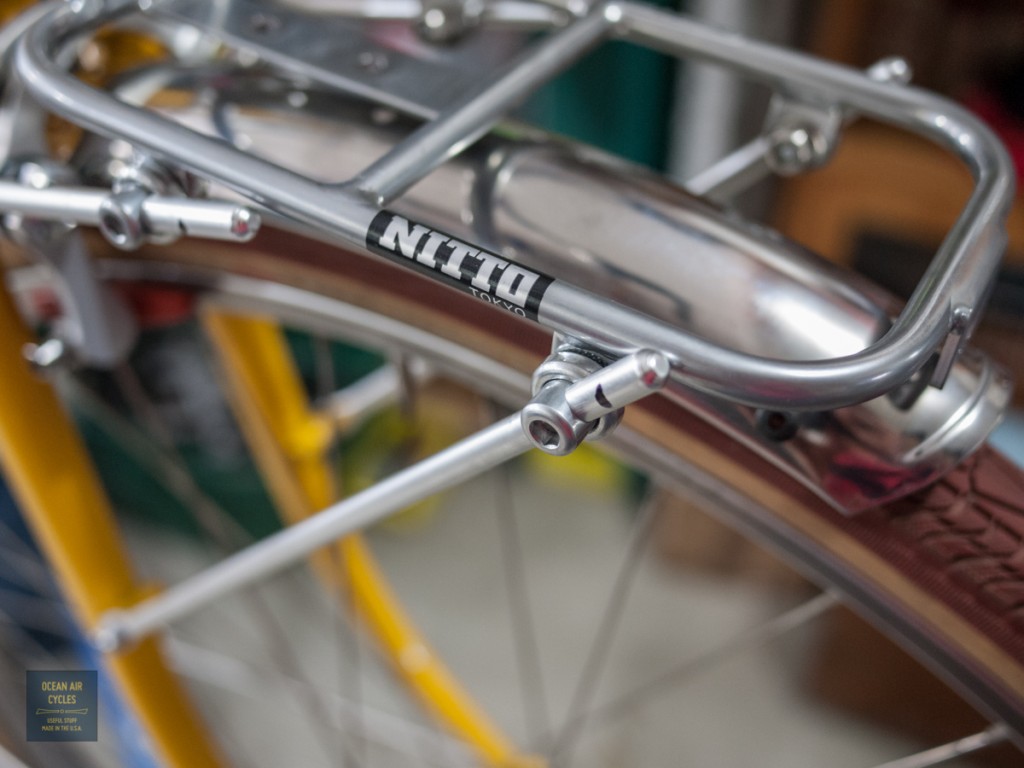
 For the final tightening, use one of the included split washers between the bolt head and strut. Clearance above the fender should be close, but not so close that movement of the fender results in a rattle. If desired one can make an angle bracket to connect the fender tip to the rack for added fender support. Here it is all together with a headlight mounted.
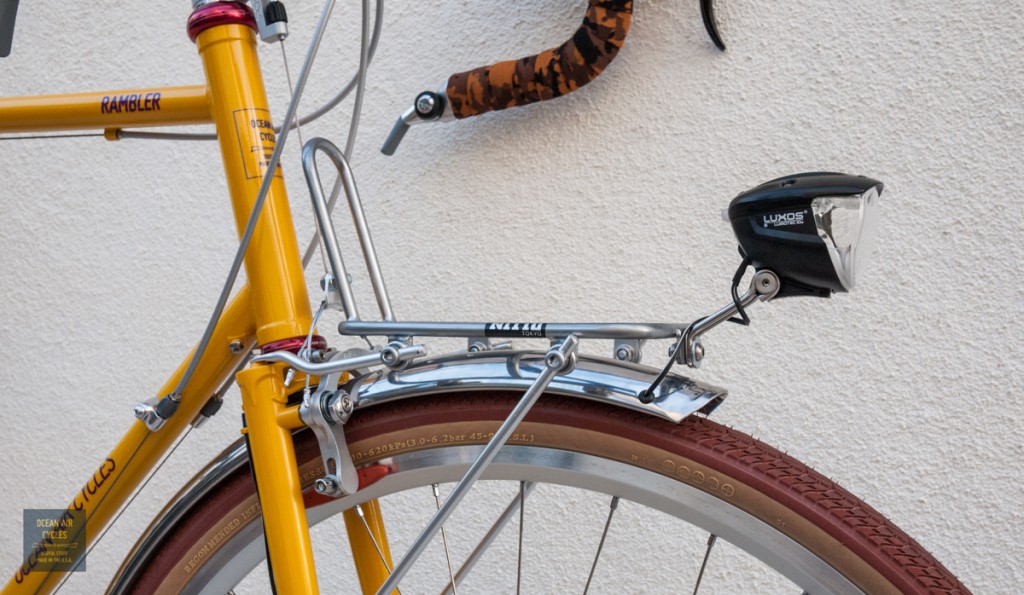
 This will work equally well on 700c and 650b Ramblers. The distance between the upper and lower fork mounting points is consistent and thus the rack position follows the same.
In the near future we will be offering the mark’s rack through our store front with the above adjustments made to the struts.
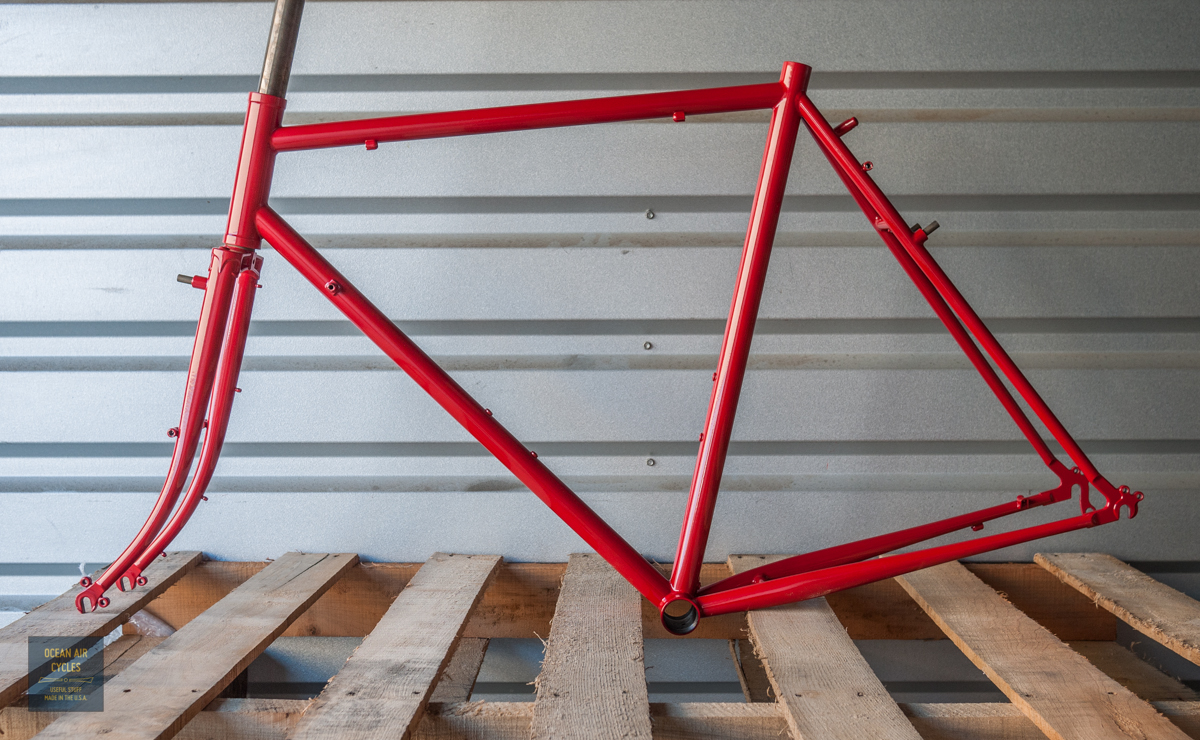
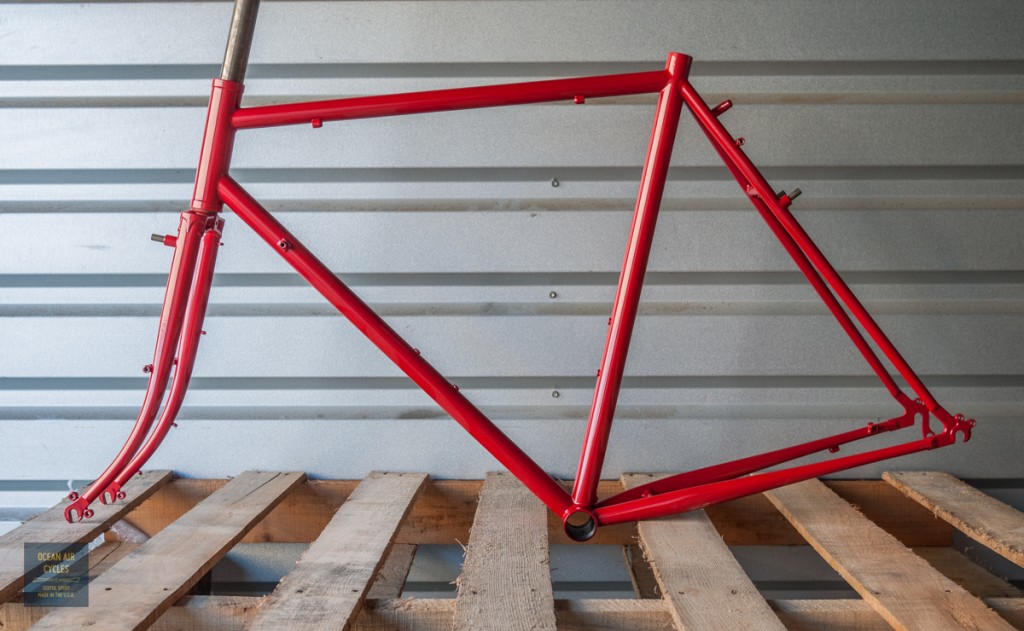
We have two Rambler blemish frame sets that are on the storefront at what I think is a smoking deal. $1049 with free US Shipping until November 1, 2013.
In all mechanical ways these are the same as our first quality Ramblers. They have a couple of blemishes in the Powder Coat that made it through the QC system. While I could go through the work of sending them back through, I thought I would offer them up at our cost to get otherwise perfectly good bikes out into the wild.
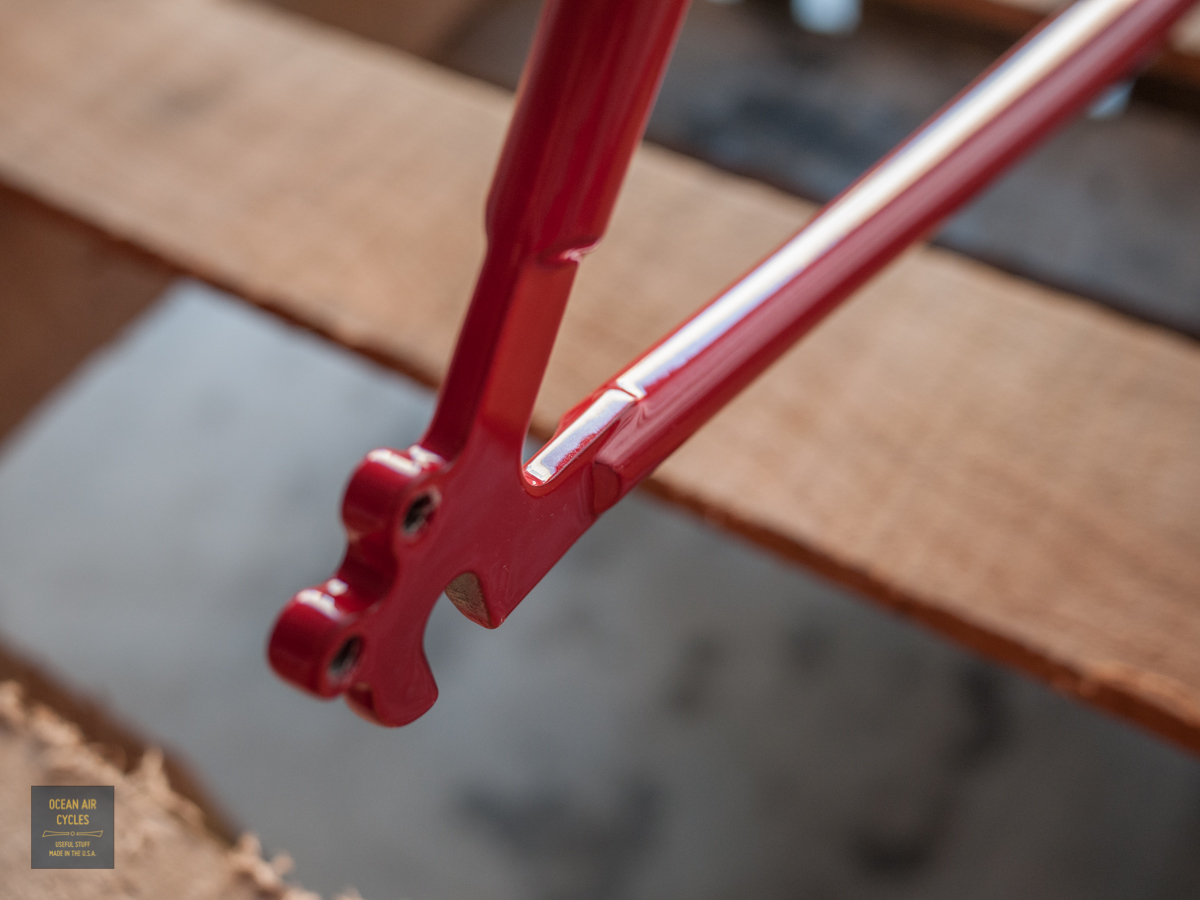
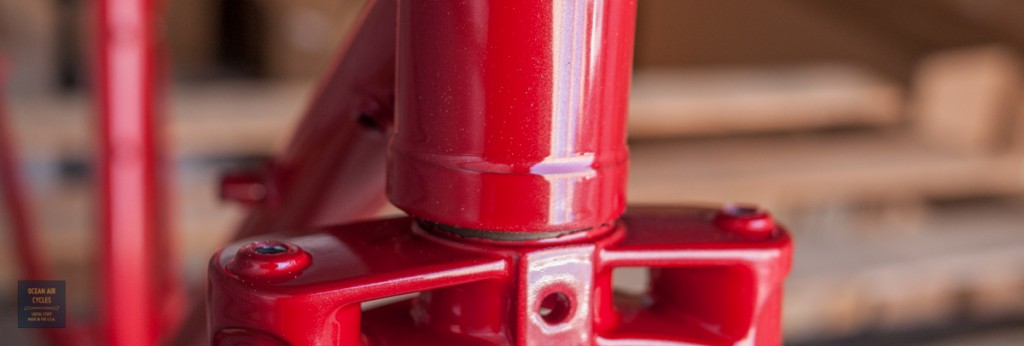
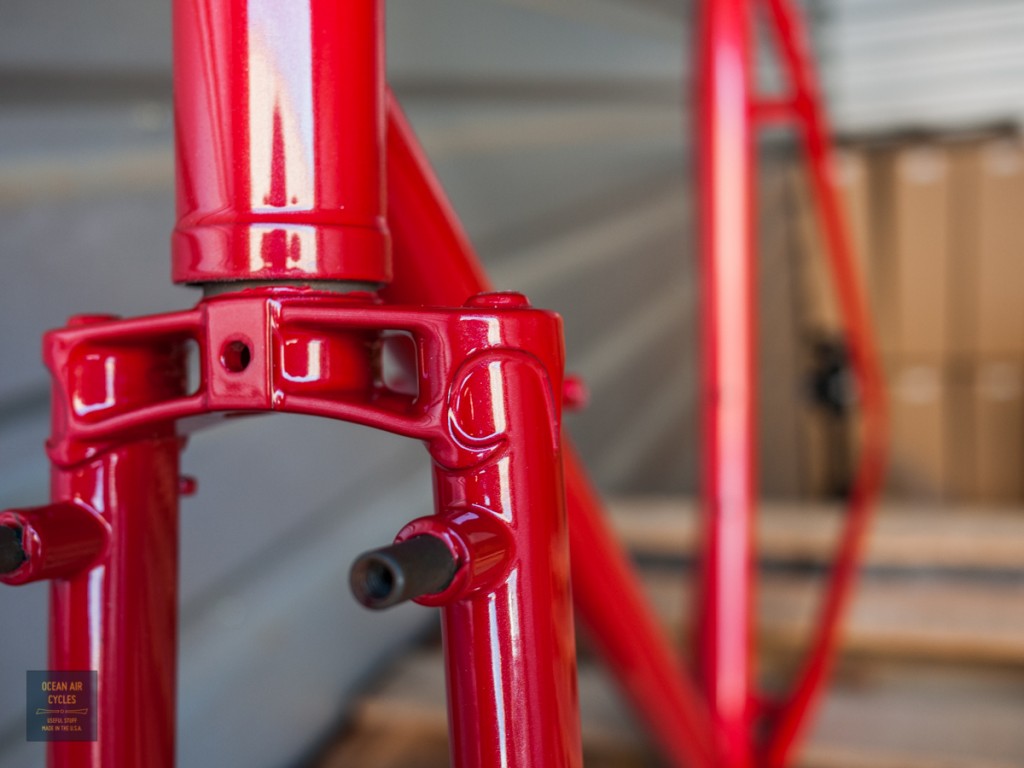
The True Red 55 has complete coverage of powder. One of the challenges with the clear top coat has been the pigment layer pulling back at sharp edges. The clear provides the needed coating, and there is no bare metal exposed to the elements. The look for lack of a better word is antiqued. The pictures tell the story.
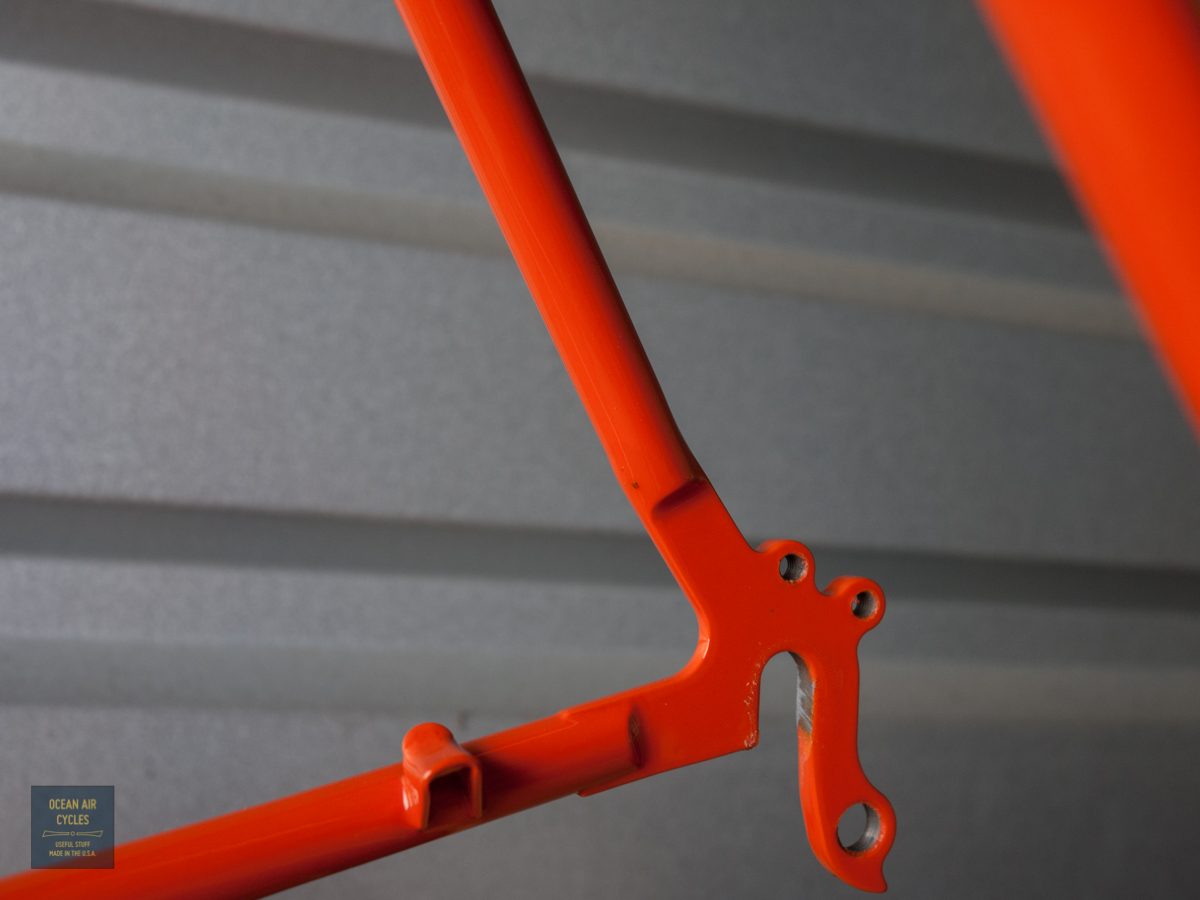
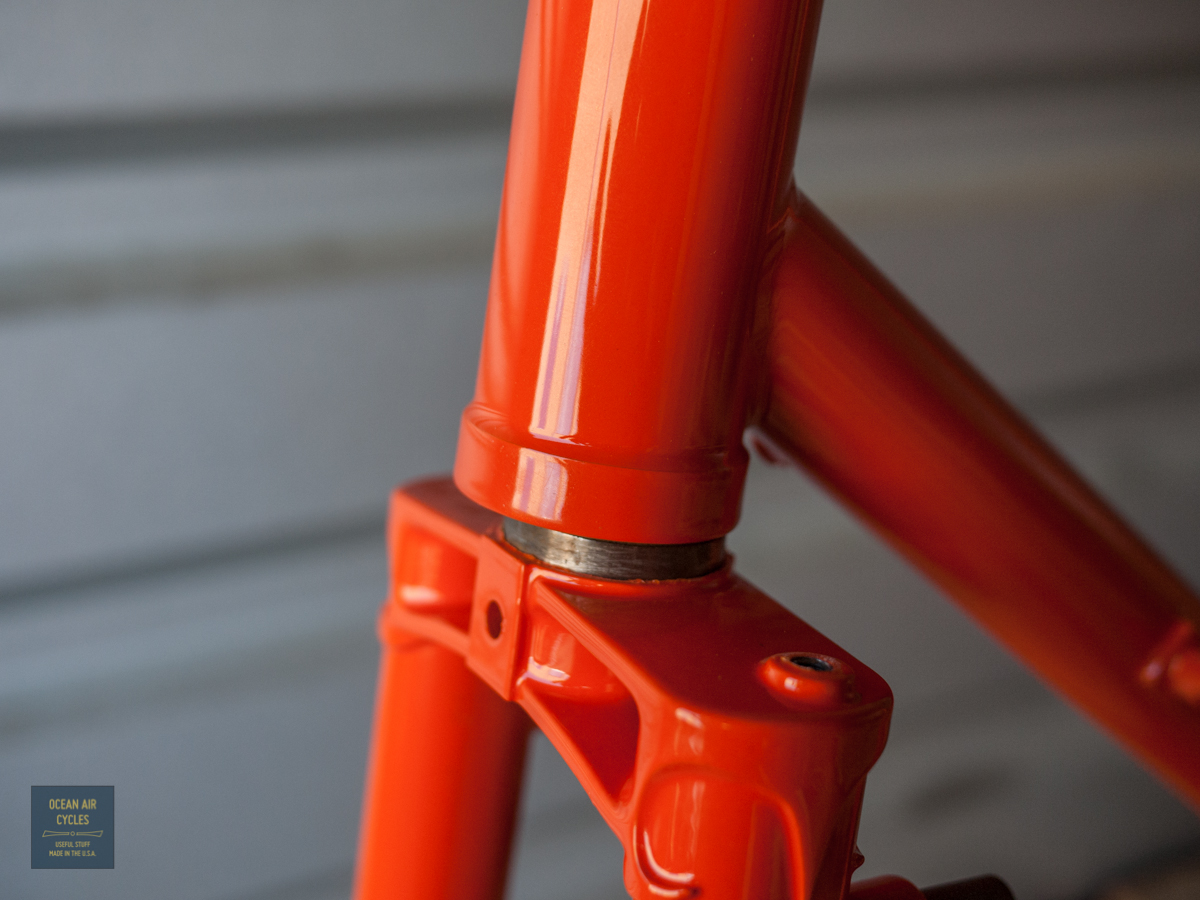
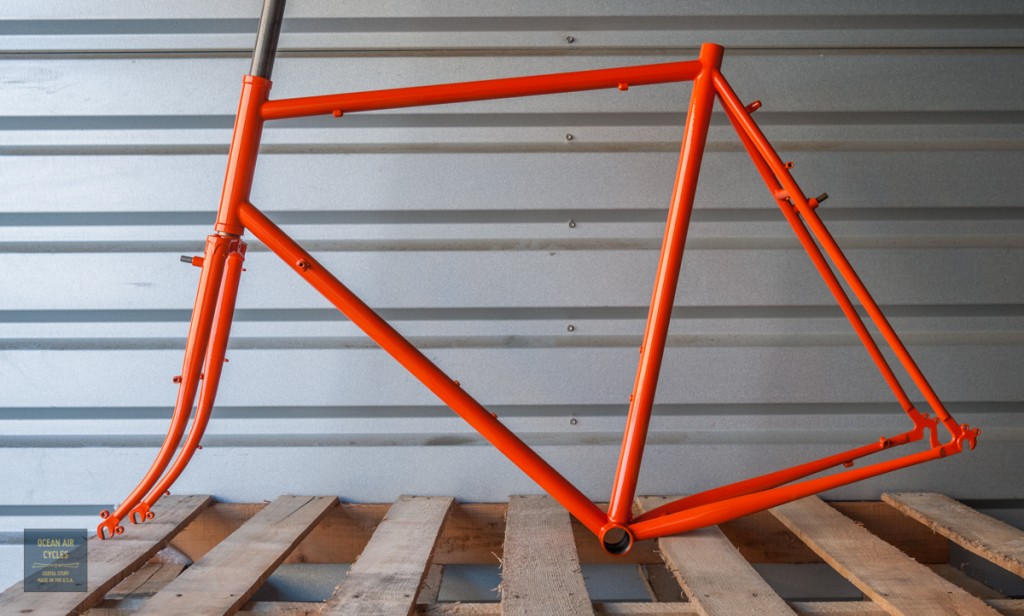
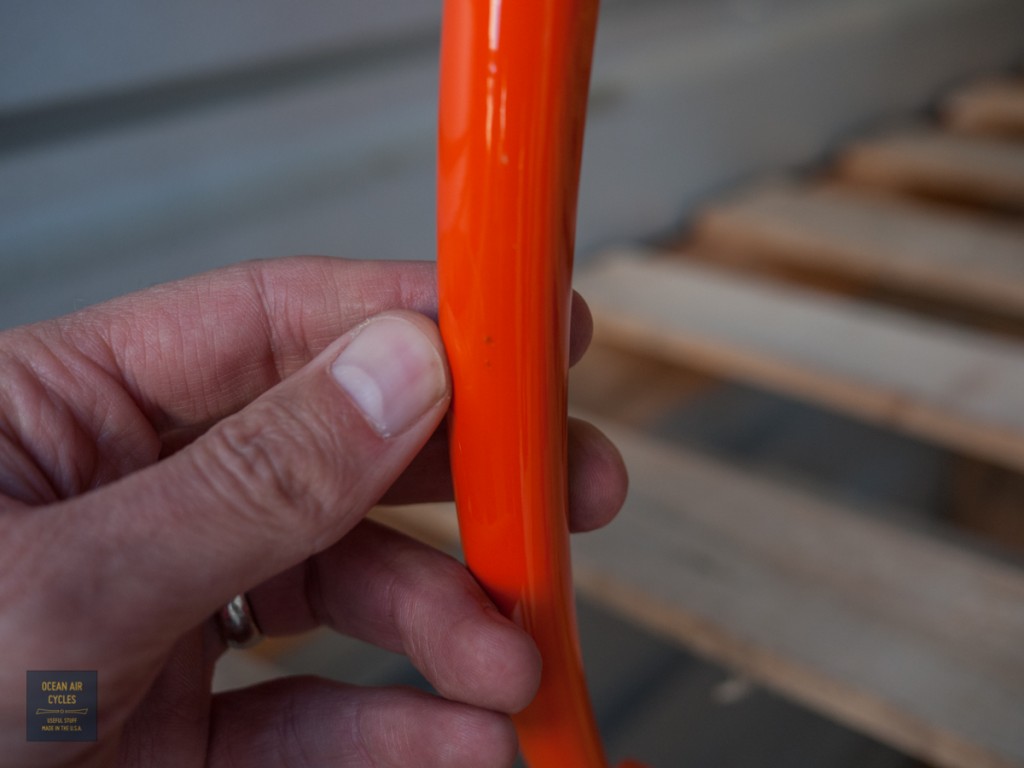
The Orange Soda 63 has the similar issue with pulling back of the color layer, though not as prominent as the True Red. In addition there are two small spots where there was either a spec of dirt or un-sanded nub on the steel, resulting in a raised bump/protrusion in the coating. The flaws are about the size of a mechanical pencil lead. They can be touched up with clear nail polish, and will not impair the performance of the frame.
Both bikes include the Paul Racer Brakes, and are being sold as is.
This is a heck of a deal IMO. If you wanted you could even get the farm chemical stripped and wet painted and still come out under the cost of our current Ramblers.


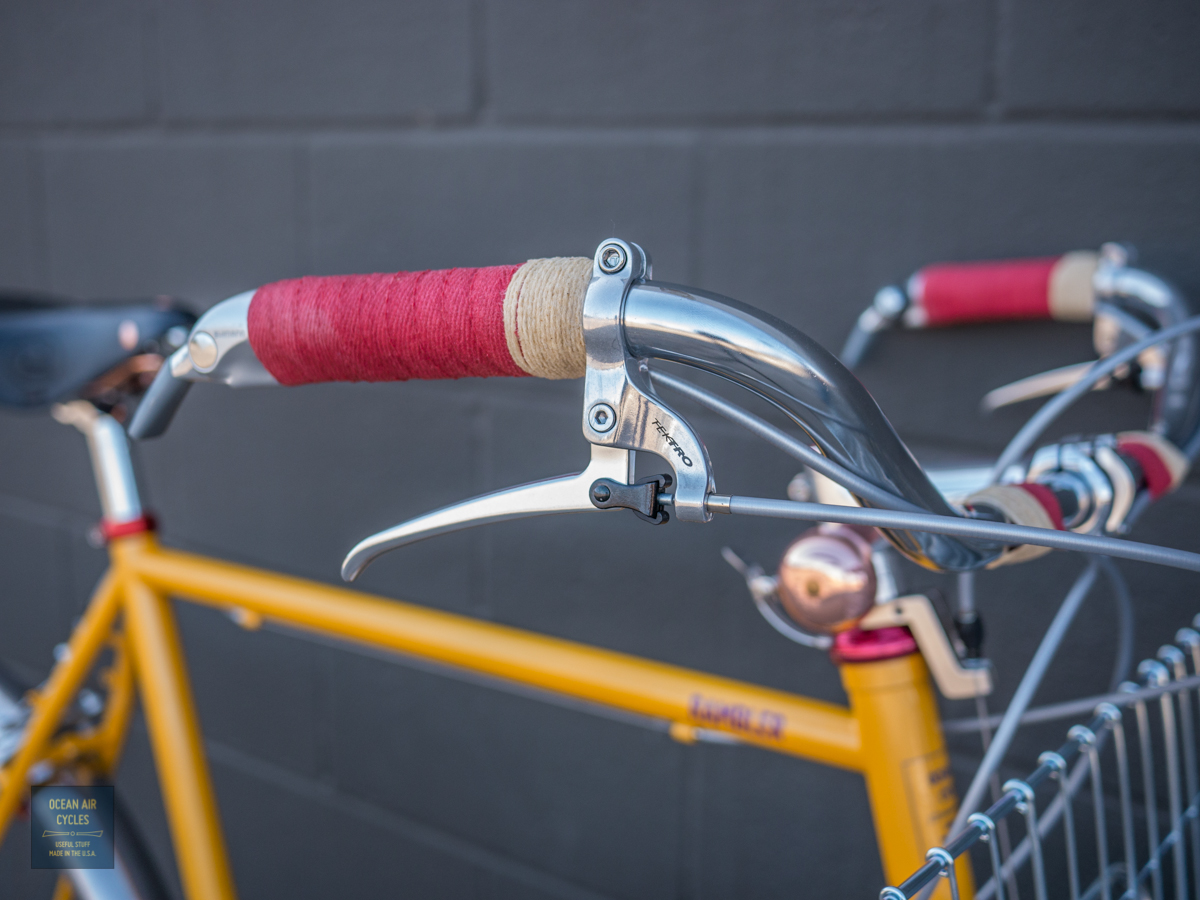
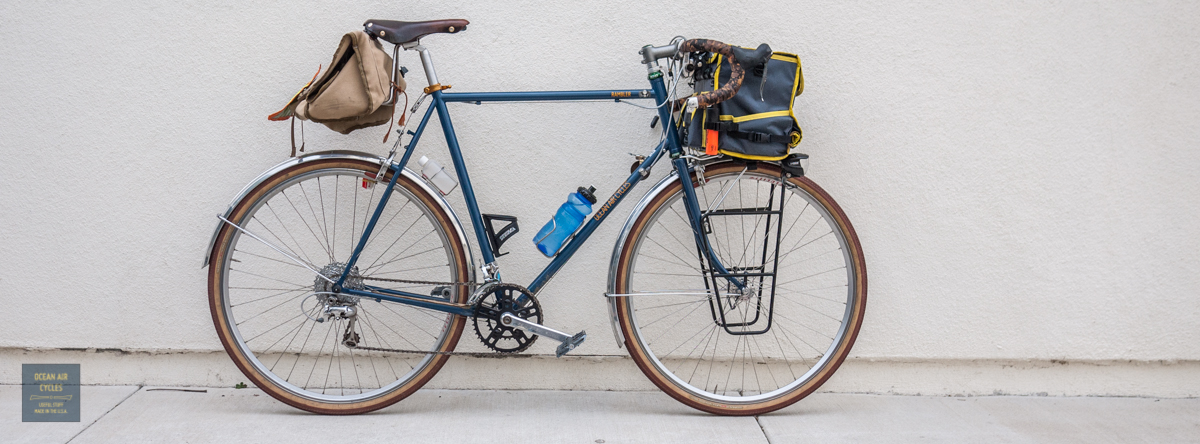
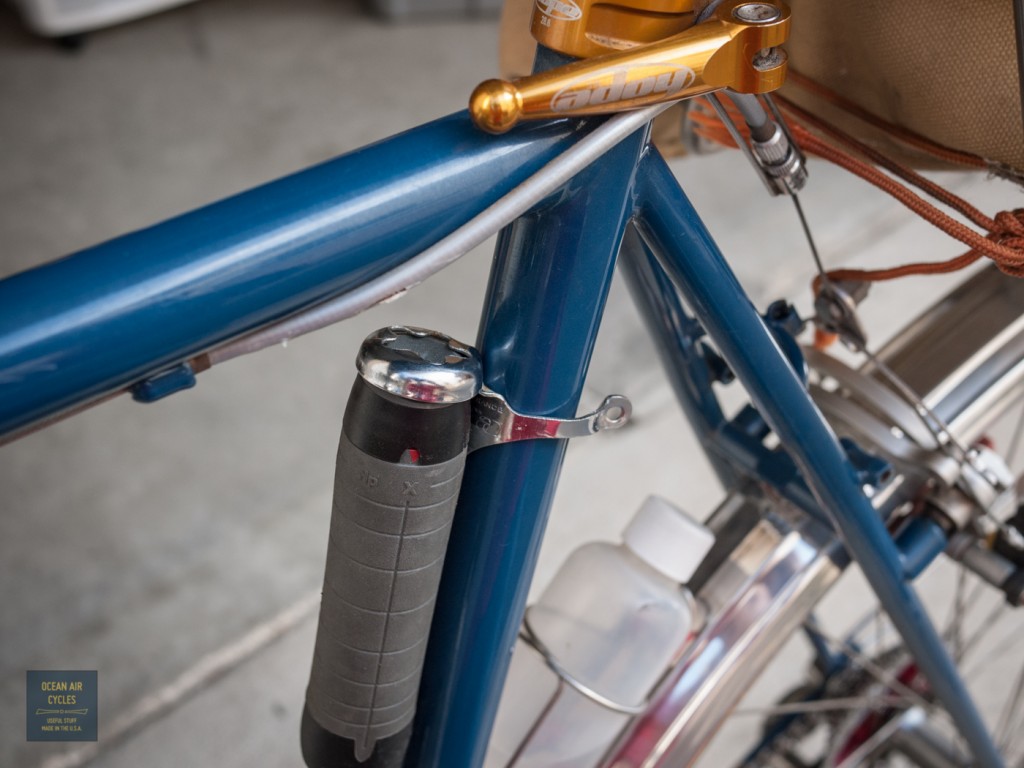
it is time to address how to carry your pump on the Rambler. The air pump for fixing flats can be a contentious issue. Not quite as volatile as saddles an handlebars, but there are still strong feelings with regard to mini or full frame options as well as the now common CO2 cartridges. Personally I have never fallen in love with the full frame pumps, and tend towards the hybrid mini pump with a hose. These get me an acceptable inflation speed and are easy to use with close to zero chance of tearing off a valve stem.
 With my bias towards this pump as well as frame bags, the long narrow bag often seen under my top tube, I decided to omit a frame pump nub on the Rambler. The nub will rapidly wear a hole in most frame bag materials. That said there are still a couple of ways to get a frame pump on your Rambler. The first is between your rear axle quick release and the seat tube weld cluster.
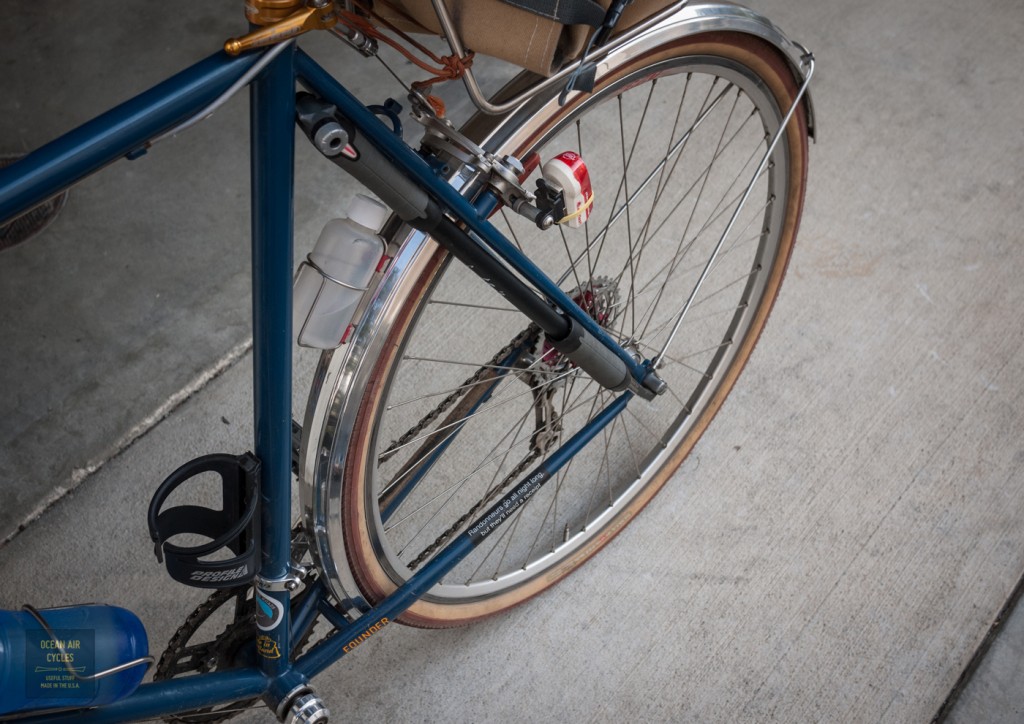 I have used this method in the past with great success, on and off-road. In general I would strongly recommend a velcro strap between around the pump and seat stay as a secondary bit of insurance that it does not self deploy. The other options involve old-fashioned clamp on bits. Either the once ubiquitous “umbrella holder”

 Or one of the clamp on pegs sold by Zefal. On the 650b models there is also generally sufficient room to mount the pump on the rear side of the seat tube.
The Rambler has a great deal of subtlety in the design that may go unnoticed at first glance. From time to time I will call these details out to better explain some of the thought and detail that went into making these frame-sets as good as they could possibly be.
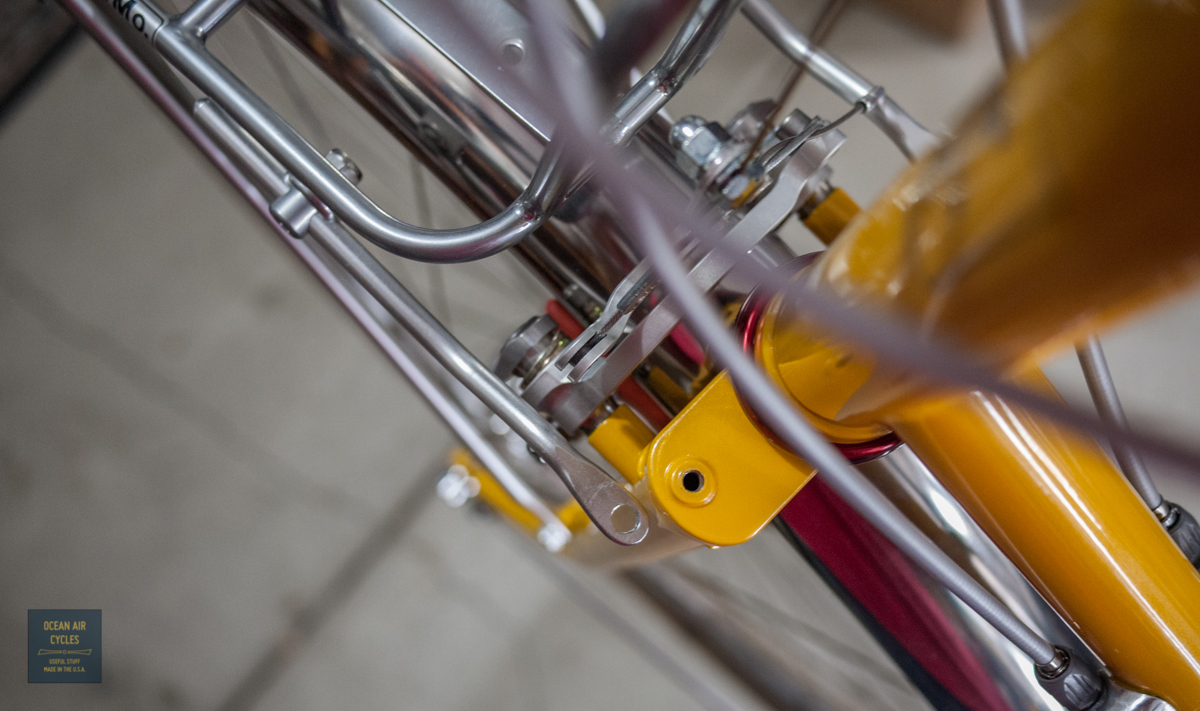
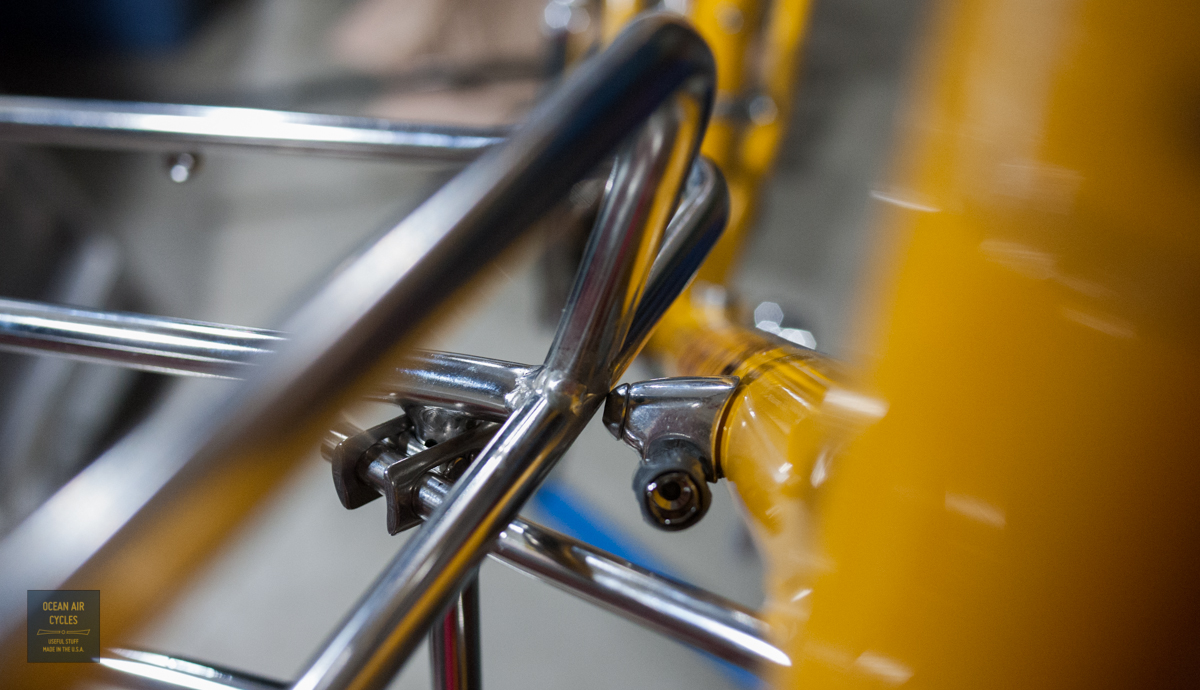
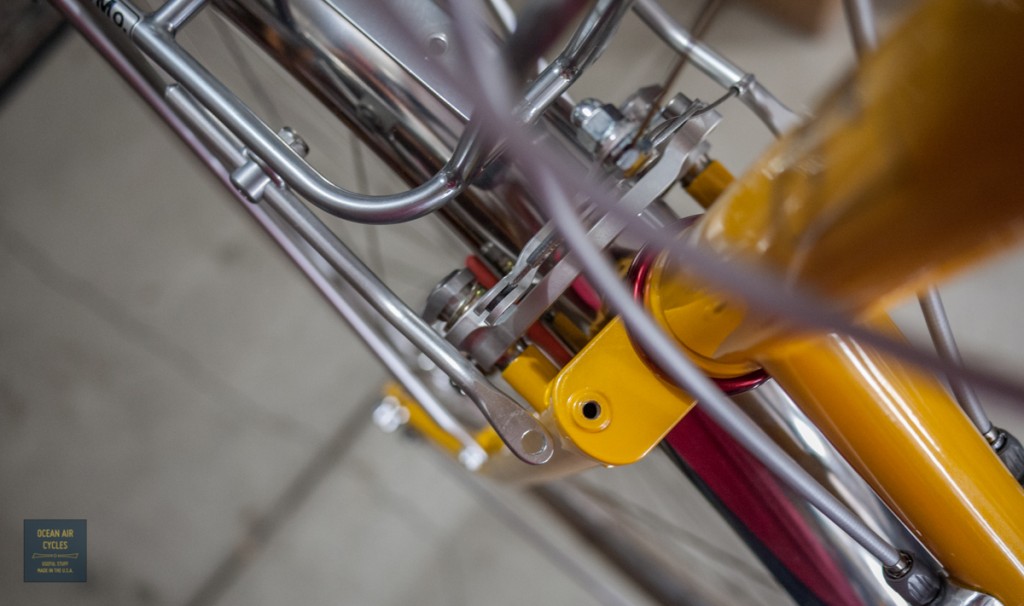
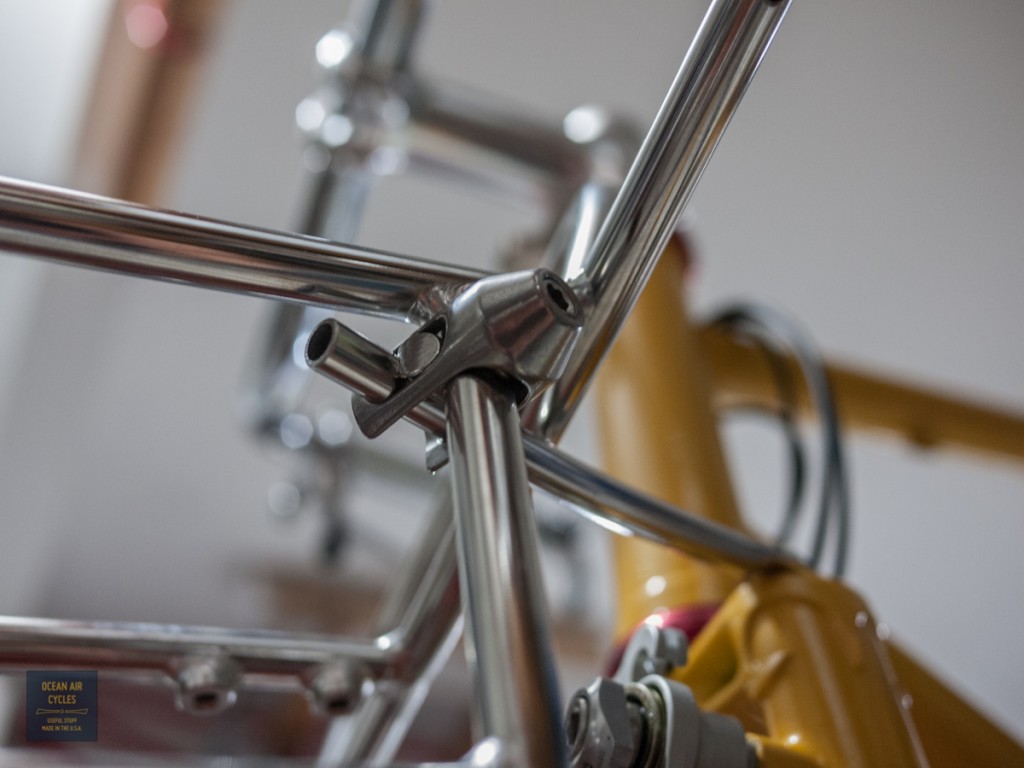
In the previous post I mentioned the added benefit of using dual crown rack mounting points for added stiffness and safety. This design feature adds a secondary challenge learned from previous attempts at this design by other makers. As the front rack swings through its arc of rotation around the steering axis there is the potential for a collision between the rack and frame tubes. With some designs this can occur both at the mounting bolts as well as at the down tube below the shifters. A collision at these points often leads to a dent in this highly stressed region of the bike, and dents here often lead to fracture or buckling of the tubes, not good at all. There is a clear analogy to this and standing on an empty soda can. The can is quite strong until you make a small dent in the side, at which point the can generally collapses under the load.
The Rambler design addresses this at both locations. The angle and spacing of the head and down tubes is such that there is a generous margin for the rack mounting bolts to clear, without degrading the aesthetic of the bike.
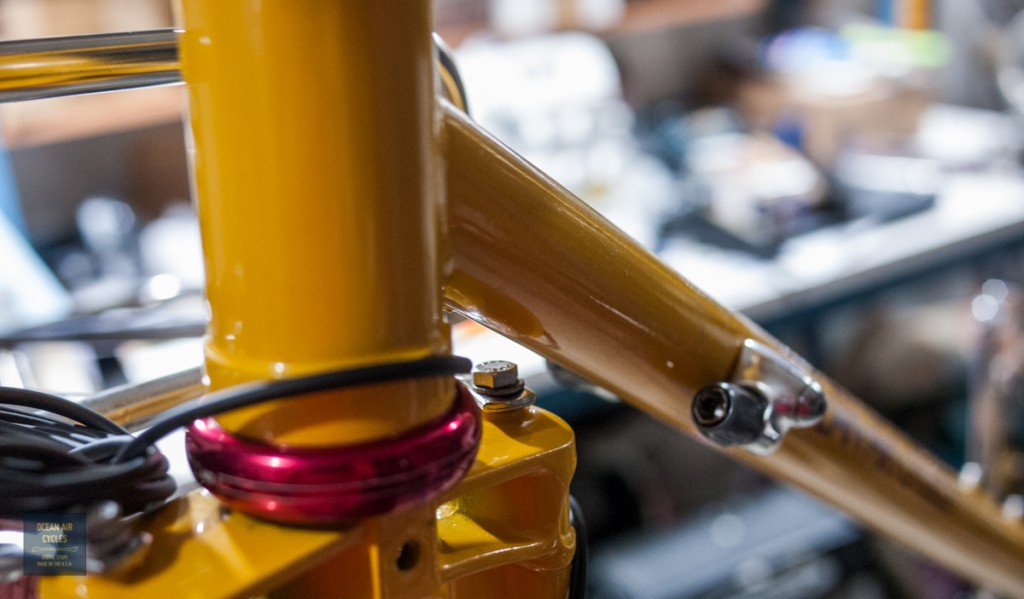 We addressed the second collision point, the rack and down tube with the position of the shift lever boss and tube butt location. By moving the boss down from its traditional location a little more than a cm, the rack will hit the boss before it hits the tube. While any hard collision here is not great, the boss will distribute the point load of the rack tube over a greater area and reduce the chance of a dent.

 Details like this are part of what sets the Rambler apart, building in safety and longevity for the frame. Our pointing them out will help you to be a more educated consumer in the market place. Adding integrated features like rack mounts, lighting wire guides and fender mounting points all come together to help build a better complete bike, a bicycle that can act as real transportation and not just a hanger for a bunch of clip on accessories. The trick is in getting the details right, and we did with the Rambler.
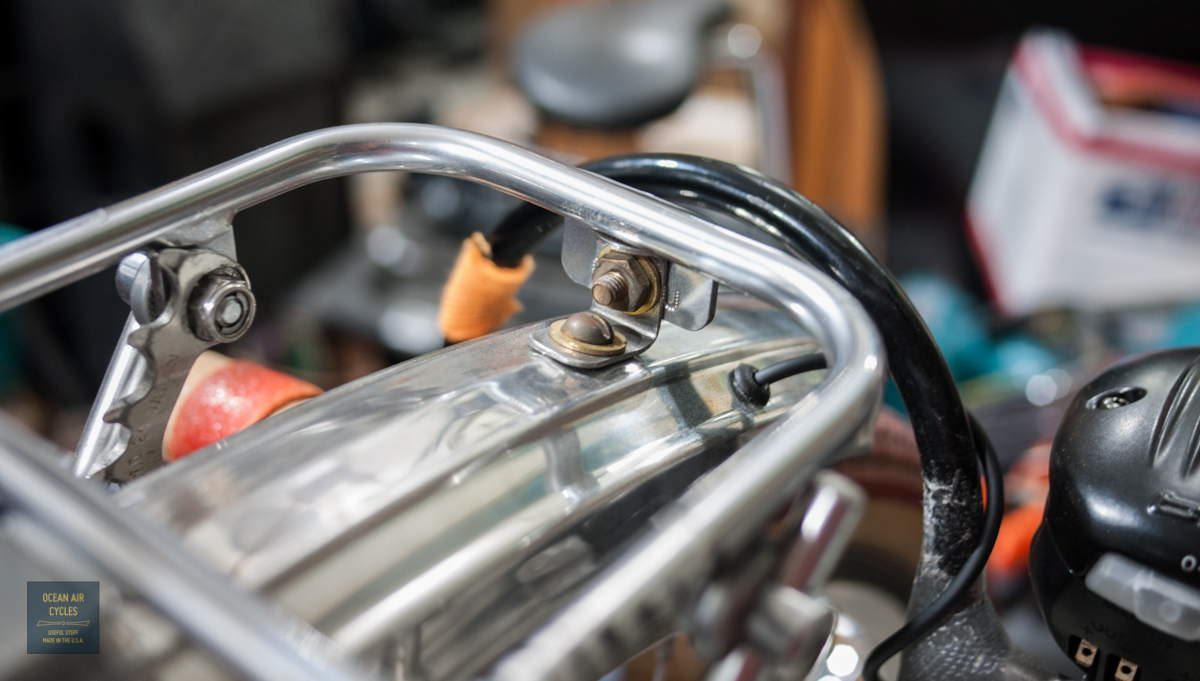
Earlier we had talked about fitting the Porteur racks at the front dropout, and today we will be showing how to get this done up at the top.
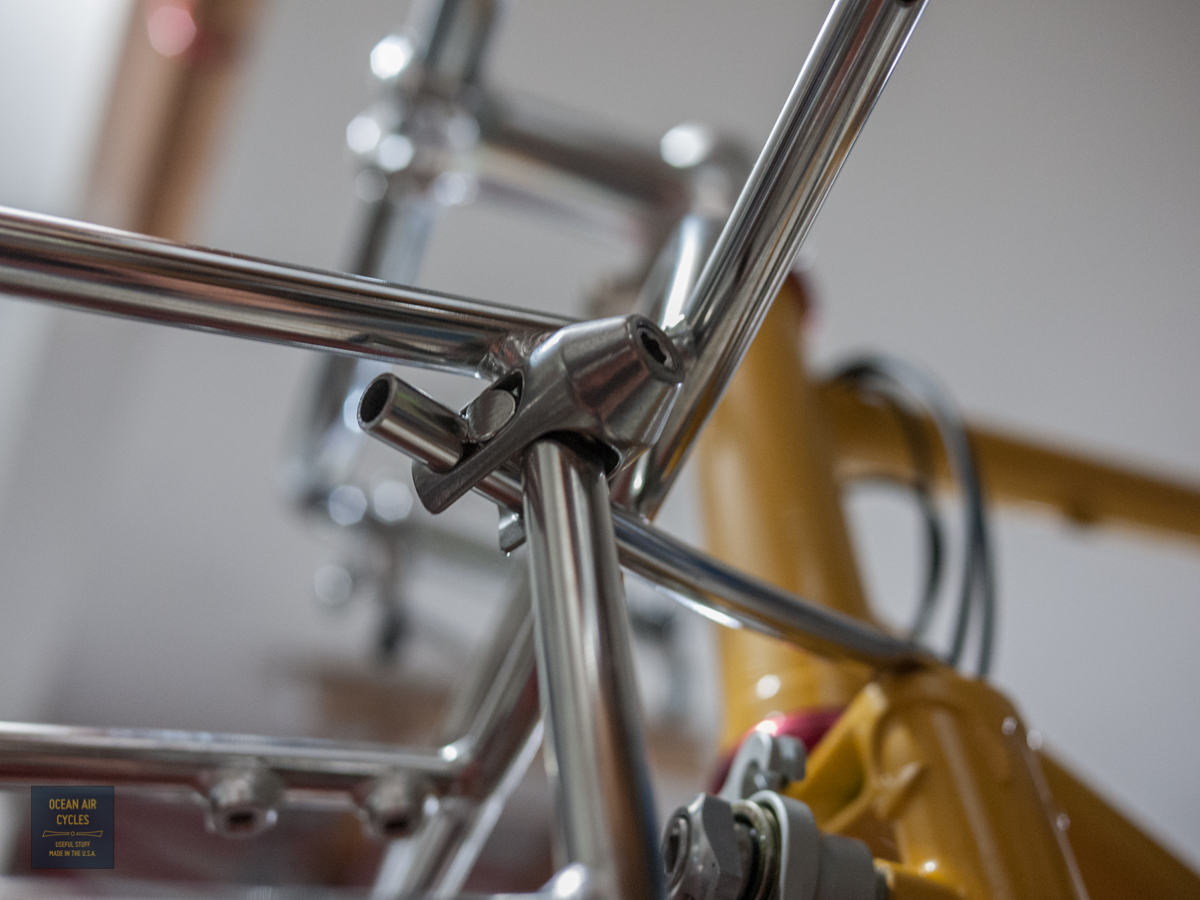
This is another area that we feel the current racks on the market fall a bit short. Most of the commonly available racks, VO, Soma etc, are designed to work with a single tang connected to the center of the crown. This works, but not as well as it could. It leaves the rack a bit wiggly, and leaves only one chance for loose hardware to become a really big problem. We designed the Rambler with dual mounts at the crown. This provides engineering redundancy in the mounting as well as greatly added stiffness. The fork crowns with this mount are open to all, this is not something we invented, but hope that will become widely adopted. The downside to this is that the current racks on the market need a bit of adaptation to integrate with the improved mounting.
Our first solutions involved the addition of struts welded in place. This has worked very well and if you have access to somebody with the metal fabrication skills needed to make this work I would recommend going this route.
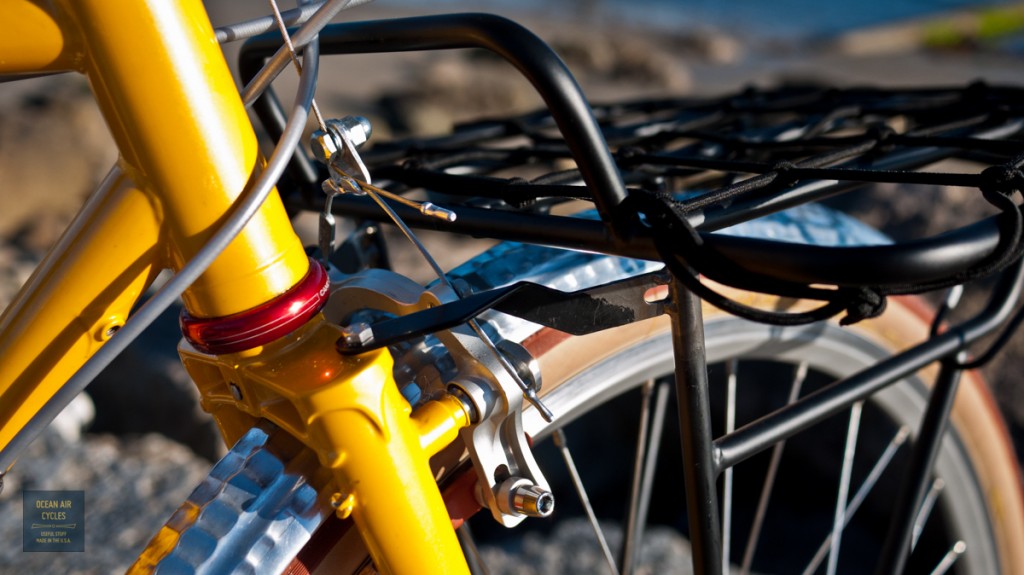 We realize that not everybody putting a Rambler together at their home workshop or even having their local bike shop buildup their Rambler has the resources to do this. While searching for a suitable hardware, nuts and bolts, solution we were turned on to the hardware kit sold by Surly for their rear rack. This has proven to work quite well, the struts included in the kit only need a bit of bending and trimming, and it all bolts right up.
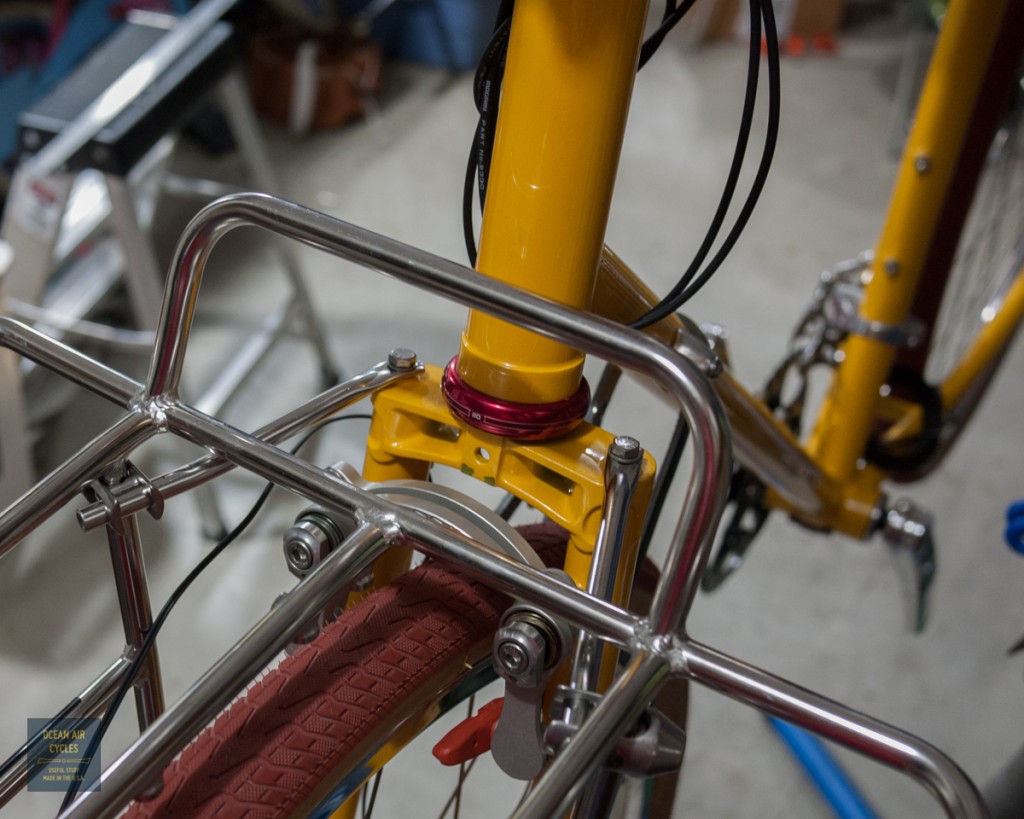
 Like al bolted hardware on a bicycle this will need to be checked regularly, but in practice has proven to be quite robust, and will work with all of the commonly available racks on the market.
Our long-term goals include the development of our own racks as well as partnering with existing producers to help their future racks work with this system that is both safer and more stable.