I took a time out in the shop this morning to make some new light brackets. The only thing better than caffeine in the morning is jumping out of bed and making an idea into reality with your hands, at least for me. The idea of chain ring light brackets is not new, a little google-fu will get you some results like this:
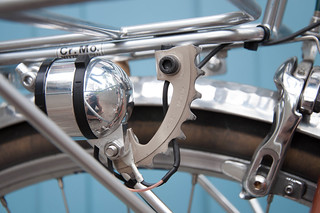
Working from this as a starting point, I went through my piles of old chain rings and decided that the diameter of chain rings in the mid to high 20's best matched the shape of the headlight. After a bit of cutting, filing, and polishing this is what I came up with:

I am pretty happy with the way they came out. Both lights will be mounting to a Nitto Mark's rack, in different ways, so I made two different length brackets.
Backing up a bit for those not familiar with these types of lighting systems, one is likely to ask why even make a bracket? Why not just mount it upside down? The lights are made with a fairly advanced optic that focuses the light in a rectangular beam with a cutoff that keeps the light on the road and out of the eyes of oncoming traffic. The optic housing interface is further designed to be most water-resistant in the upright orientation. This all works out fine for 90% of the intended audience who mount these lights to the fork crown of an average city bike. The challenge starts with the crown mount location when you use a front bag or basket. The lights beam is obstructed in the competition for real estate. So a bracket needs to be used to move the light under the rack and forward so that the light is not blocked by the front wheel or hanging out in a spot where it can be easily damaged. Surprisingly there is not much on the market to solve this problem.
I am waiting for some additional hardware to be delivered so I can keep this project moving. Later in the week I should have this much further along.
Thanks to the marvels of intentional shipping and internet friends it has been a fun week in the receiving department here at OAC. With the days starting to get shorter the talk about lighting systems is starting to heat up. I was able to buy a built up dynamo from one Rambler early adopter to build up a lighting system for another.

For those who not familiar with the current state of the art, dynamo systems have a generator built into the front hub that can be directly wired to your lights so that you never have to worry about batteries. Just ride and the light are there. The resistance is barely perceptible, nothing at all like the generator you had rubbing on the tire of your old Schwinn. With new LED technology the light output is astonishing as well, combined with high quality German optics that keep the light on the road, it can totally transform you riding experience after dark.
The Rambler frame sets are designed with the use of these systems in mind, and have wire management systems in place to keep everything clean and well protected. In the coming week I will have some detailed posts showing how I will be setting this up, as well as highlighting the Rambler specific features.
Lately I have been getting more interest in the various bags I have on my Rambler. The 5 bag set up I have been running in most of the pictures is a mash-up of self-made and store-bought bags that have built up over the last five years. Some are on the bike every day, while others, the panniers, are only there for the more voluminous loads. I have a few new designs I am getting ready to sew up, and before the switch I thought it would be a good time to share my thoughts on each of the bags.
Up front I have been using an Acorn brand handle bar bag for a few years now. These bags are hand-made by a husband and wife team in Los Angeles, and are an incredible value if you can get your hands on one.


This bag holds all of my essentials: spare tube, patch kit, pump (Lezyne micro floor drive) multi tool, maps, energy bar for an emergency bonk and plenty of room left over for my Micro 4/3 camera kit or a lunch and jacket etc. The bag is made with un-waxed canvas, and has proven water tight through a few rainy seasons now. You will also not my "FrontFlector" No.1. I have a couple of different versions, all working as hoped. While not a headlight replacement, I have found it quite effective in getting driver's attention. There is over a full 20 square inches of 3m reflective tape, it can easily be retro fit to most traditional front bags, and is integral with the front pocket. I will be offering these as part of the line over this winter.
The frame bag I run all the time is the first one I have ever made. It came out well enough in spite of my early sewing skills and has help up far better than I expected.
[caption id="attachment_3137" align="aligncenter" width="640"]

Click on the Pic to see the bag specs[/caption]
Some of the design aspects were meant to be a trial, assuming I would need to replace or repair in time. It is going on two years at this point, and nothing has needed anything other than use. I carry my pole mounted GoPro camera in it on most rides, and often use it to carry a dozen eggs. On longer rides it holds a 2l platypus bladder, and in the winter it holds my extra layers and the come on and off throughout the ride. Like the Acorn bags, I chose the un-waxed canvas, and it had proven water tight through two winters.
On the rear I have my self-made saddle bag.
[caption id="attachment_3139" align="aligncenter" width="640"]

Click on the Pic to see the bag specs[/caption]
I originally made this bag to increase the rear loading capacity of my Rivendell Roadeo, a sport bike, that was not intended to carry panniers, but has a geometry biased towards rear load. It has just a bit more room than a Carradice Nelson long flap. Made with the same un-waxed canvas, it has yet to let me down in a California rain storm. As of late it mostly holds up the reflector, and the occasional bulky package.
It also, like my front bag, has a self-made reflector. Starting with the basic premise of the reflective triangles made for runners, I upped the reflective surface area. Most triangles have a mesh center, but if you are strapping it to you bike or bag, a breathable center is a waste of real estate IMO. It may look a bit dorky, but after thousands of miles at the margins of the day, it gets results. Hands down cars give me a wider passing space when it is on there, and I do not leave home without it on the bike.
For the loads with a bit more volume I have a set of the Jandd Mini MTN panniers, that I modified with a set of Arkel mounting hooks. These have been with me for well over 5 years now and have proven quite versatile.

They are a mass-produced bag, made with Cordura Nylon. They are fairly water-resistant, but have had leakage in heavy rain. The width of the bottom half is expandable for the really big loads. I have used these for everything from touring, to groceries and commuting. They will swallow a gallon of mill, 2 quarts of yogurt and have tons of room the softer packages. While labeled mini, these have a surprising amount of capacity and are rated at 2000 ci for the pair.
I am pretty happy with all these bags. If it were not for the constant need to tinker, the tools and ability to make exactly what I want, and it being part of the business, I would probably push these bags for a decade or more. So what is next? I am planning on making a 5 bag set with Dimension Polyant's XPAC laminate material. This is a composite 3 layer laminate of cordura, mylar, and pack cloth with rip stop fibers. The weight is a fraction of the canvas, and it will be waterproof. Canvas is great, but my three every day bags tip the scales at around 7 lbs empty, that is significant IMO. I will still have a set of canvas bags in the works, bit materials have pros and cons, and I need to work it out with some test bags.
The rambler is designed to handle modest front loads, and I want to up the size on the handlebar bag. This will reduce my tendency to fall back on the panniers when I need just that little bit more space. The design will be rooted in a traditional Berthoud style bag, but with modern materials and a couple of twists.
The frame bag will be similar in design to my current bag, but with a couple of improvements and the use of XPAC as the main material.
The saddle bag will shrink a bit, have a different closure system, and shape.
Fourth on the lest is a set of roll top panniers. Everything I can find on the market, short of the Berthoud mini, is still a bit big for most of what I need. I am leaning towards a roll top design for water tightness and a bit of flexibility in volume. I will use Arkel hooks until I can find something lighter that is as easy to get on and off, yet incredibly secure.
Time to move the designs from paper to pattern, cut some cloth and get sewing.
As part of the OAC Rambler program I have been installing a bunch of components and accessories to make sure they fit. The good news is that just about everything has fit as planned. Some things go on easier than others, and often stay on the bike longer.
The White Industries VBC double crank set is one of those shining stars. The crank set is machined here in California, completely, arms, rings and bottom bracket. The most unique feature being the proprietary outer ring. It mates directly to the crank arm, and has 5 radial slots in lieu of the traditional bolt circle pattern. The in turn removes many of the tooth count constraints imposed by bolt circle diameters. I have ours set up as a wide range double, 48 tooth outer ring and 28 tooth inner.

95% of my riding is on the larger ring, and I only shift down to the inner ring when the road starts to point up sharply. The biggest gain is simplified shifting, fringe benefit is dropping a little weight compared to a triple ring set up
I have pushed various vintage cranks into similar chain ring combinations, some intended, some with a bit of creativity. I appreciate that the WI crank set is purpose built to this design. Everything goes together perfectly, as it should. One thing that is hard to explain is the feel of some components going together. This "feeling" can only come from installing and removing lots of components, at a wide range of price points. The bottom bracket and crank set went on silky smooth. Everything threaded on easily, comes up to torque spec easily and has stayed there for months. This can not be said for some of the more affordable offerings on the market. While the price is a bit steeper than some, these are a solid example of getting what you paid for, and will likely outlive the bike you first put them on.
Performance on the road has been great. Shifting has been smooth, and after some fine tuning of the front derailer there have been no dropped chains. If you are thinking of going this route, I would recommend the FSA compact double front derailer. It works well with compact or wide doubles due to the flat outer cage and being radiused to a 48 tooth ring. Other derailers will work, but set up may be a bit finicky.
I will be adding these to the web store as a special order item in the next week. Keep your eyes peeled if you have been thinking about migrating from a triple to this set up. The initial offering will be at a price that is hard to beat, particularly when combined with the coupon code for news letter subscribers.
I have been using the Paul Tall and Handsome seatpost for a couple of months now. It has done everything you would want from a seat post and a little more.

The biggest differentiation is the setback, a full 26mm, but it gets better. The two bolt vintage campy style upper clamps allow you to get yet another mm or two of setback. For those who dream of getting the brooks back just a little further this could be the ticket.
The two bolt set up is extremely secure Tilt adjustment is a cinch to manage by loosening one bolt, tightening the other. Likewise, 1 turn of each bolt and you can slide the saddle forward and back, tighten both up evenly and your tilt is preserved.
I have been happy with my Berthoud saddle for a couple of years now, but things got even better with it just that little bit further back. My sit bones hit further ahead of the cantle plate (rear saddle support). Hard to believe such a subtle difference could yield such big results.
The one great irony is that I am using a 360mm post with about 50mm exposed. I had to cut the post for the 51 Rambler so that it did not interfere with the bottle bosses. For now I will live with it, but will likely cut mine short in the future, not that I am a weight weenie, but it does shave close to 100g.
I can get these on a special order basis at the moment. As Ramblers start to roll though I will be adding them to the regular stock. Maybe Paul will do a run of Sort and Handsomes if I ask.
Part two of how I have been racking up the front end of Rambler No.1. Yesterday you saw the Mark's rack from Nitto. That rack is a great handlebar bag support and for occasional small loads. When I know I will be hauling more volume, and need the panniers, I go with the Bruce Gordon Low-rider rack. Hand welded with aircraft grade 4130 steel in Petaluma, Ca, these racks are IMO the best bang for your buck in front pannier racks. The design is rock solid, the price fair at around $180, and it will likely be the last front low-rider rack you will ever need to buy. If you do need to get rid of it, the used market has been around $120 for as long as I can remember. Here is Rambler No. 1 all racked up:

The way I have it set up you can quickly take it off and on without having to alter the position of the upper rack at all. The upper rack mounts to the inside of the fork, the low-rider to the outside. Two nuts at the top and two bolts at the dropout and you are ready to go. Production Ramblers will have the hourglass mount located higher than my sample so that this rack will bolt up right out of the box.

The space between mounting points provides plenty of clearance between the top cross bar of the low-rider and the support struts for the Mark's Rack. Easy on and easy off for the panniers.
The Rambler while a well handling bike with no load aside from the rider, is designed to ride well with a modest front load. As part of the design there are integral rack mounting points: two eyelets at each dropout, two mid fork hourglass mounts, a hole drilled through the crown at the traditional brake mounting point and two M5 bosses set into the shoulders of the fork crown. One of the questions that keeps comment up with the Rambler is what front rack do I recommend. In particular a rack that will work well with the rack mounting bosses located in the shoulders of the fork crown. While popular among custom bikes of this genre, this mount is less common on production bikes. By providing for two upper mounting points, the rack can be more stable and have redundancy. In the case that one upper mount should fail, loose a bolt etc., you have a second mount in place helping to prevent the load from crashing into the front tire. Trust me, loads into the tire are not a good thing. Solid rack mounting helps to keep things where they belong and you rolling safely.
The most versatile and well made small front rack on the market at the moment is the 'Mark's" rack produced by Nitto of Japan, and designed by Rivendell employee Mark Abel. This rack is made of brazed CrMo steel with a nickel plate finish for long corrosion free service. The mounting has provisions for four struts and a center bracket to the crown. These options allow it to easily mount to just about any bike as a strong and attractive solution. I have been using it on the Rambler with the central mount to the crown and the two front struts connected to the mid-fork. I recently replaces the central mount to the crown with two aluminum struts between the rack and the upper crown mounting points.


With the mount to the center of the crown the rack was stable, now it is rock solid. I had to reshape the supplied mounting struts a bit, hammer and bench vise. After trimming things to length it all bolted right up. While I knew it would fit fine, it is exciting when a plan comes together. Next, since I have a habit of fiddling with things, I will work out a way to attach the fender r added support and fine tune the fit.
The way I have it set up I can quickly install/remove the Bruce Gordon low-rider pannier rack. I will have a pictorial of this process in the next week. The keen of eye will notice that I have all of this mounted to a band clamp on the mid fork. Production Ramblers will have the hourglass mounted such that the racks will bolt right up. So far little details like this are all that needs to be adjusted between the samples and production. Testing continues, but I am ecstatic with how these are turning out.
I have been riding the Resist Nomad 700x42 for almost 6 weeks and almost 1000 miles, and feel comfortable sharing my initial impressions of the tires. Over the years I have come to appreciate the ride quality of fat light weight tires on the road. Experience has proved for me at least that you can get the comfort and speed, rolling over all of the little stuff and most of the big stuff too without having to give up speed and acceleration. The catch in the 700c size is a limited selection of true light weight performance tires wider than 32mm.

While the selection for tires like this is improving, most have a more pronounced knobby tread. I was excited to see the Resist Nomad hit the market a little over a year ago. These tires are primarily designed for the freestyle urban scene. The fact that they meet the demands of the mixed terrain / fat tired road bike crowd was a bit of a surprise for Resist. The catch for me at the time was not having a bike that would fit tires this wide. Rambler No.1 then entered stage left. My Rambler is purpose-built around tires this wide. While my production samples were under way I was in contact with Resist to get some samples in my hands. Currently these are the lightest 700x42mm tire on the market that I know of.
Out of the box I was pretty impressed. I have samples in both the skin wall and black wall. The skin walled tires average 530g while the black walls average 560g. Both currently are only available with a wire bead. While not a svelte race tire, the weight is quite reasonable when you consider that the popular 650bx42mm Grand Bois Hetre' is roughly 430g with a folding bead. The width is a rue 42mm. The tread is a semi slick with micro pyramids broken up with a larger square grid. The street price on these tires is around $30.

Enough with the stats, the ride is what really matters, and it has been great. Initially they were a little bit loud, a sort of hum from the tread against the road, but that quickly faded as the tire wore in a bit. I have kept the pressure between 40-50 psi for my combined rider/load/bike weight in the 240lb ball park. Handling has been superb. They get a little bit of roll or dive at the rim if I let the pressures drop below 35psi. The road buzz from our currently terrible roads is gone. It really is like riding on pillows. Average times and speeds, about 18mph cruising, are on par with my previous data I collected riding Jack Brown greens or a variety of 28mm tires on other bikes. Cornering and grip in dry weather is fantastic. I am able to carry more speed through turns, ride through rough patches and hold more consistent lines than previously possible on narrower tires. Unfortunately (or Fortunately) we are a bit spoiled with a lack of rain in the SoCal basin and I have not had a chance to push these in the wet. On fire roads and the trails they have held their own well. While obviously not as grippy as a true MTB tire, the added volume and contact patch has been welcome in easing the attention I need to pay to my line with the "skinny" 35mm tires I have been on in the last couple of years. The Nomads help to bridge the gap between true underbiking and a knobby tire.
The build quality is what you would likely expect for a tire at this price point. For $30 retail you can not expect the level of detail and finish that has been coming out of the Panaracer Japan group for some of the other popular boutique tires. As you can see in the picture the two sides of the mold were not well aligned. The casing and rubber around the bead on the skin walls is a little thin. One of my samples has a short tear from being a bit heavy-handed with a tire lever, and that tire is now out of service. I have only had one flat to date. It was in the rear and caused by a thin truck tire wire. Considering the amount of glass and debris on out roads this is pretty good. I tend to pick up flats or slow leaks like this every couple of months. Thus a single flat early on is just that, a flat, and marginally an indicator of long-term performance.
Bottom line, these look to be a great tire for the price. I will likely run them for a long time, and look forward to a long-term follow-up review. If your bike has the room to fit these tires I would not hesitate to pick up a pair. I am happy enough with them that I may be adding them to the storefront in the next few weeks. There are a bunch of variables in that equation, but I know I will stock them eventually.

I am putting together the bits and pieces needed for a customer who wants to dip their toe in the 650b waters before diving in with a propose built frame set.

As always these projects require a bit of measuring and test fitting to get things just right. In this case we were able to meet so that I could pull the required measurements myself from the bike to be converted.
The biggest part of the investment, the wheel set, is directly transferable to a Rambler he finds the waters to his liking. The 32mm tires would work fine, but I am sure that he would want to go fatter as the Rambler would allow. The only thing that would end up in the parts bin is the Tektro brakes.
The knowledge and components needed to pull off a successful 650b conversion are scattered throughout the web. What would you think of having that information in one place, as well as the needed components to pull it all off? Rivendell used to have something like this, but does not appear to be a focus of theirs as much any more. How about a kit price on a package like the one above?
As I am getting things going there will be quite a few components passing through my hands and onto bikes. Some of these will be things I have used for years, some new, and some in the gray area in between. The ones that I find remarkable will get special mention here on the blog, and may even show up in the soon to emerge online shop.
The first up for review are the new Dia-Compe ENE shifters. These are mechanically identical to the Silver friction shifters that Rivendell helped to bring back to market a few years back. The difference is in the look and shape.

The Silver shifters have a more modern like the later Suntour down tube shifters. The ENE shifters shown here are styled after more traditional or older Campy style. They offer the same silky smooth ratchet mechanism that we have grown to love over the years. For those not familiar with friction shifting. Unlike indexed shifting that you "click" from gear to gear, friction allows you infinite freedom to shift across the range of gears. For the initiate thee may be a short learning curve, but once you have the control back you will not likely want to give it up. Friction shifting allows the rider to shift smoothly across a range of gears, mix and match drive train components to you heart's delight and trim a shift as needed without touching a barrel adjuster.
I prefer this shape to the silver model. The slightly wider and textured tail of the lever has a better feel. I also like the look, while not a complete retro-grouch, sometimes the classic styling just works.

The ENE shifter are available as a pair in both a down tube model and bar end configuration. Both will be offered here for sale in the coming week. Down Tube shifters will be $44, and Bar End $79.
Thanks for taking a look.


